If you’ve been running Google Ads campaigns for any length of time, you’ve probably experienced a situation where your Google Ads conversion tracking failed, leaving your campaigns in a state of chaos.

So, what should you do when this happens? How do you prevent bad data from dragging down your campaign’s performance? That’s where data exclusions come in.
In this blog post, we’ll explain what data exclusions are, why they’re critical to your account’s success, and how to implement them (step by step).
Prefer video? Check out our YouTube video on How and When to Use Data Exclusions in Google Ads:
Still with us? Good. Let’s dive in!
What Are Data Exclusions?
First off, let’s clarify what data exclusions are (and why they’re so important).
A data exclusion is a feature within Google Ads that allows you to exclude specific periods of data from your campaign’s learning process. This is particularly useful if you’ve encountered a conversion data outage — a period where your conversion tracking or Google tag wasn’t working correctly. Google Ads uses conversion data to optimize your campaigns, especially if you’re using smart bidding strategies like target cost per action (tCPA) or target return on ad spend (tROAS). These strategies rely on accurate conversion data to make bidding decisions that align with your campaign goals.
When your Google Ads conversion tracking goes awry, it can send your campaigns into a tailspin. Suddenly, the smart bidding algorithm doesn’t know what’s going on, and it starts making poor decisions, leading to inflated costs and decreased performance. The longer the issue persists, the more damage it can do to your campaign’s efficiency (and effectiveness).

But with data exclusions, you can mitigate the damage. By telling Google Ads to ignore the tainted data, you’re able to protect your campaigns from the major issues that can come from learning bad habits based on faulty information, and preserve smart bidding performance.
Why Should You Use Data Exclusions?
Let’s say you’ve got a Google Ads campaign that’s performing beautifully. Your smart bidding strategy is dialed in, and you’re consistently hitting your target cost per action (tCPA) or return on ad spend (ROAS) goal in the account. But then, one day, your Google tag breaks due to external factors. Maybe it’s a coding issue on your website, or a page update that accidentally disrupted your tracking setup. Whatever the cause, the result is the same: your conversion data stops tracking in the account.
Without this critical data, the smart bidding algorithm is flying blind. It doesn’t know which clicks are leading to customers or purchases (and which aren’t), so it starts making uninformed bids. This can lead to skyrocketing costs, plummeting conversions, and a generally poor return on ad spend.

Now, if you’re able to fix the issue quickly, that’s great. But even a brief period without conversion data can have lasting effects on your campaign. The longer it takes to resolve the issue, the more entrenched the bad data becomes in your campaign’s learning history.
This is why data exclusions are so valuable. By using them, you can effectively “erase” the bad data from your campaign’s memory, preventing the Smart Bidding algorithm from learning from those flawed periods where the conversion action wasn’t firing properly. This helps maintain the integrity of your campaign’s performance, even in the face of broken conversion tag.
Data Exclusions: An Example
To help you really understand the power of data exclusions, we’ll share a real-world example from one of our client accounts.
The Situation
Everything seemed to be running smoothly in one of our client’s Google Ads campaigns. Until, on February 3rd, we noticed something alarming — no conversions (blue line) were recorded.
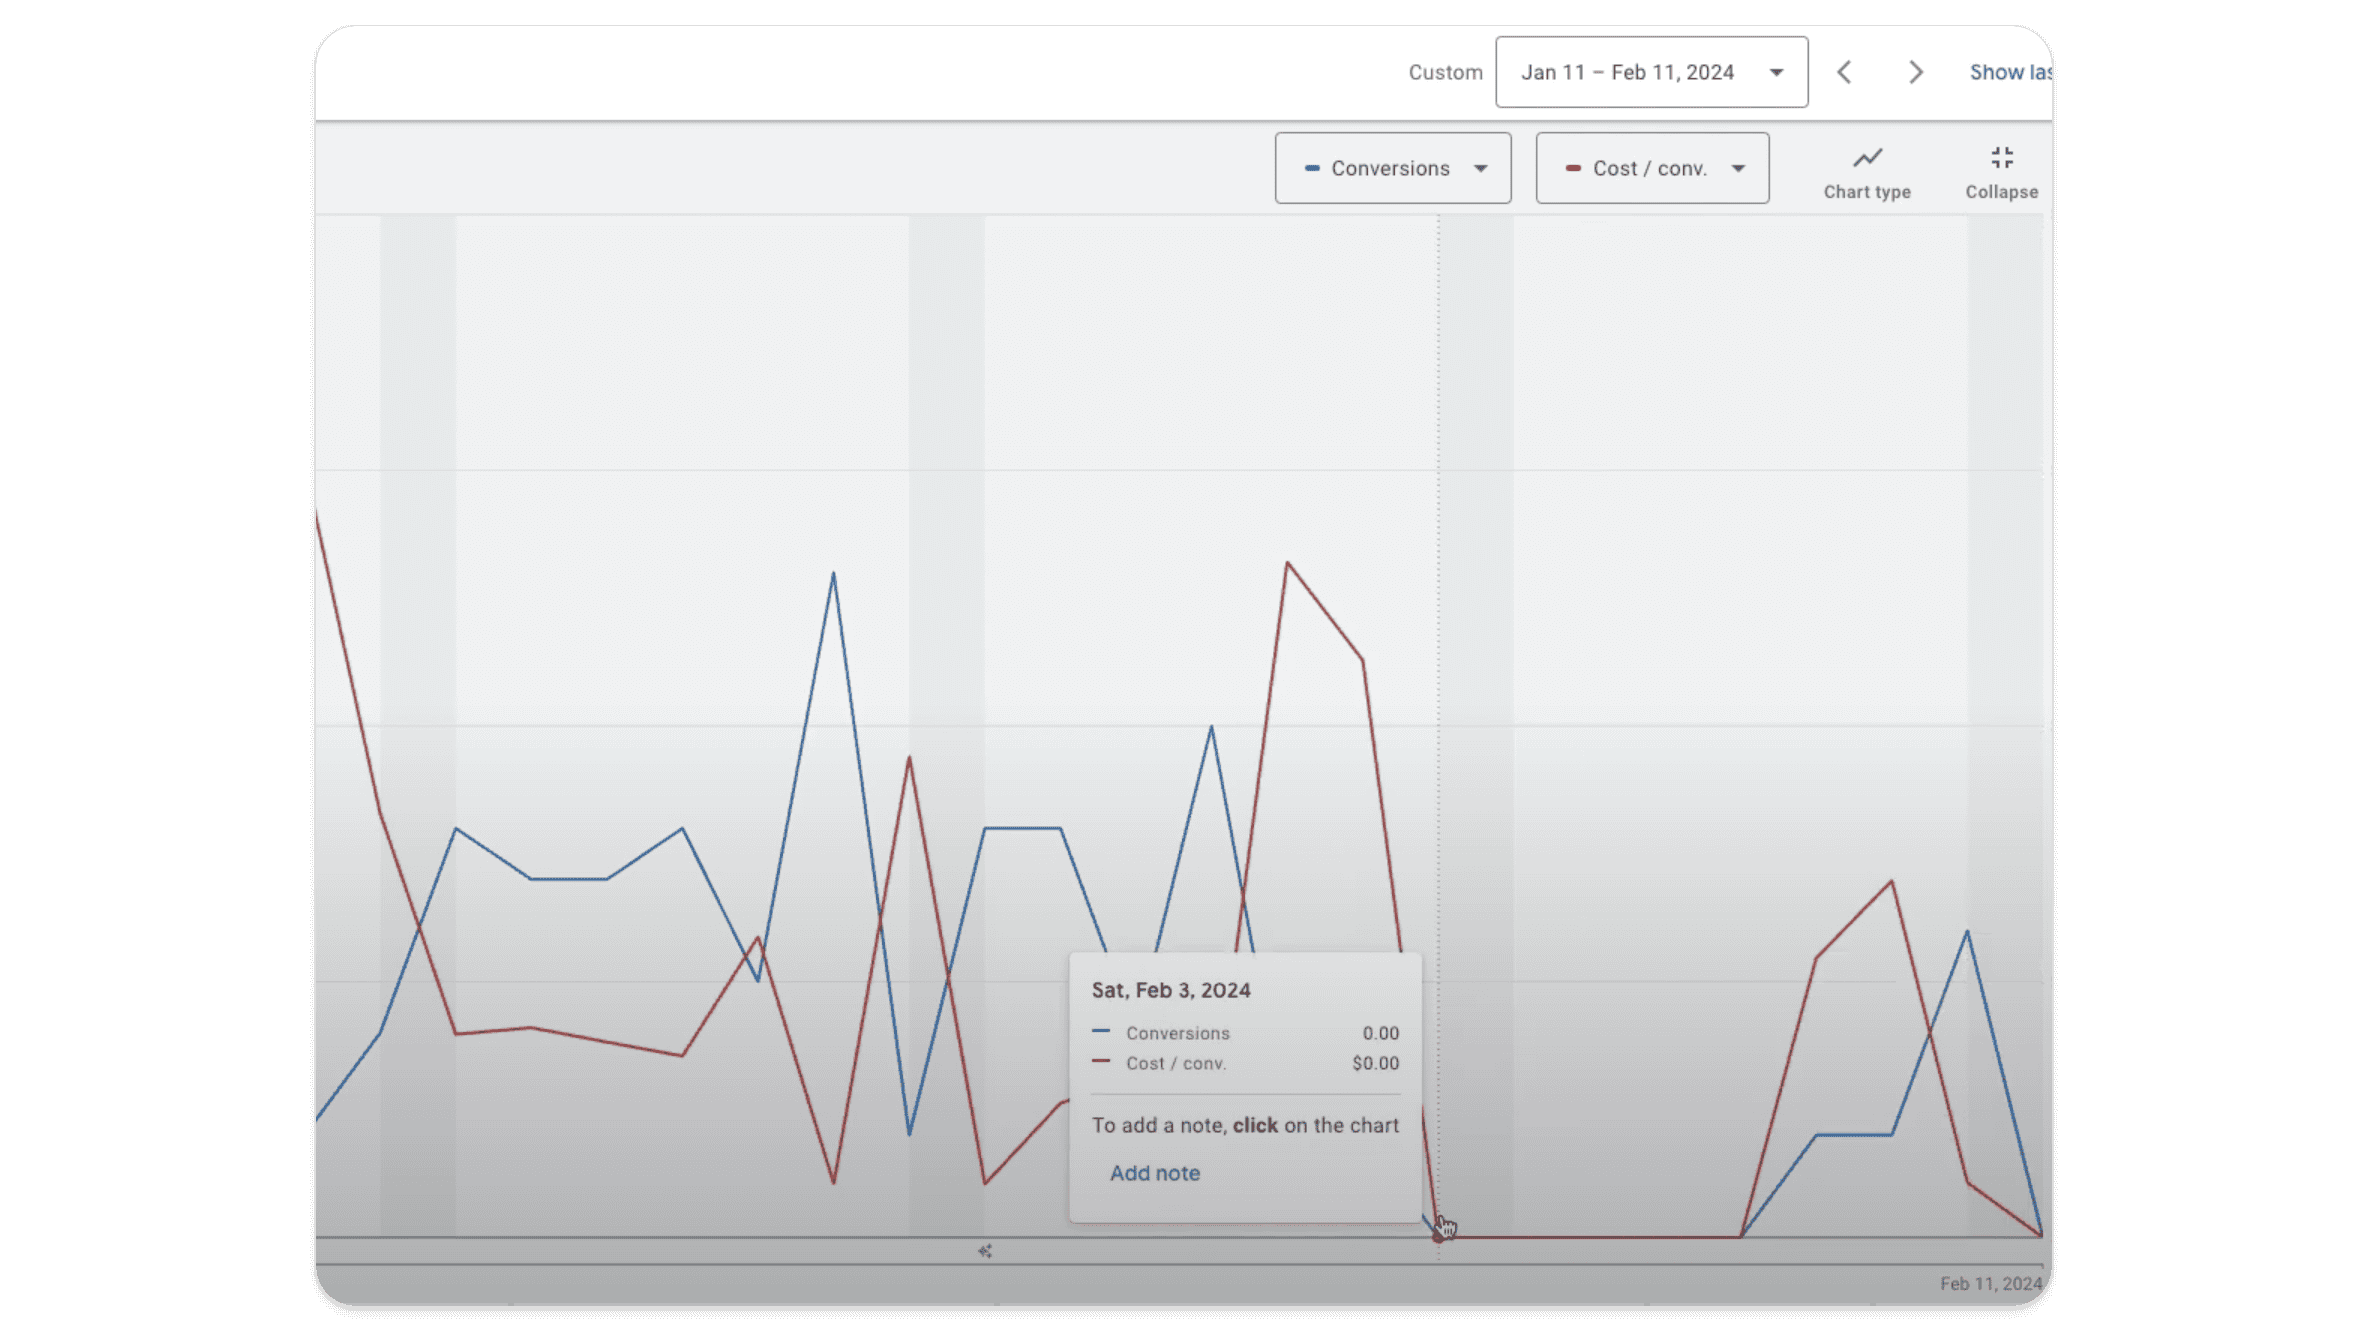
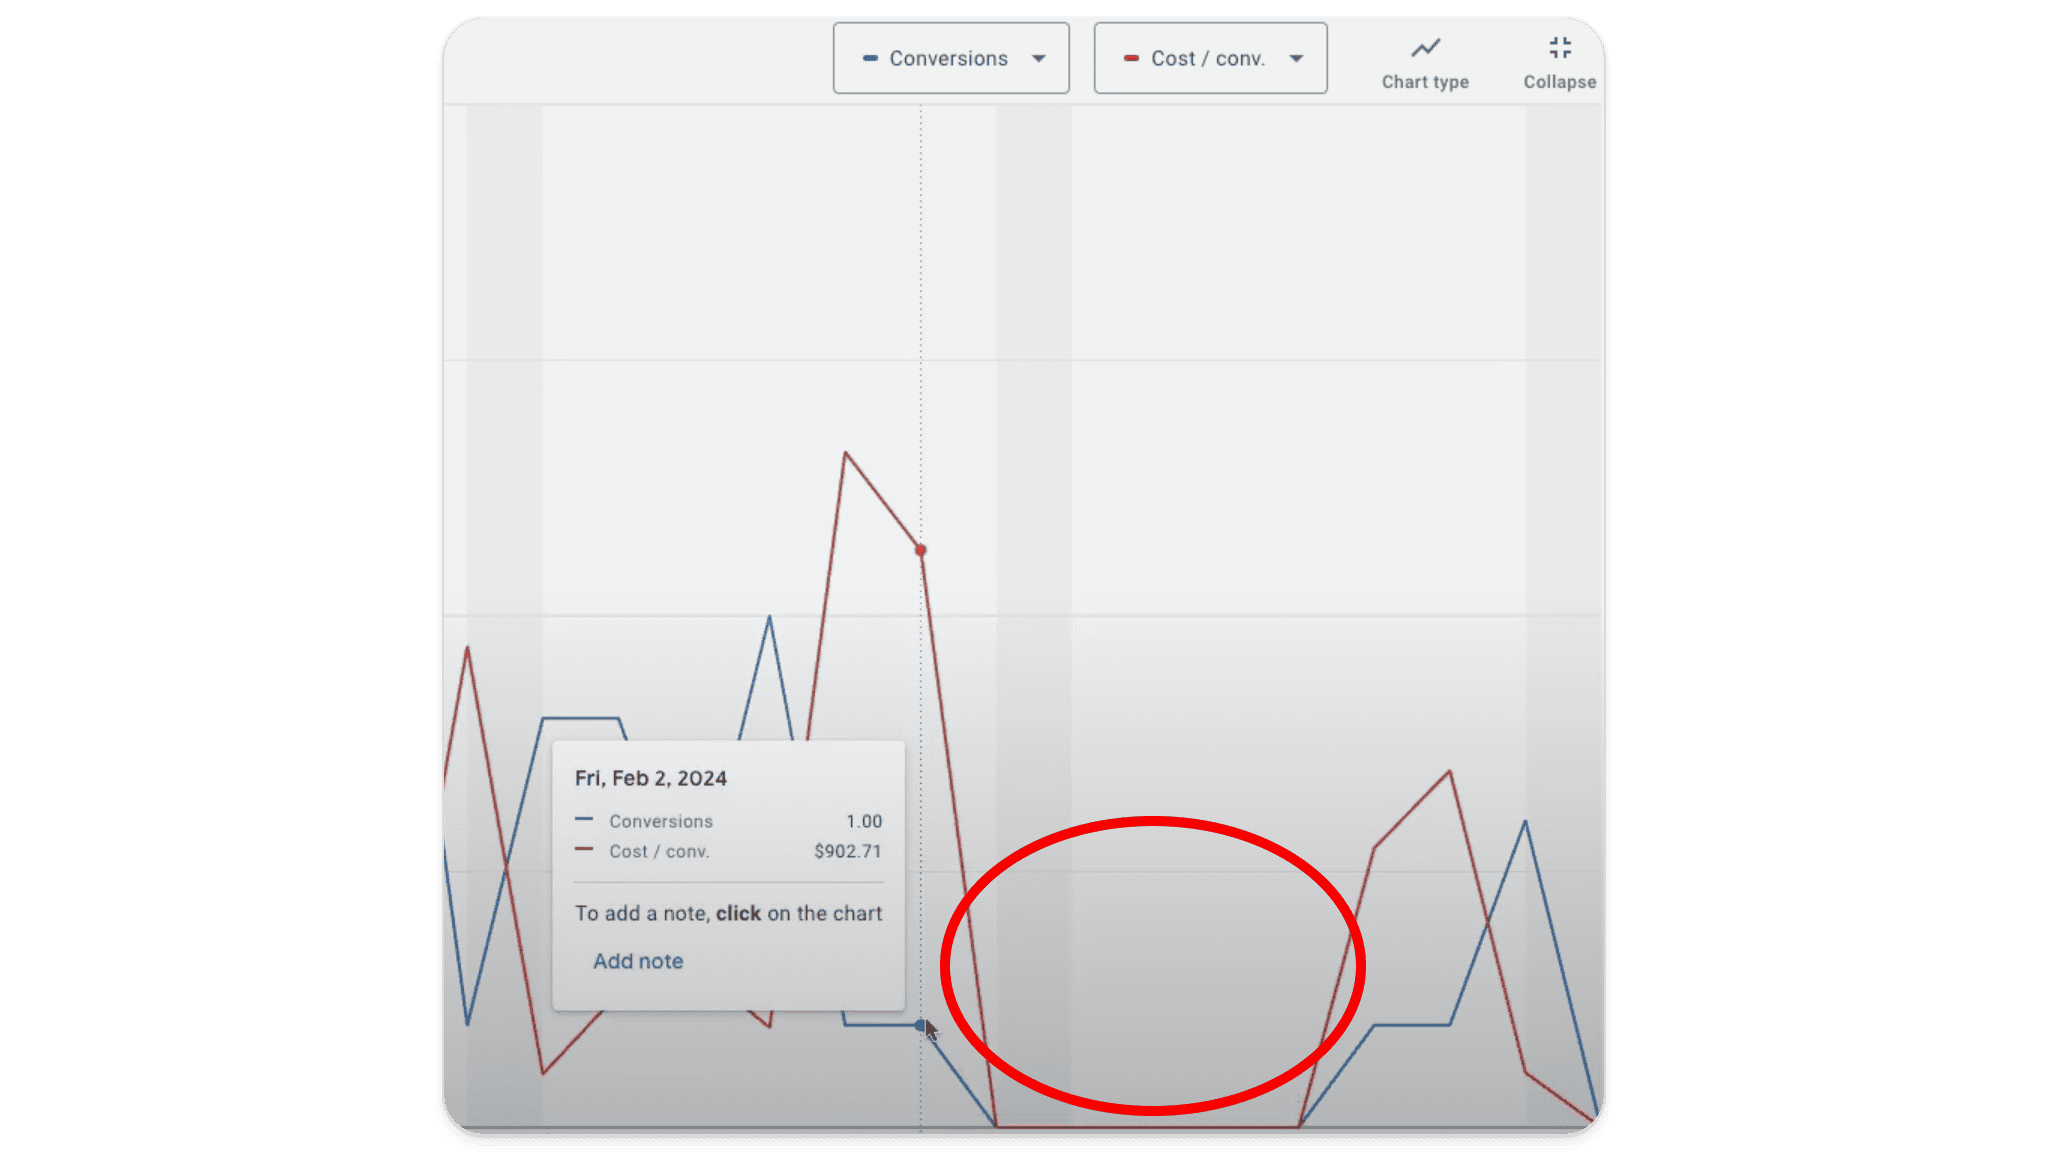
This was highly unusual, as the account typically saw a steady stream of conversions every day. We decided to investigate, and lo and behold there was a problem with the conversion tracking code on the website. Something had changed, and the code was no longer firing correctly. This issue persisted until February 8th, when the problem was fixed. That’s a date range of six days, which is not insignificant.
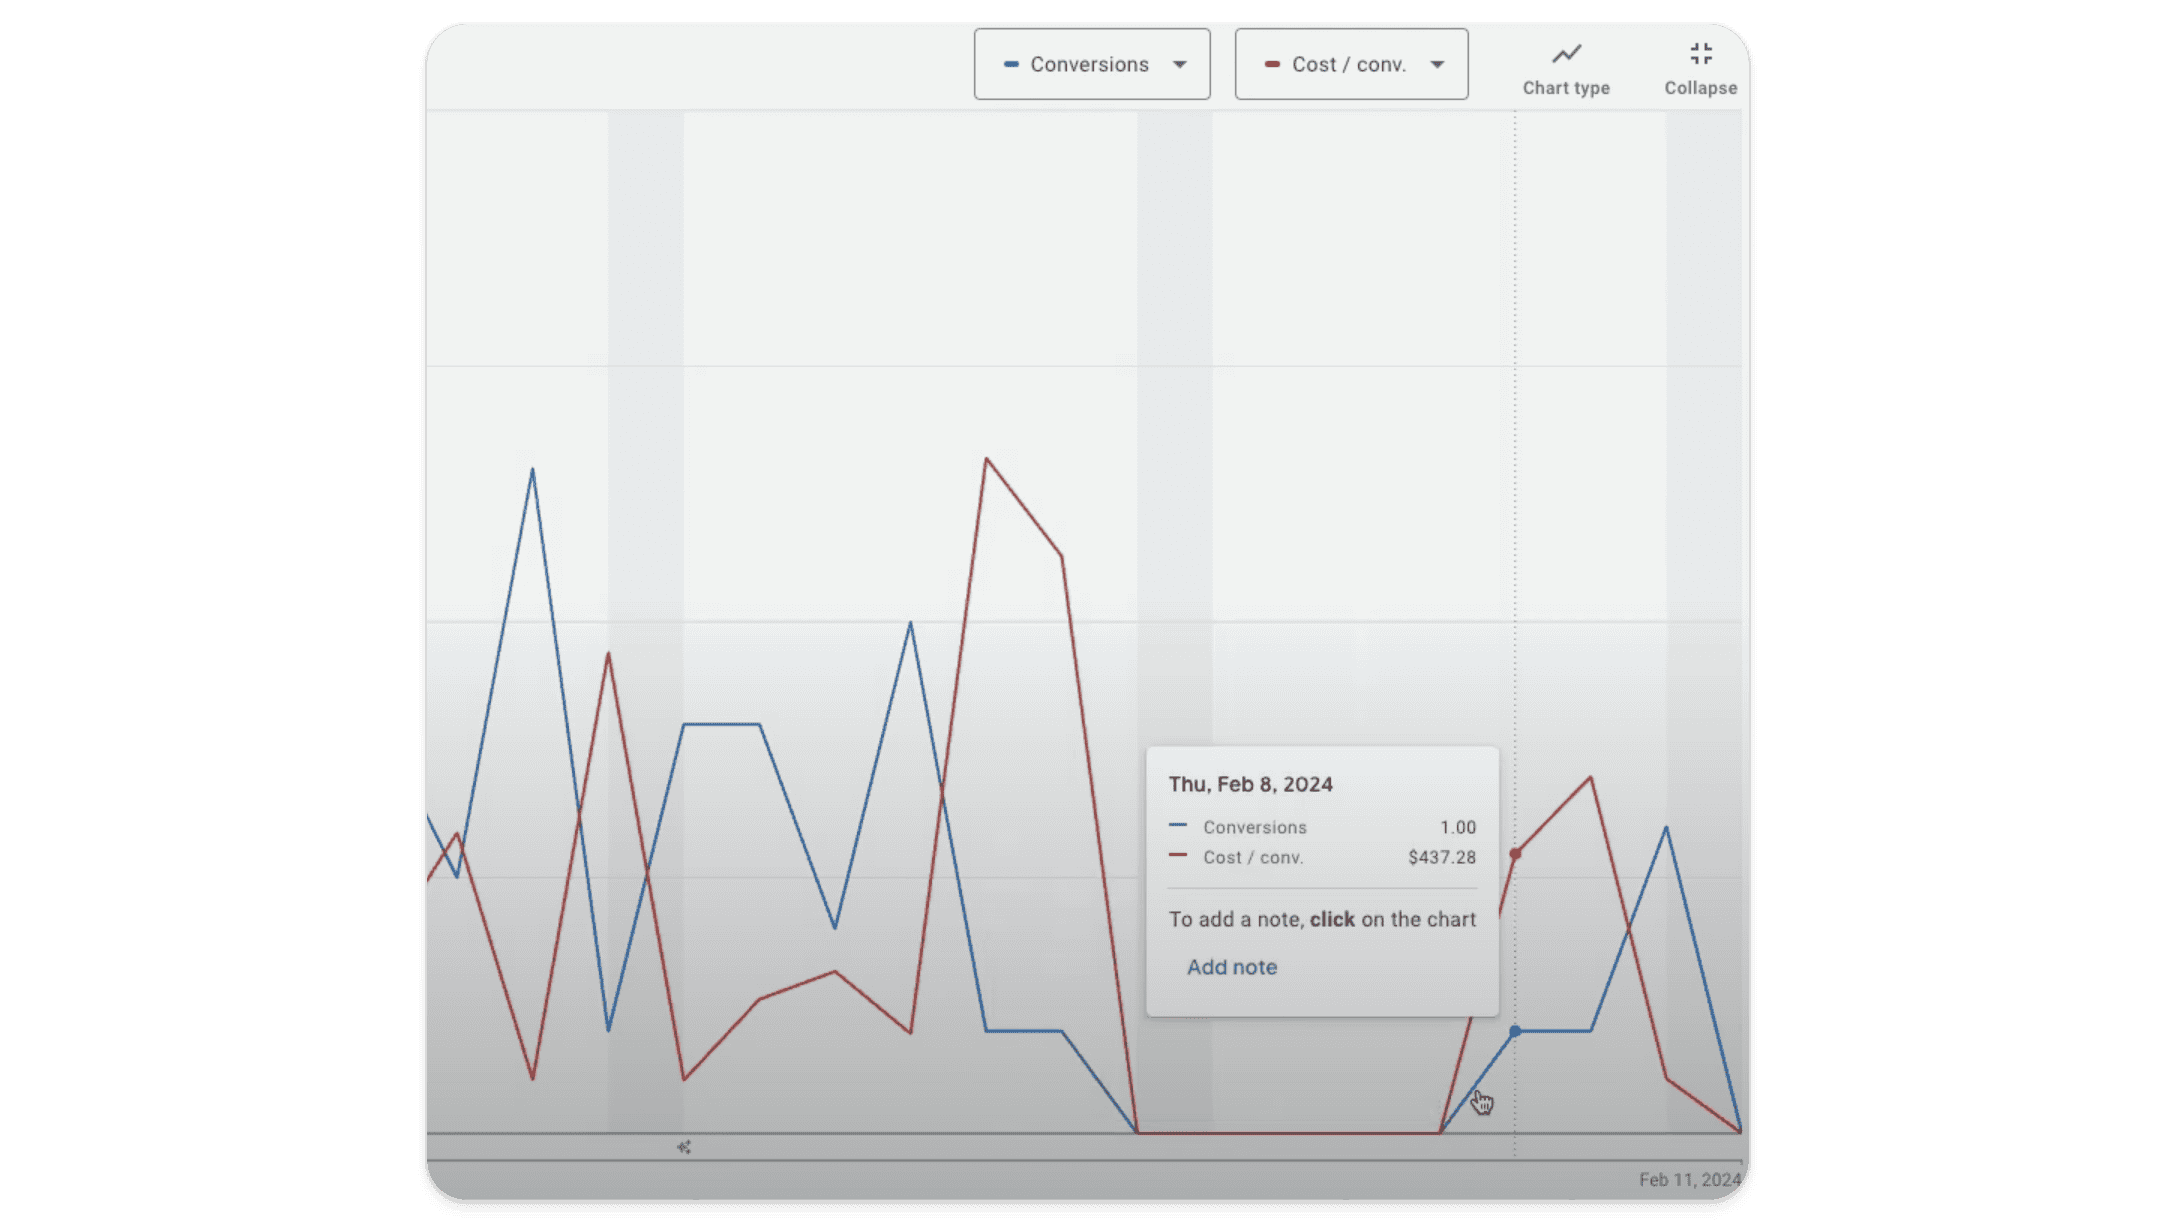
During this period, the campaign’s performance took a nosedive. The cost per action, which typically hovered around $200, suddenly spiked to $500 on February 9th. Why? The smart bidding algorithm had been thrown off course by the lack of reliable conversion data.
The Solution
Thanks to the data in the account, we knew exactly when the error had occurred. So, to mitigate the impact of this tracking failure, we decided to create data exclusion. By doing so, we could tell Google Ads to ignore the period from February 1st through February 9th. We expanded our date range here in order to prevent the smart bidding algorithm from considering any bad data during this time when making future bidding decisions.
How to Implement Data Exclusions in Google Ads
Now that you know why data exclusions are important, let’s walk through the process of setting them up in your Google Ads account.
Step 1: Identify the Affected Period
The first step in using data exclusions is identifying the period when your Google tag was inaccurate or broken. This requires a close examination of your campaign data to pinpoint exactly when the issue started and when it was resolved.
In our client’s account, we noticed some irregularities starting on February 1st. By February 3rd, it was clear that the conversion tracking was completely broken. Although the issue was technically fixed on February 8th, the data on that day was still unreliable, so we decided to exclude data through February 9th to be safe.
Step 2: Access the Data Exclusions Feature
Once you’ve identified the period you need to exclude, log in to your Google Ads account and navigate to the ‘Tools and settings’ menu. From there, select ‘Bid strategies’ under the ‘Shared Library’ section.
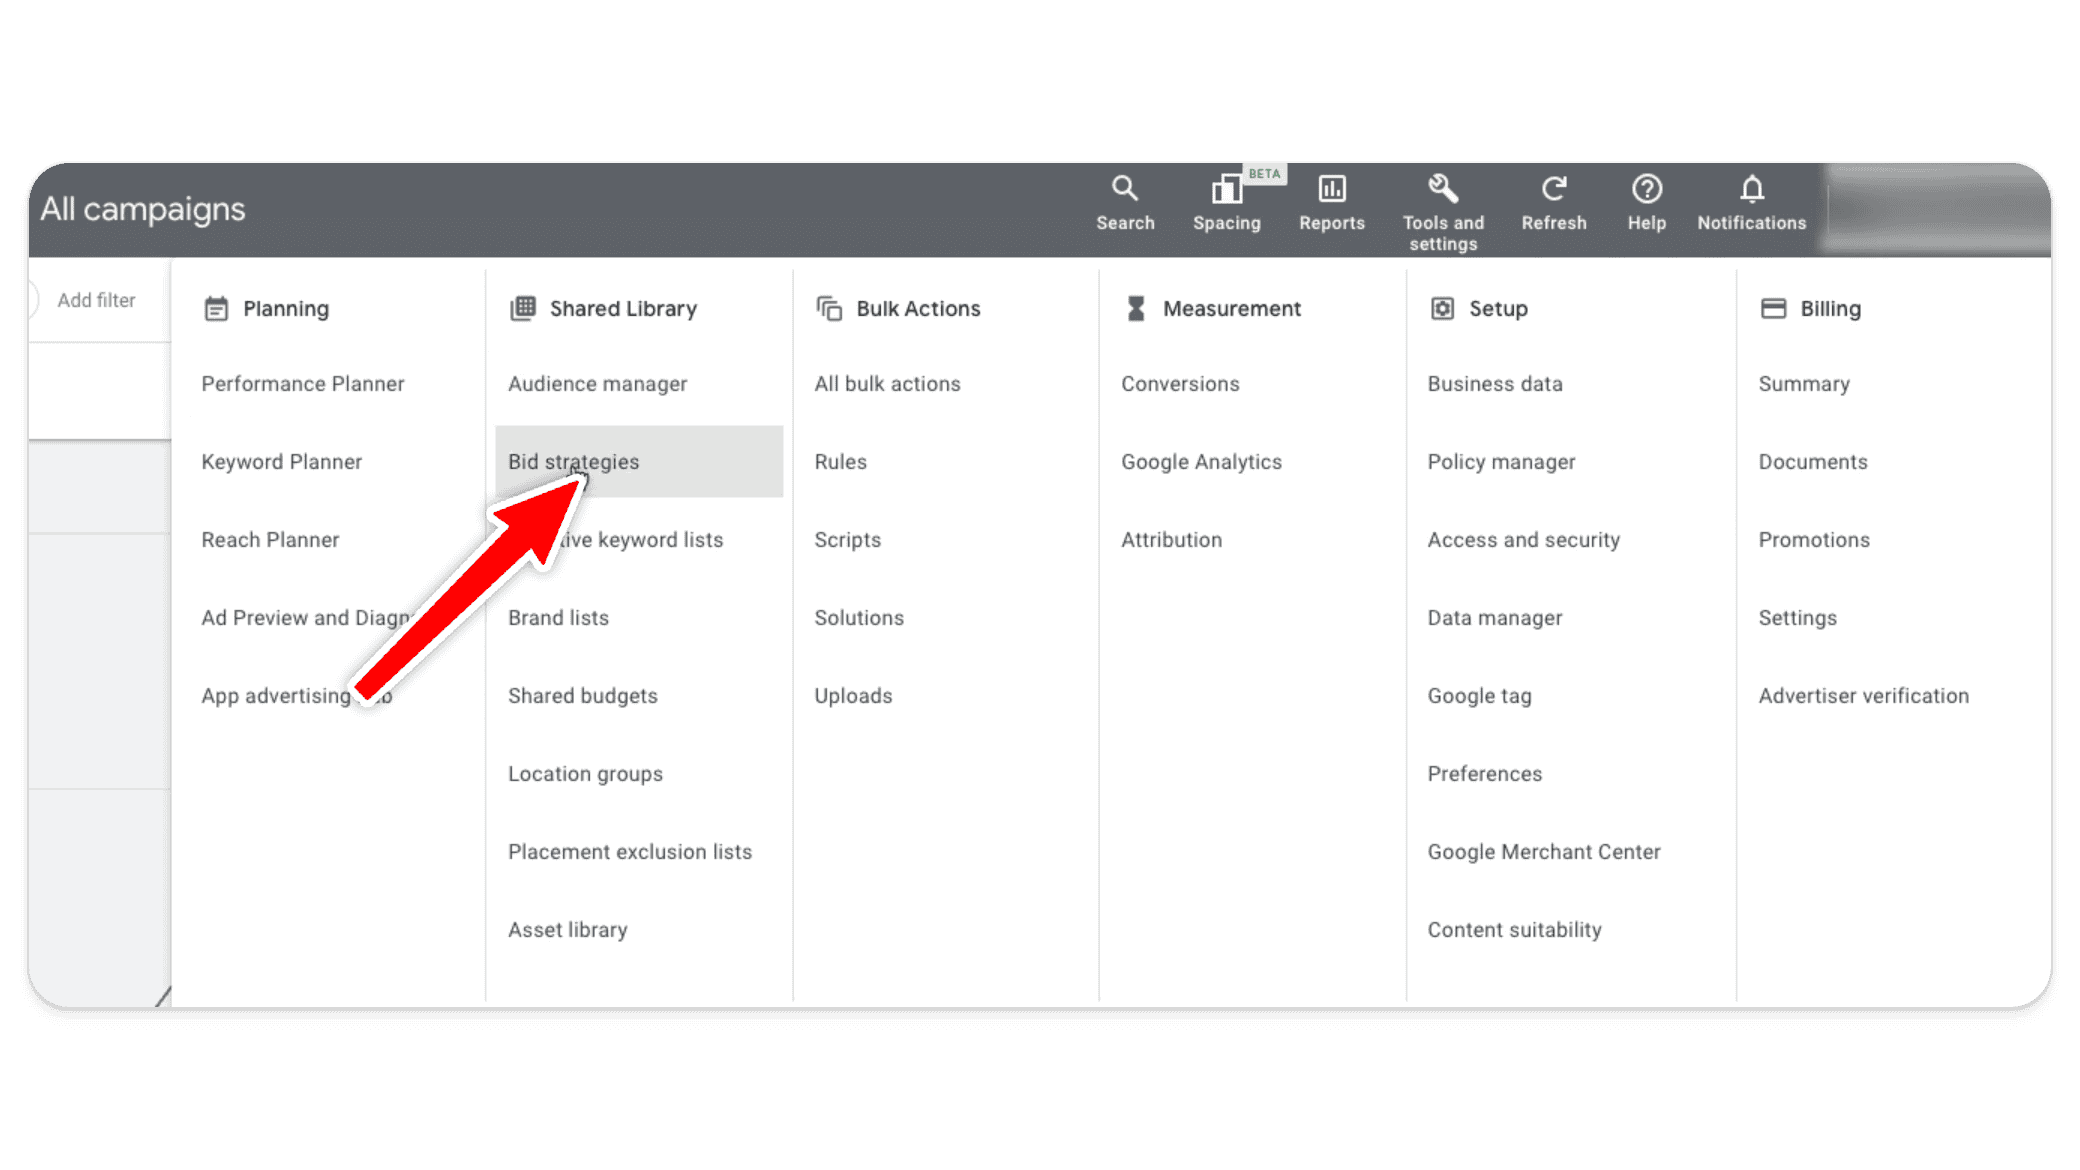
Next, click on ‘Advanced Controls,’ on the left side of your screen.
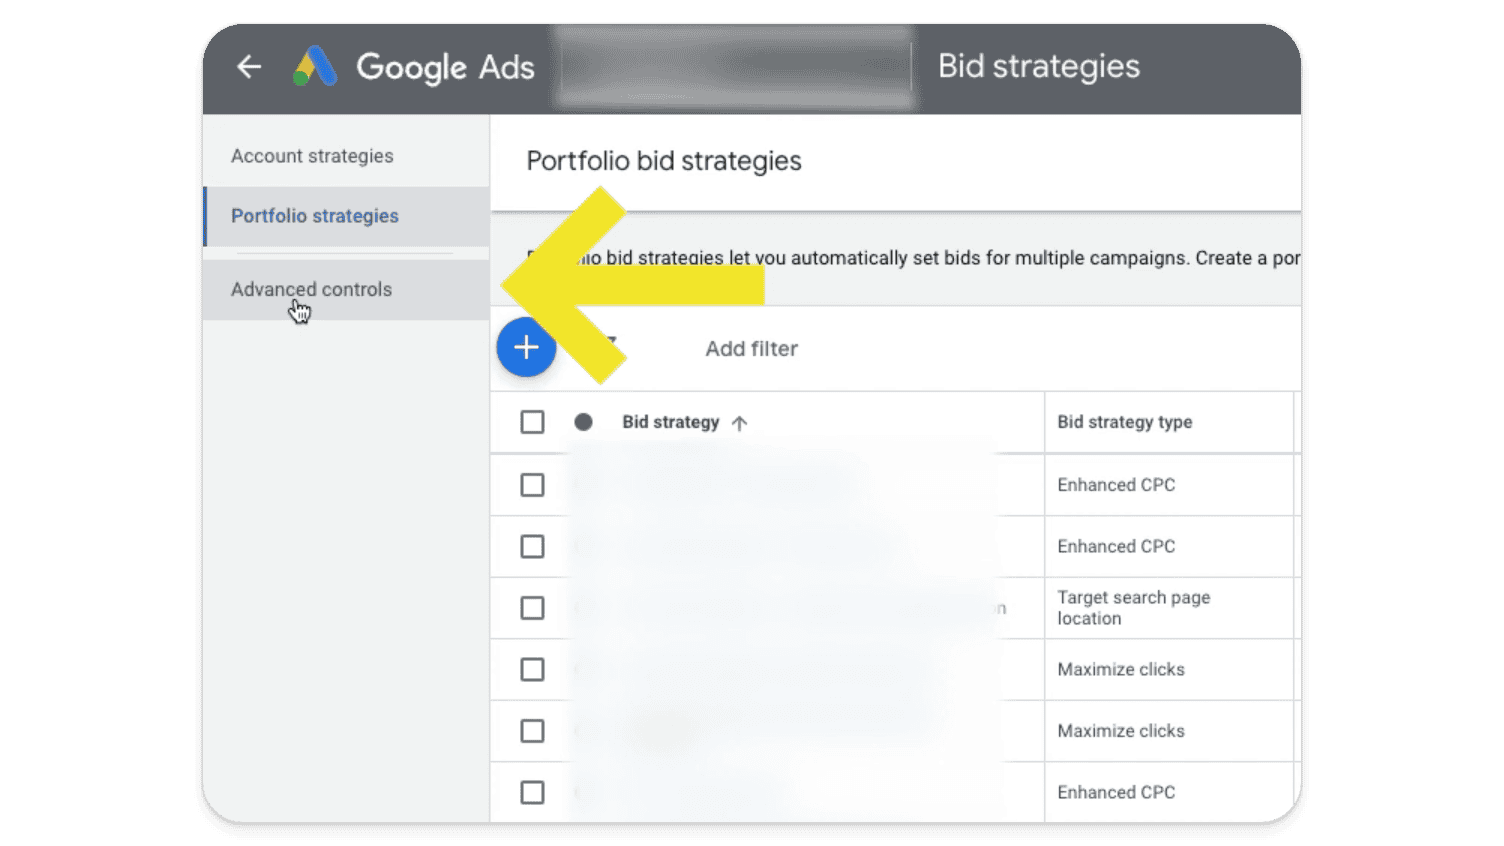
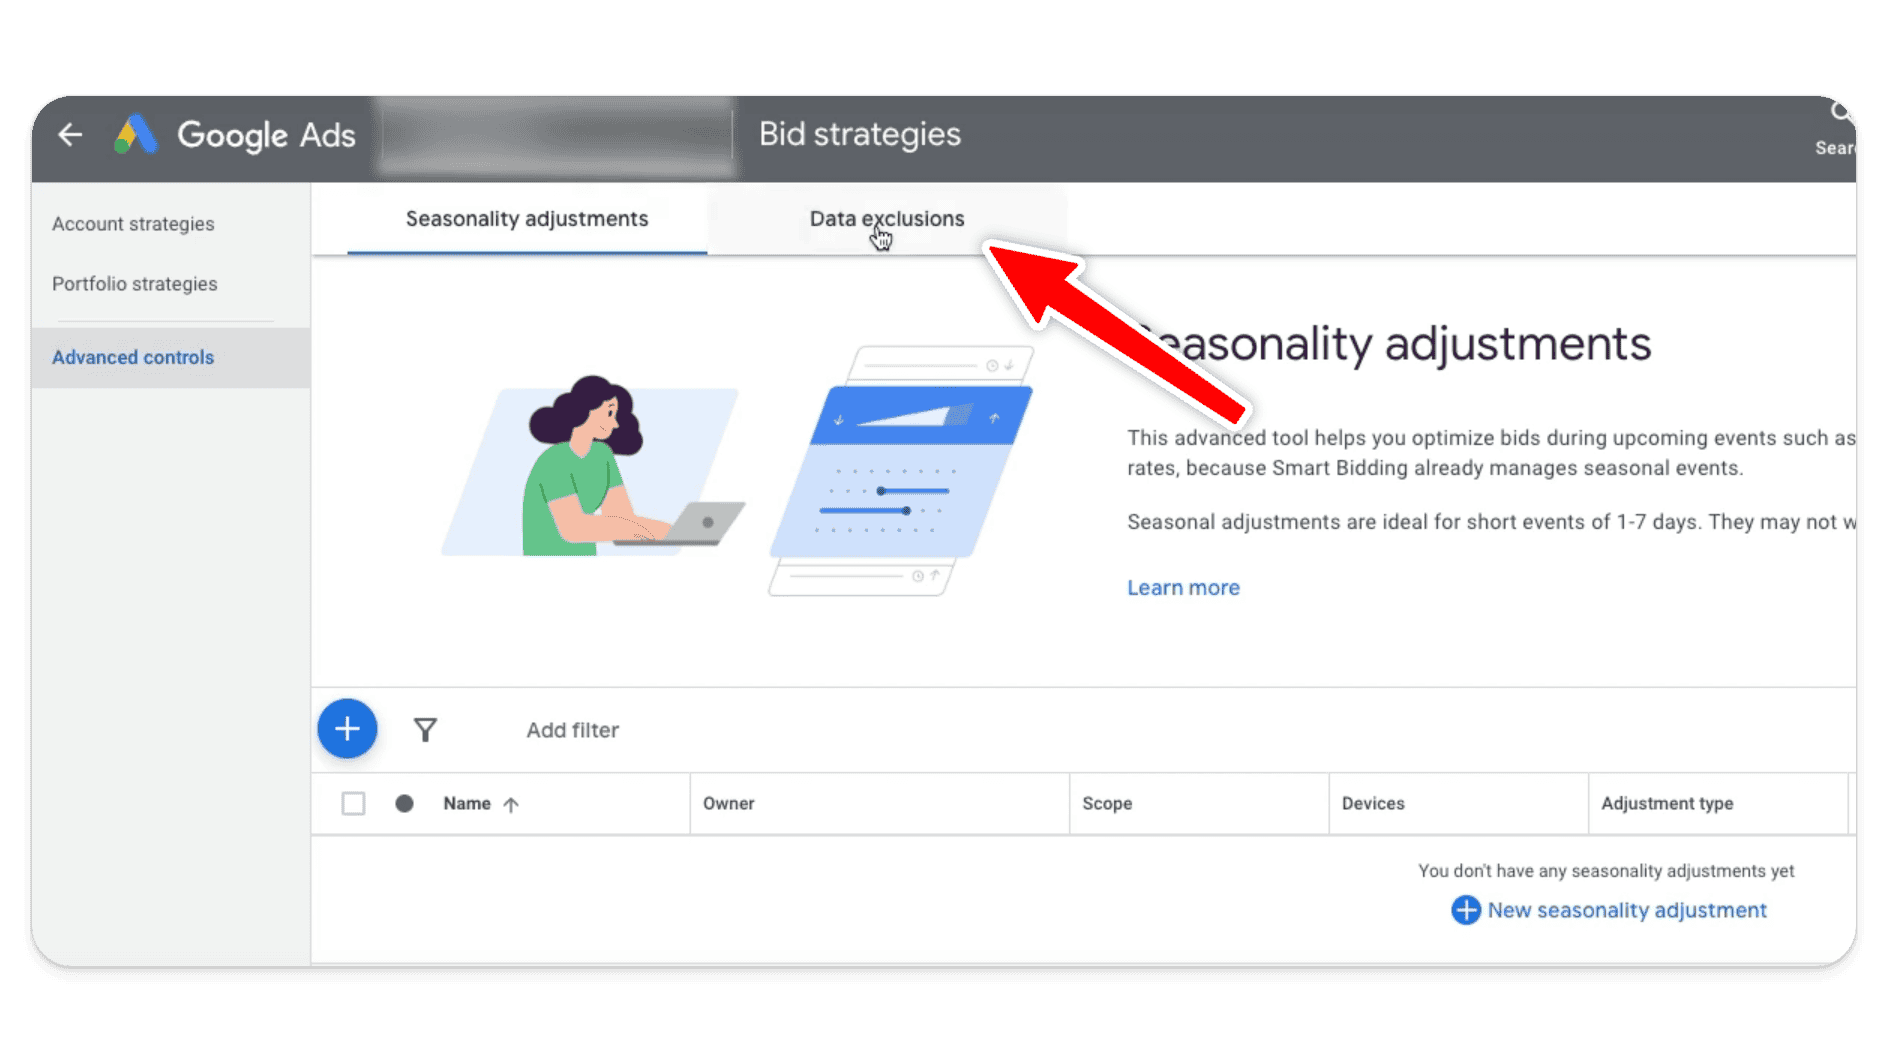
Here, you’ll see two options: ‘Seasonality adjustments’ and ‘Data exclusions.’ While seasonality adjustments are great for managing expected fluctuations during events like Black Friday or major sales (find out more on seasonality adjustments here), we’re focused on data exclusions in this post. Click on ‘Data exclusions’ to proceed.
Step 3: Create a New Data Exclusion
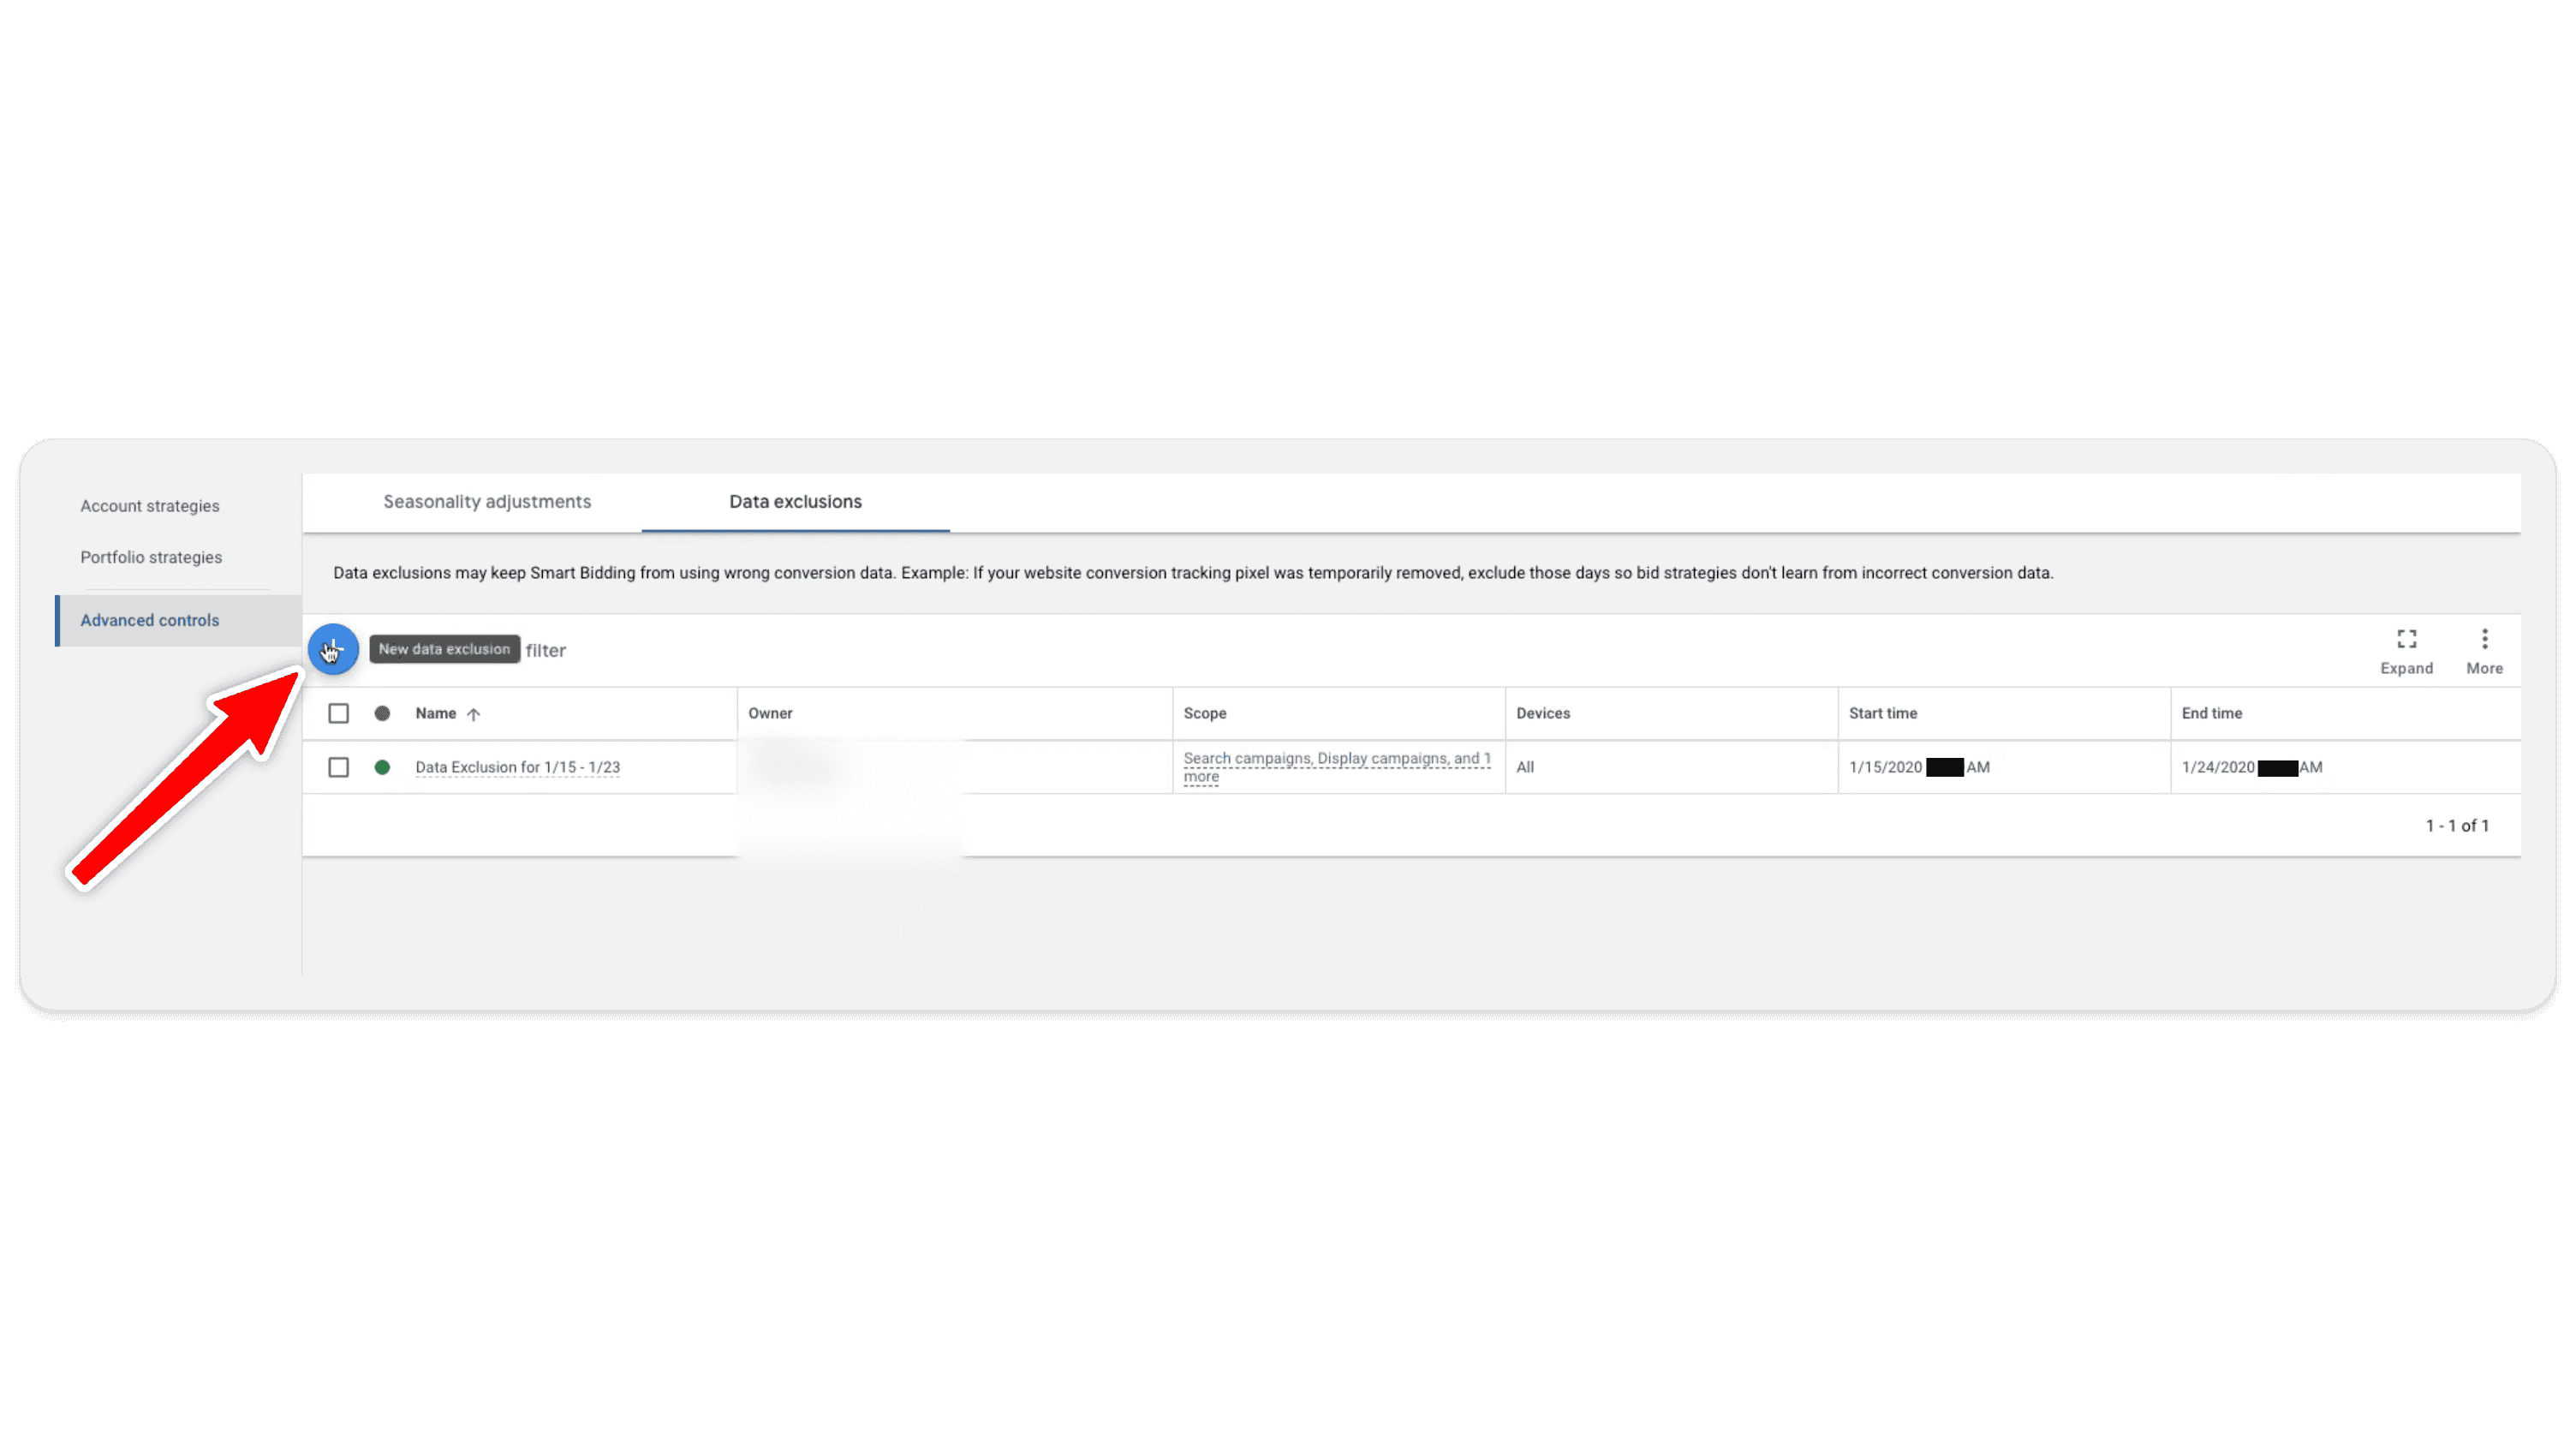
In the Data Exclusions tab, you’ll see an option to create a new exclusion. Click on the + button to start setting up your exclusion.
Give your exclusion a name that clearly identifies the issue and the date range, such as “Conversion Tracking Outage Feb 1-9.” This will make it easier to find and manage your exclusions in the future.
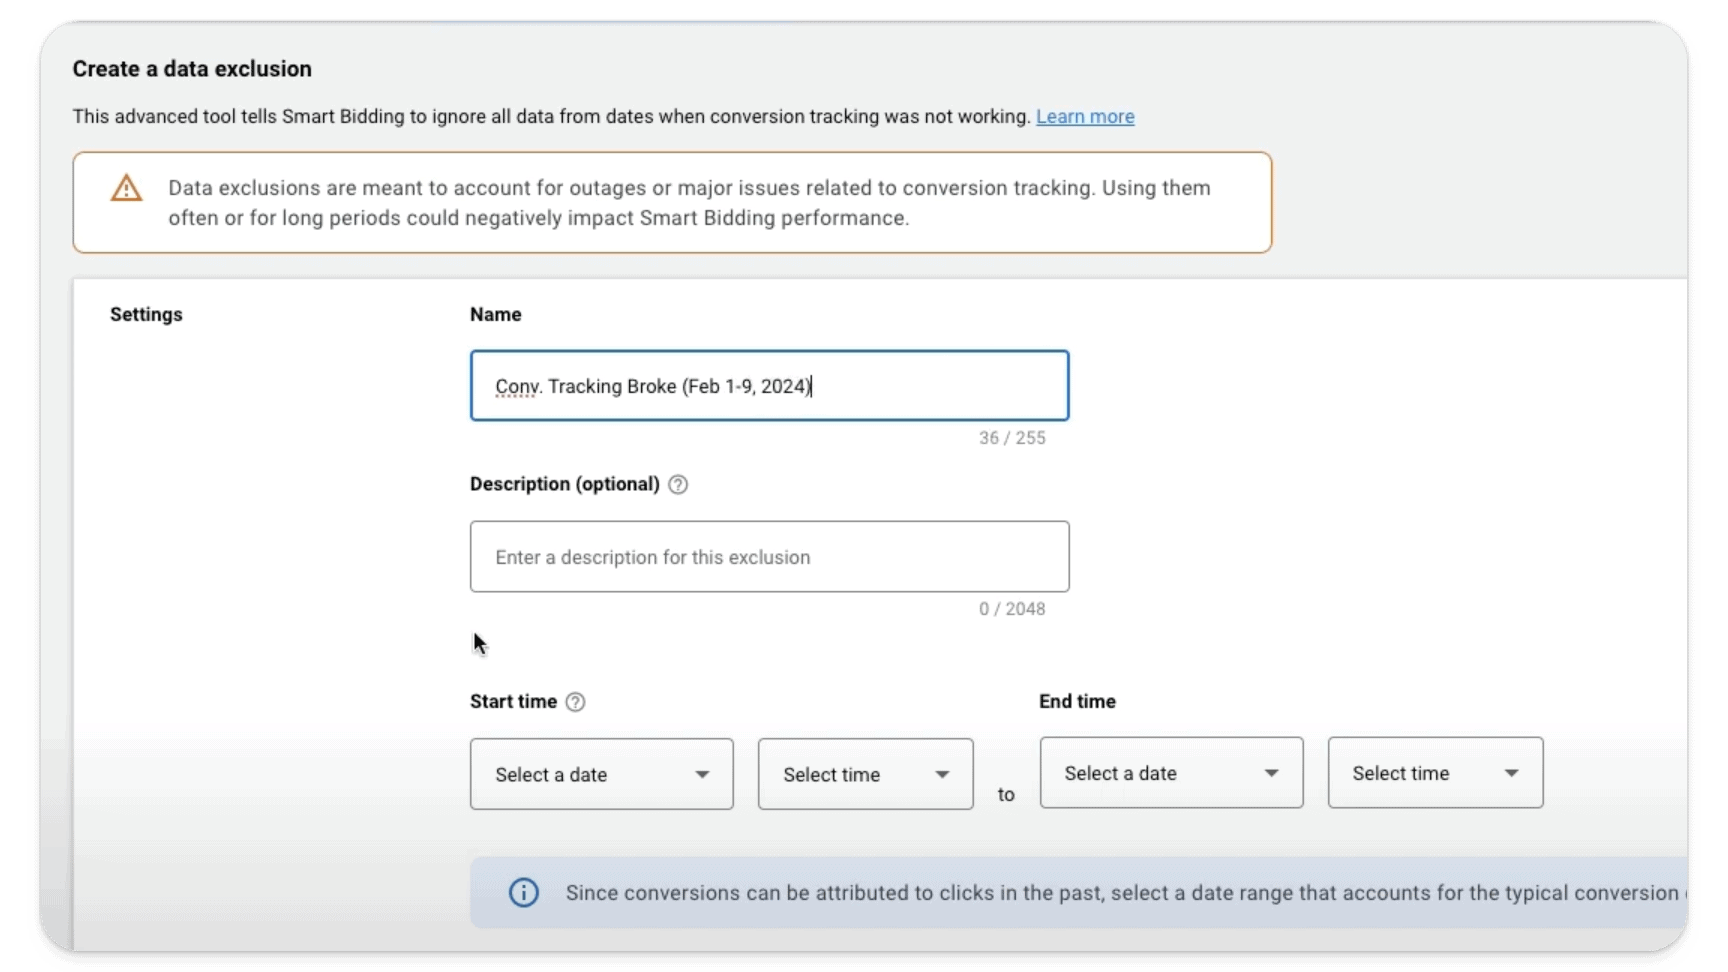
Next, set the Start Time and End Time for the exclusion. In this case, we set the start time to February 1st and the end time to February 9th.
Step 4: Define the Scope of the Data Exclusion
After setting the time frame, you’ll need to choose which specific campaigns and devices the exclusion will apply to. For example, if the tracking issue affected your entire account, you’ll want to apply the exclusion across all campaigns and devices. However, if the problem was isolated to a specific campaign or device type, you can target the exclusion more narrowly.
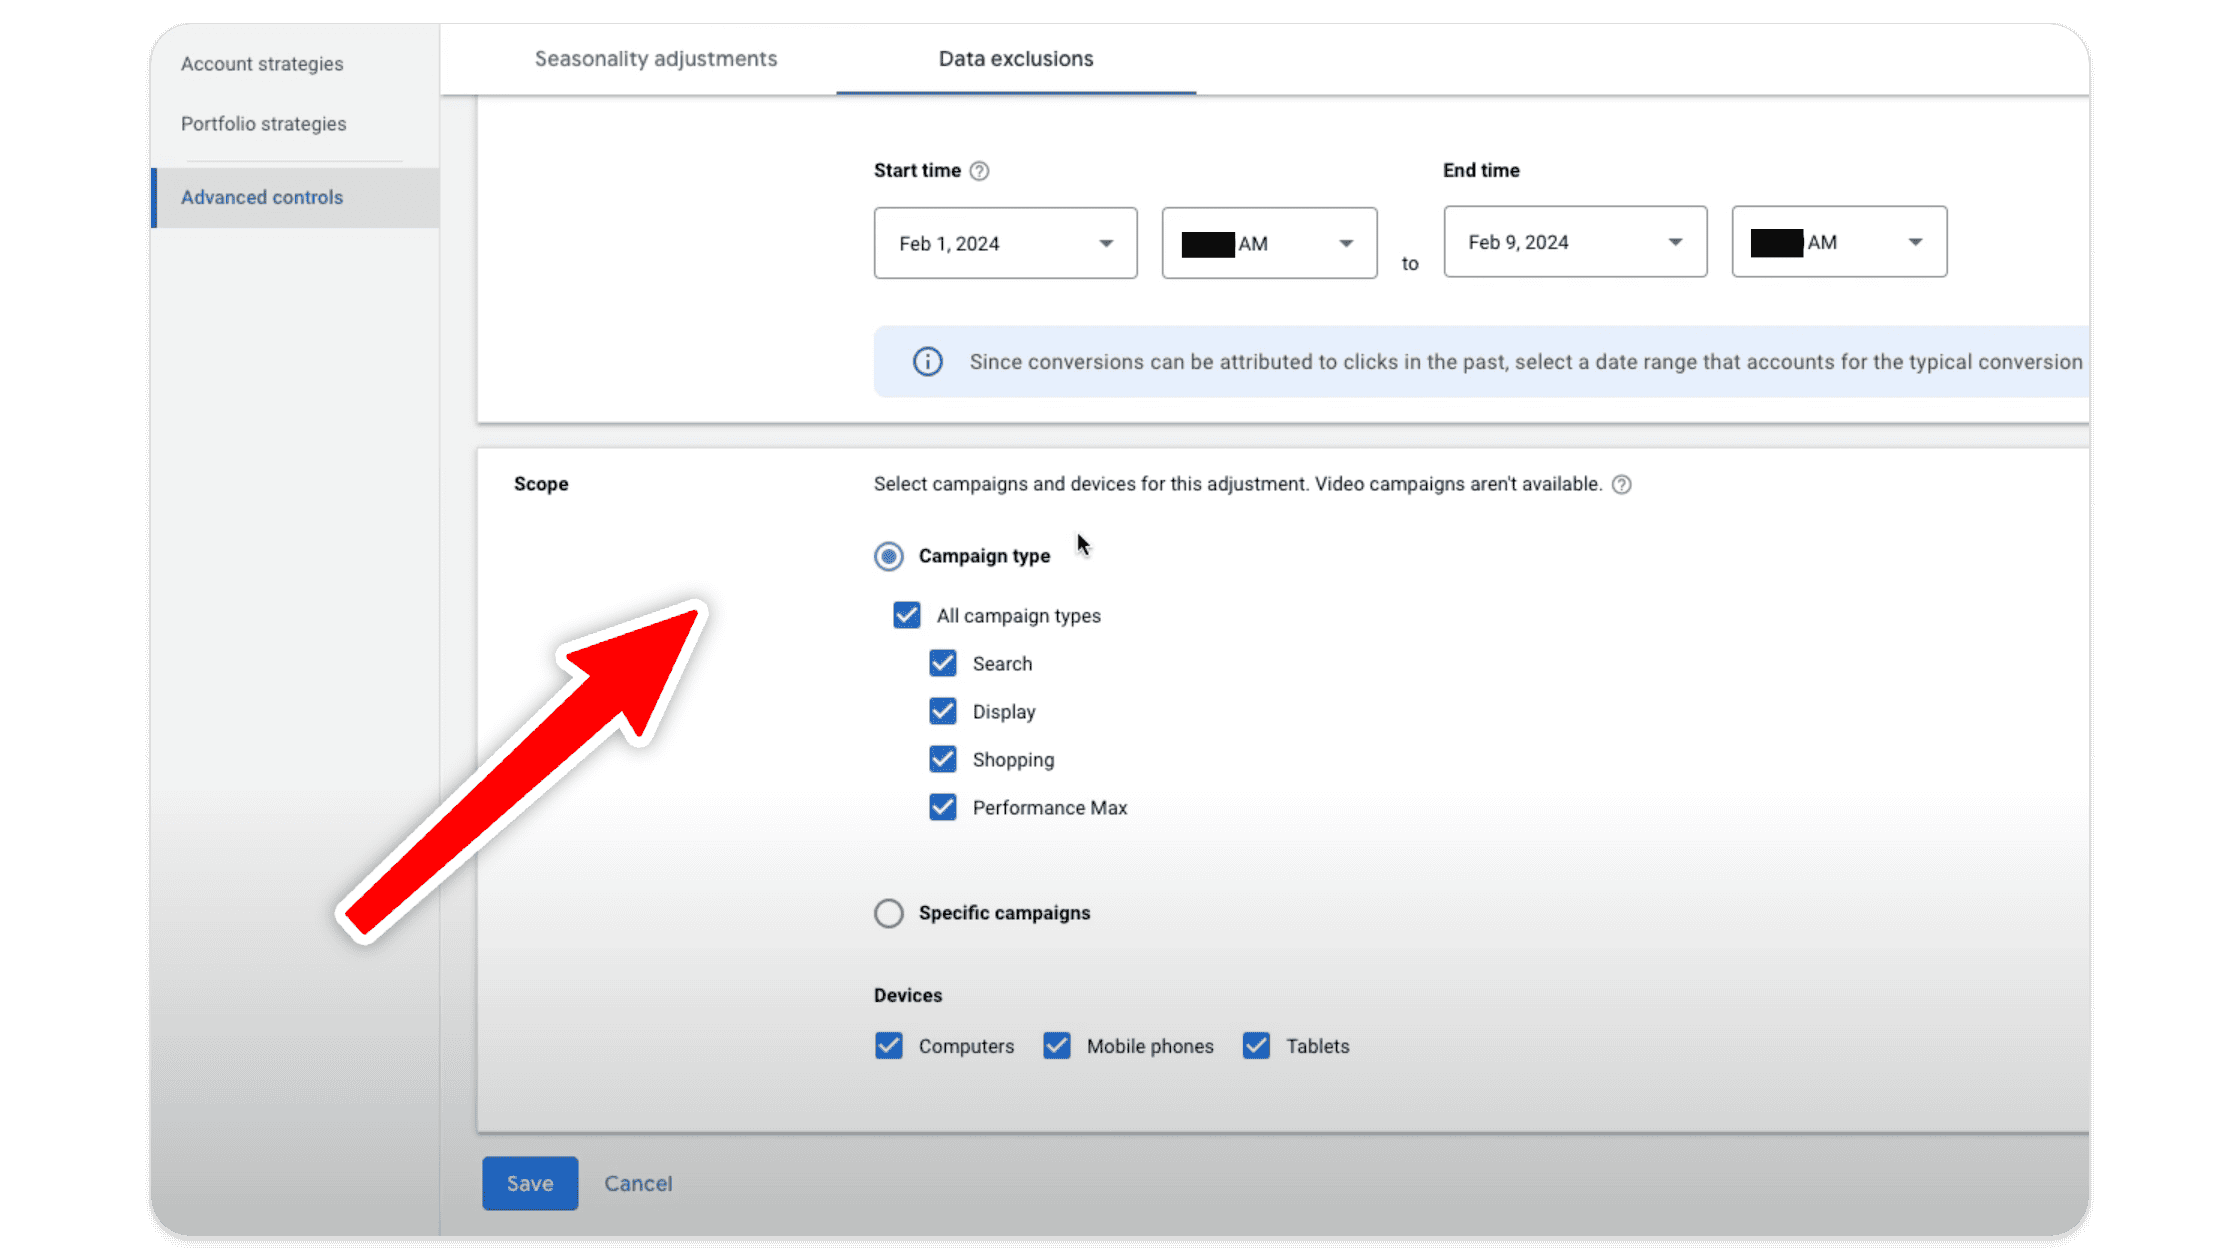
In our example, the issue affected the entire account, so we selected all campaigns and devices.
Step 5: Save and Confirm the Exclusion
Once you’ve configured the exclusion, Google Ads will prompt you to confirm your settings. This is a critical step because data exclusions can significantly impact how your campaigns perform. Double-check that the time frame, campaigns, and devices are all correct before proceeding.
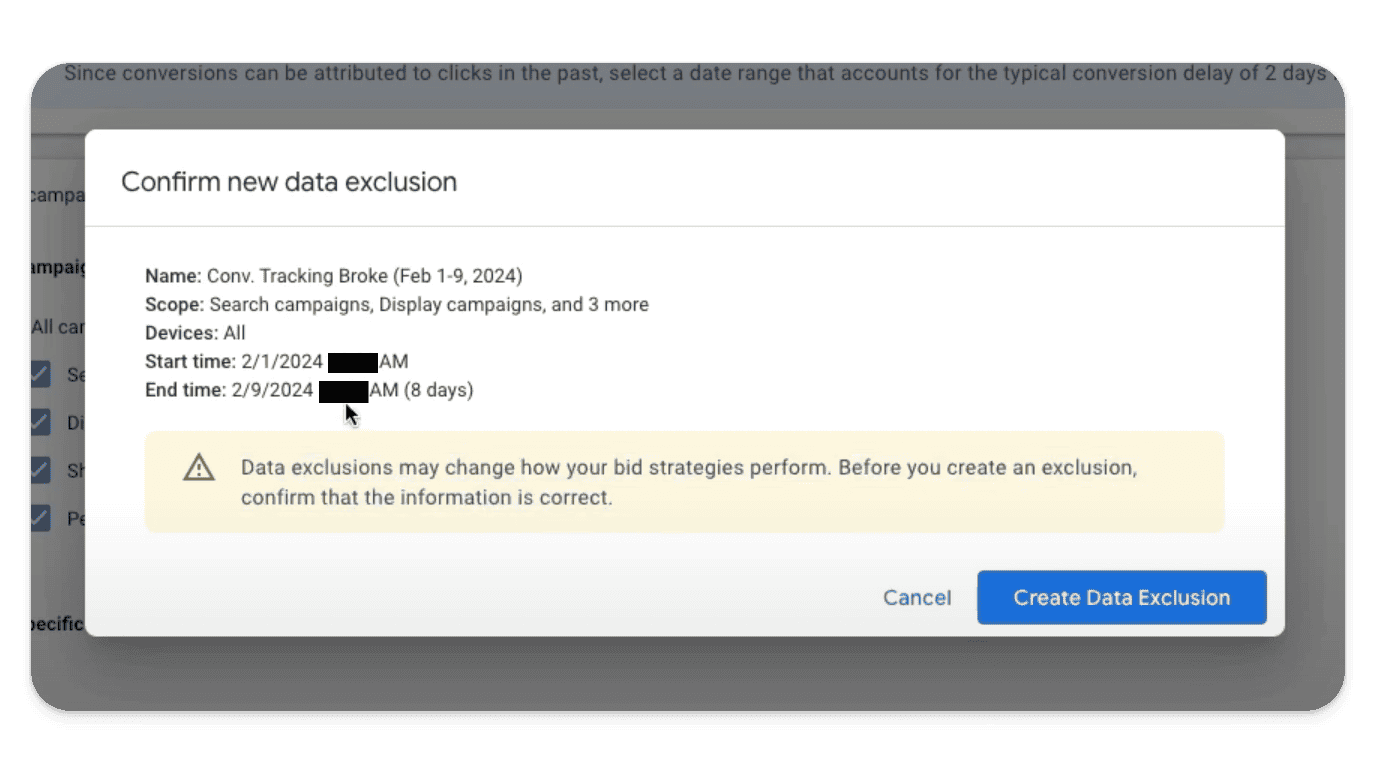
When you’re ready, click ‘Save’ to create the exclusion. Google Ads will then apply the exclusion, effectively erasing the selected period from your campaign’s learning history.
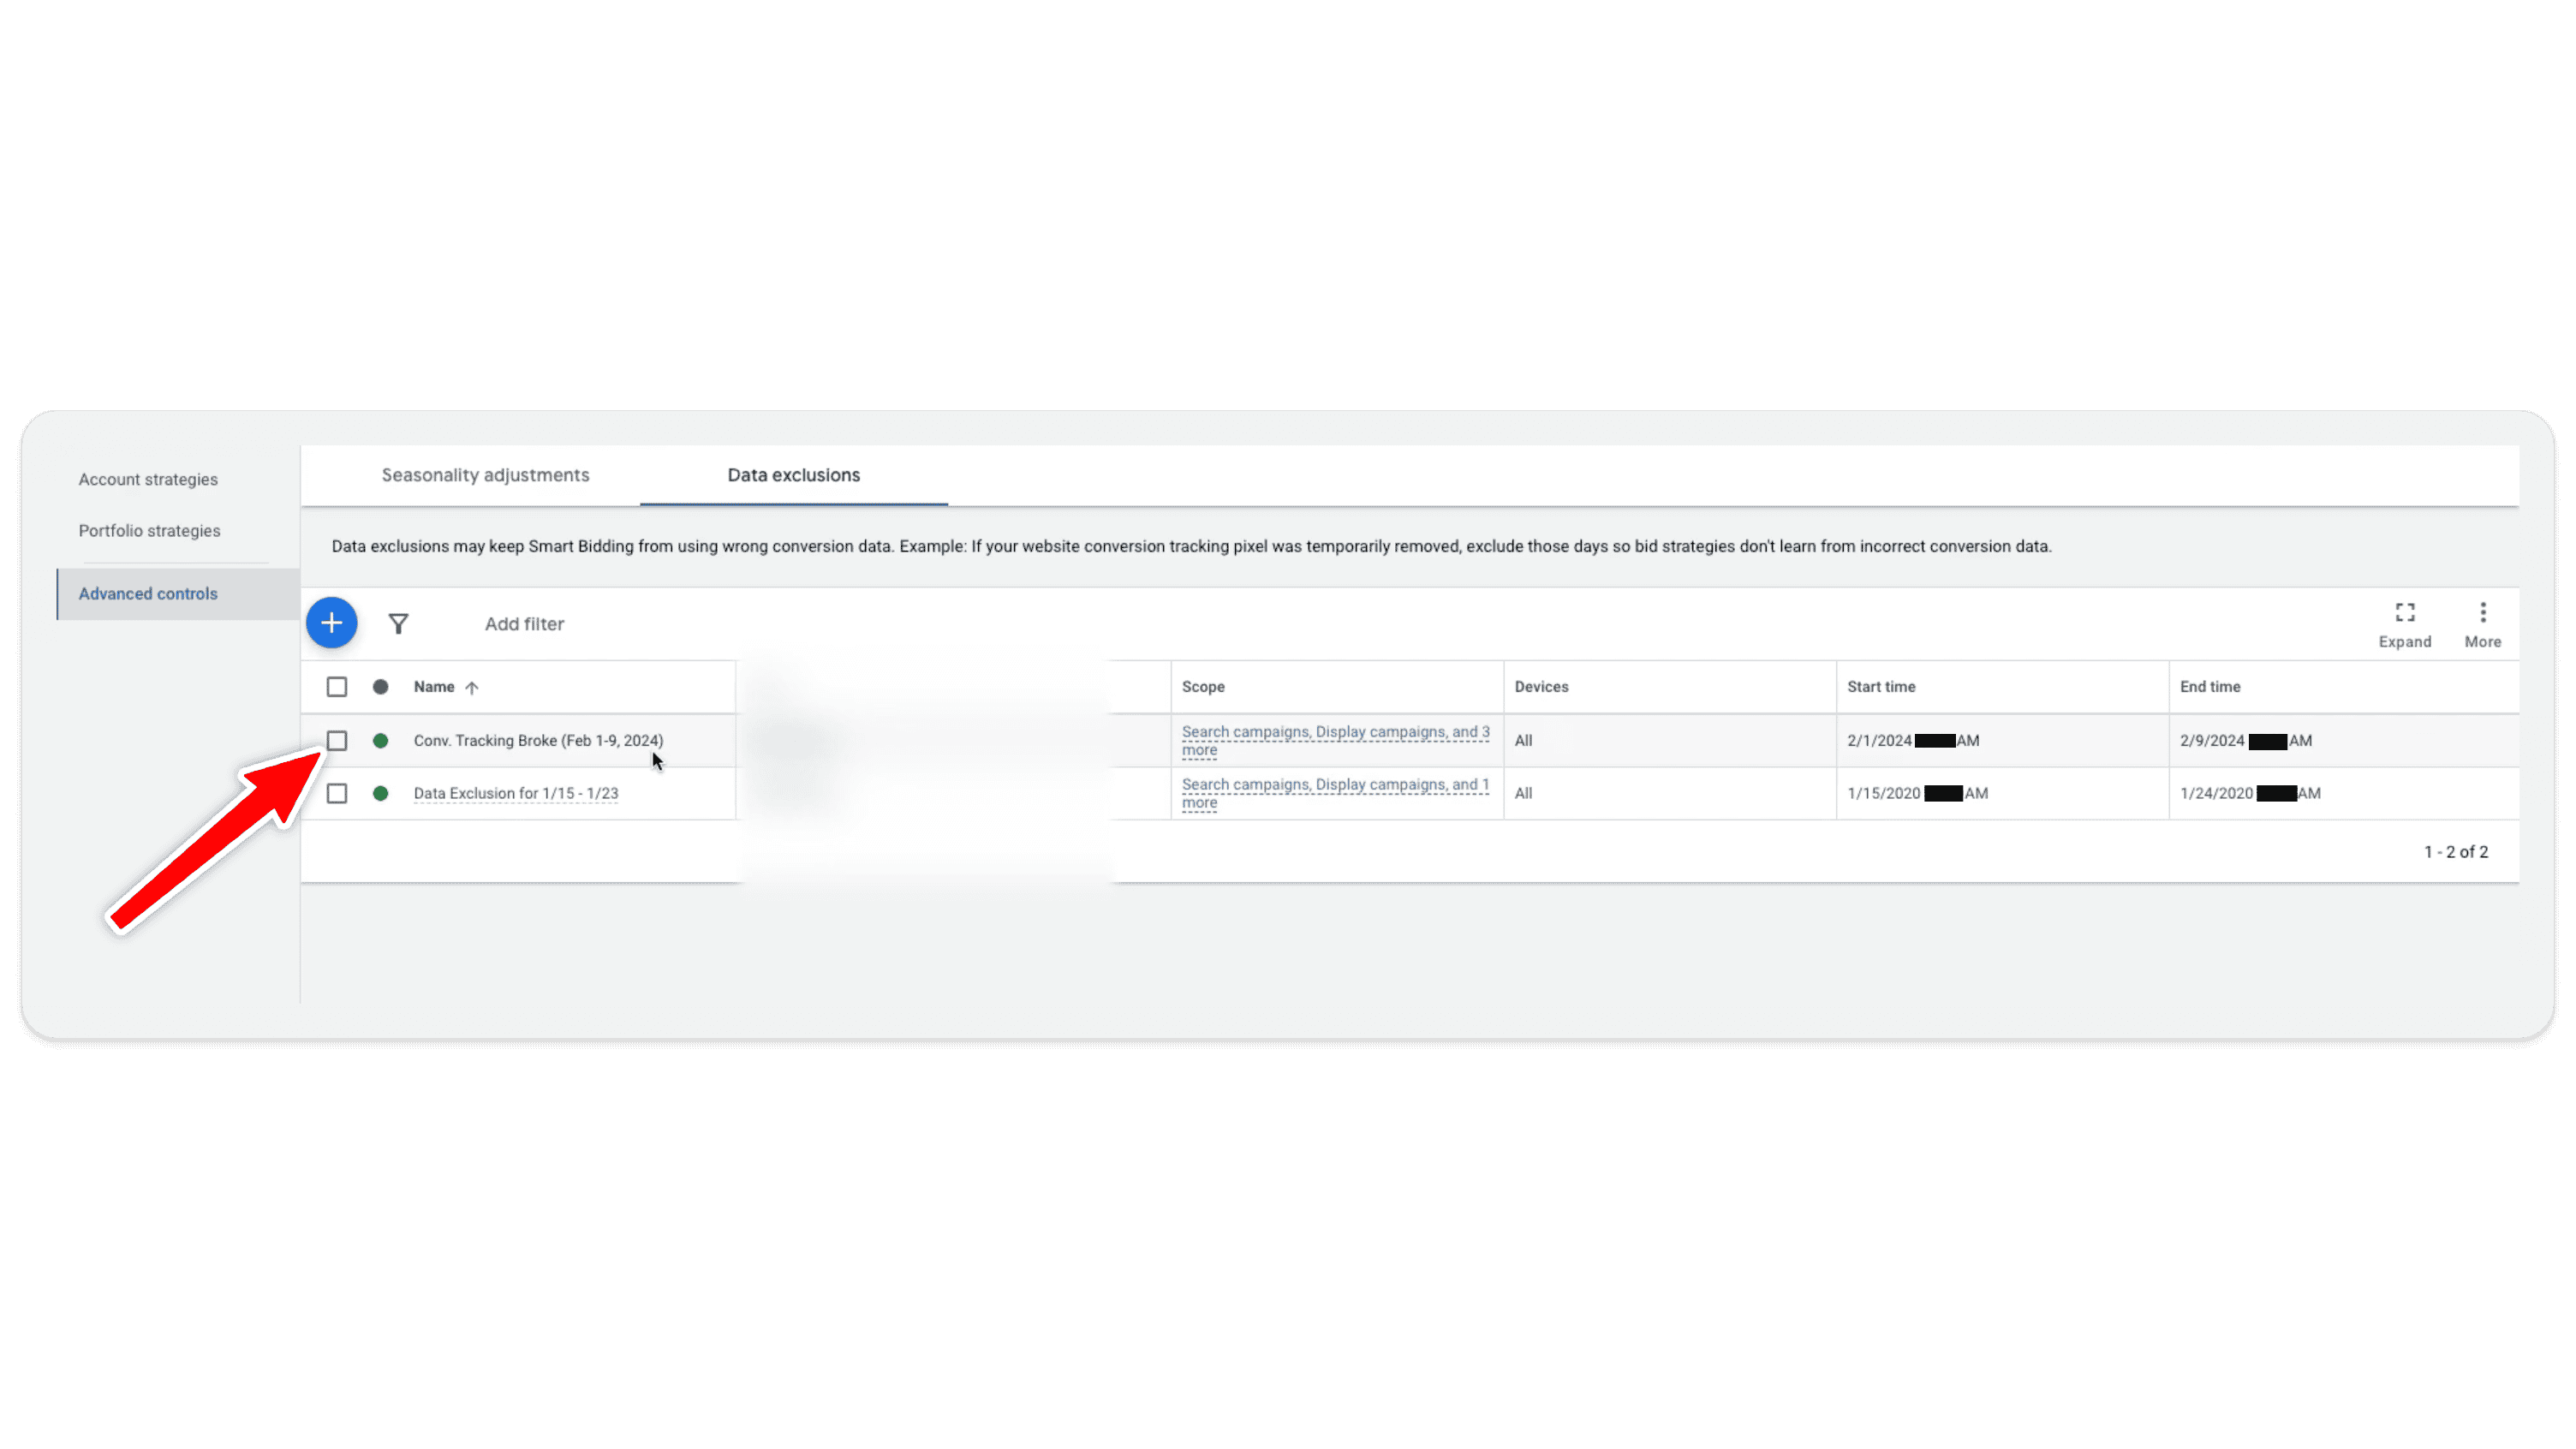
What to Expect After Implementing Data Exclusions
It’s important to set realistic expectations after implementing a data exclusion. While excluding bad data can prevent long-term damage to your campaigns, it won’t fix everything overnight.
When you remove a chunk of data from your campaign’s learning history because of a broken conversion tag, it can take some time for the smart bidding algorithm to recalibrate. In our case, we expected — and communicated to our client — that the account performance might be up and down for the next week or so as the algorithm adjusted to the exclusion.
During this adjustment period, it’s crucial to monitor your campaigns closely. Watch for any significant fluctuations in conversion action, and be prepared to make additional adjustments if necessary. Remember, the goal of data exclusions is to protect your campaign’s long-term performance, so be patient as the algorithm gets back on track.
Data Exclusions: Best Practices
Now that you know how to implement data exclusions, let’s go over some best practices to ensure you’re using them effectively.
Act Quickly
The sooner you implement a data exclusion after identifying a conversion tracking issue, the better. Delaying this action can allow the bad data to influence your campaign’s performance, making it harder to recover.

Be Conservative with Time Frames
When setting the time frame for your data exclusion, it’s better to lean towards being more conservative. If you’re unsure exactly when the issue started (or ended), it’s a good idea to exclude an extra day or two on either side. This helps ensure that all potentially problematic data is excluded.
Communicate with Stakeholders
If you’re managing campaigns for a client or another stakeholder, be sure to communicate the situation clearly. Explain what data exclusions are, why you’re using them, and what they can expect in the coming days. Setting the right expectations upfront can help maintain trust and prevent misunderstandings.
Monitor Post-Exclusion Performance
After implementing a data exclusion, keep a close eye on your campaign’s performance. The smart bidding algorithm may need some time to adjust, and it’s essential to monitor how things are progressing. If you notice any issues, be ready to make additional tweaks to your campaigns, but be sure to give your conversion rate the time it needs to recover.
Final Thoughts
Data exclusions are powerful. When used correctly, they can save your Google Ads campaigns from the negative effects of conversion tracking issues, helping to maintain performance even in challenging situations. So, if you ever run into a conversion tag issue and your account runs for a period of time with no conversion tracking, you now know how to fix it.
Whether you’re dealing with a minor tracking hiccup or a major outage, data exclusions give you the control you need to protect your campaigns and keep them on track.
Still have questions? Don’t hesitate to reach out. Join our free community (PPC Launchpad) to ask a question. In the group, you’ll also find tons of resources, including a free Performance Max course, that can help you get the most out of your Google Ads campaigns.
So, go ahead and start using data exclusions with confidence. Your campaigns will thank you for it.


