The Ultimate Guide to Performance Max Campaigns in Google Ads


Navigating Google Ads can be daunting, especially with the introduction of new campaign types like Performance Max (or PMax). Performance Max promises better reach and efficiency, but only if you know how to use it. In this guide, we’re demystifying Performance Max campaigns — giving you the tools and insights you need to better understand (and utilize) this new campaign type in Google Ads.
Watch YouTube Video:
Fundamentals of Performance Max
What is Performance Max?
You might think of Performance Max as every campaign type available in Google Ads, lumped into one campaign.
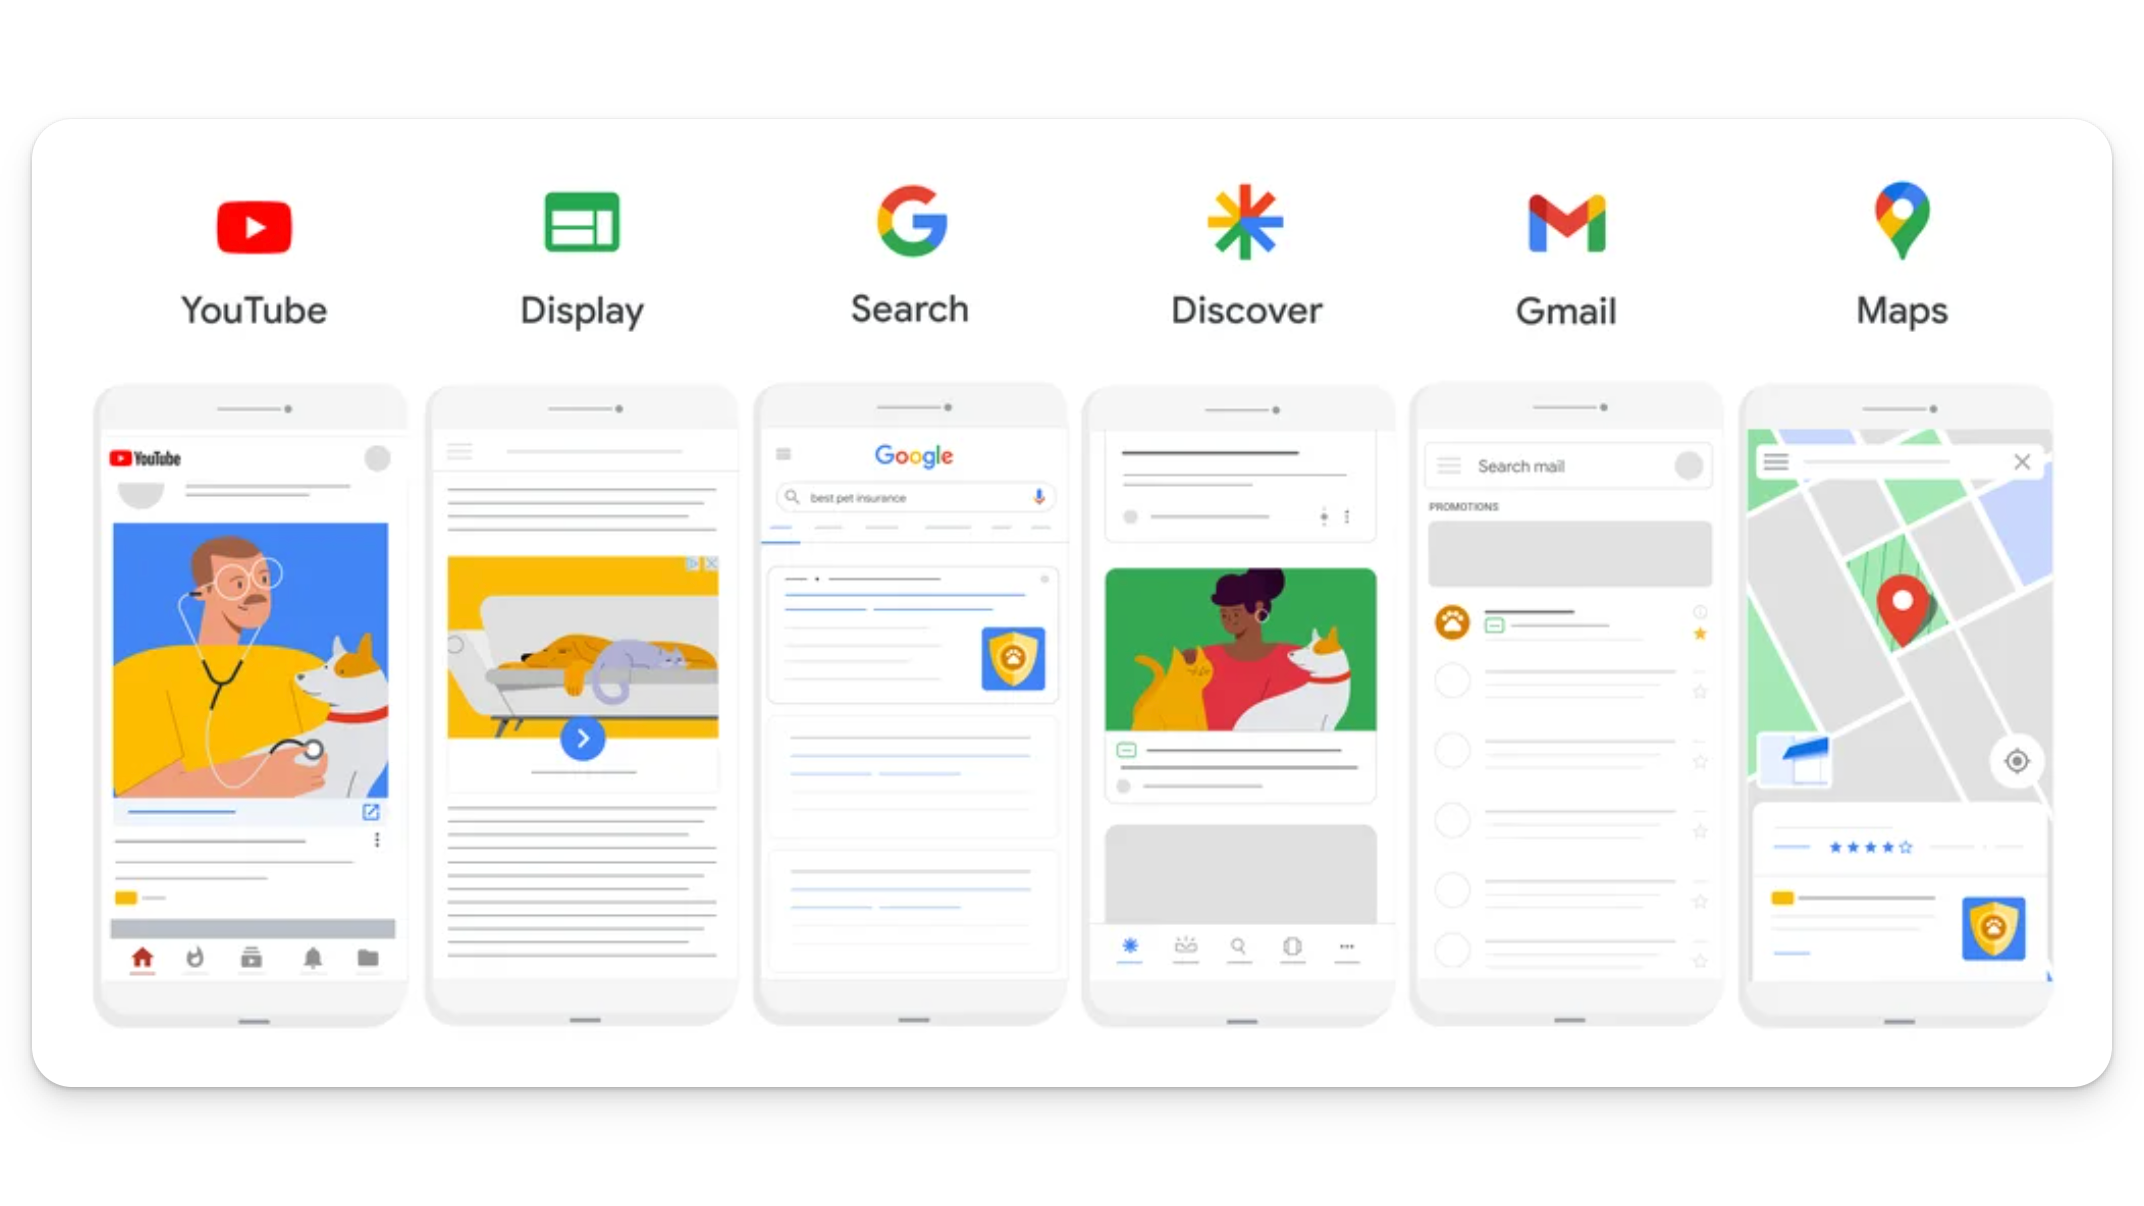
It was designed to enable advertisers to reach potential customers across YouTube, Display, Search, Discover, Gmail, Maps, and more from a single campaign. You can use Performance Max to augment your keyword-based Search campaigns, leveraging Google’s automation and machine learning to find more converting customers across all channels. This is both good and bad: it forces advertisers to utilize all of Google’s ad placements (including some which may not be beneficial for them), but it also works beautifully (if you set up the campaign structure correctly).
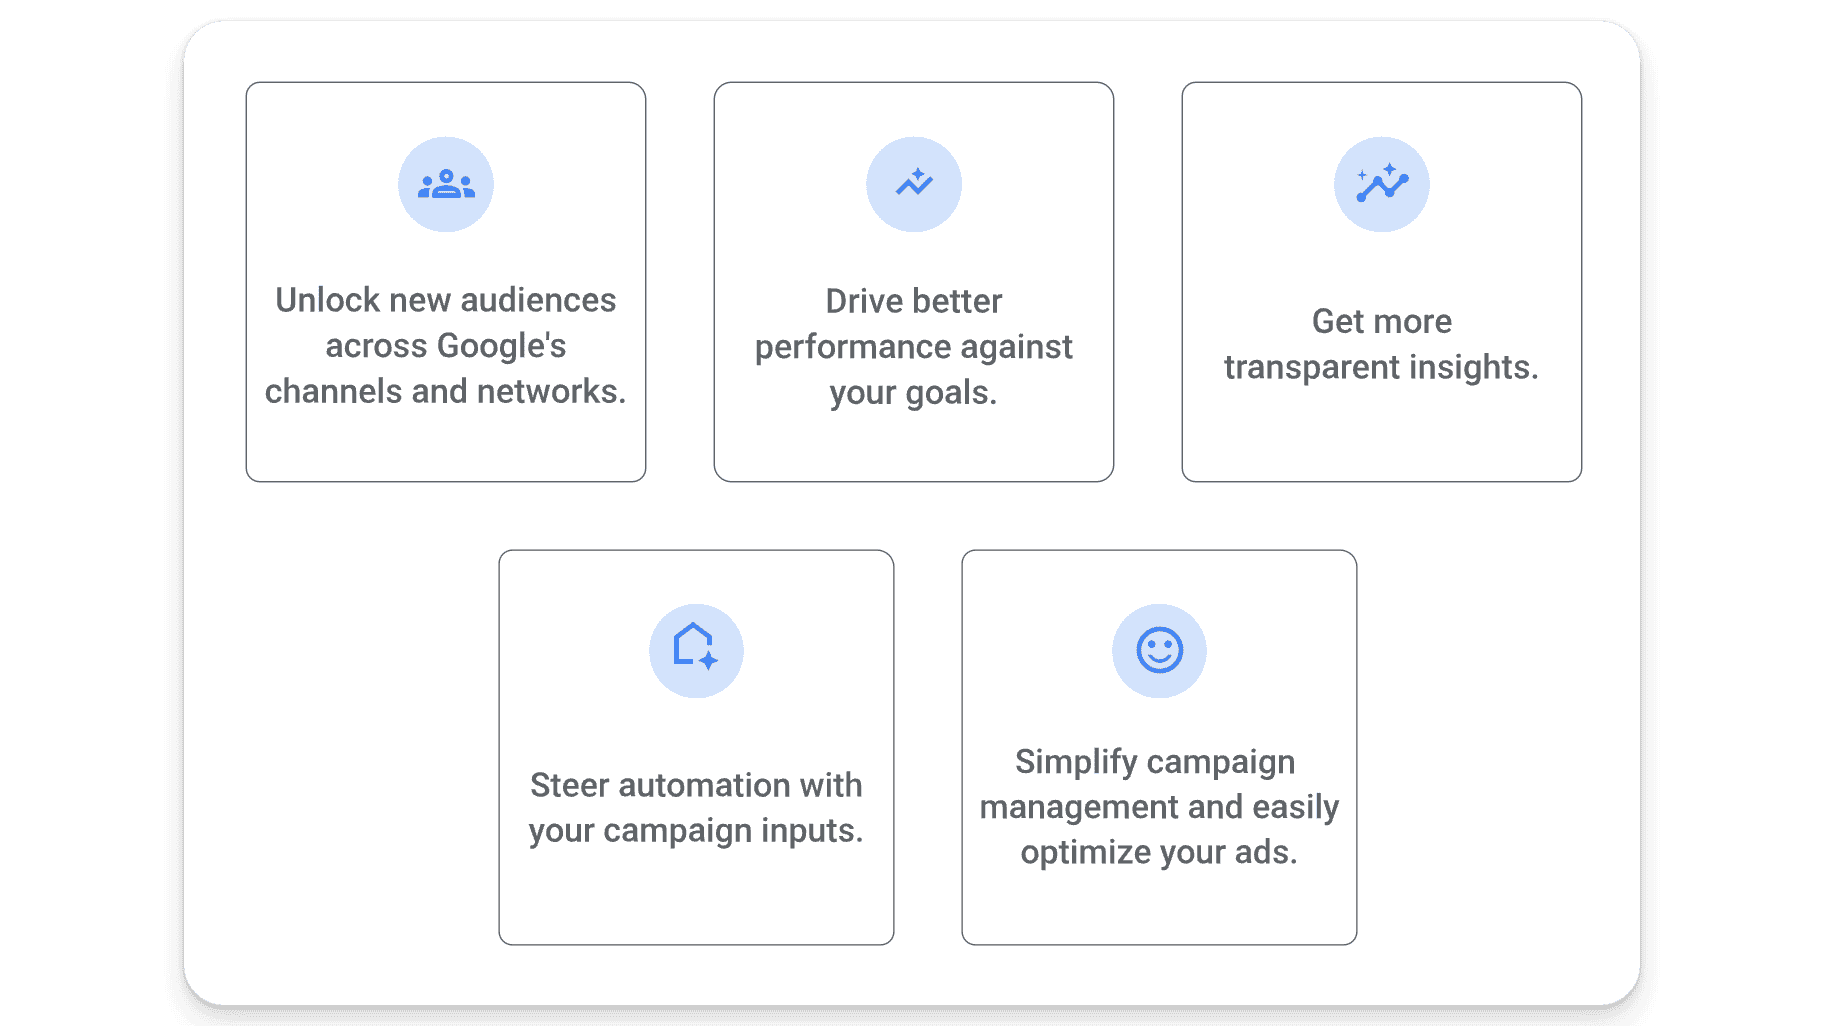
Here are some of the benefits you can expect from Performance Max:
You might think of PMax as something akin to Smart Shopping, but with Dynamic Search Ads (DSAs) and YouTube baked into it. This can make your campaigns more powerful, but only if you know how to manage the black box of Performance Max effectively.
Another key difference? Unlike traditional Google Ads campaigns that focus on keywords, Performance Max is audience-focused, requiring advertisers to set a goal (like cost per acquisition (CPA) or return on ad spend (ROAS)), after which the system autonomously hunts for the target audience. This is a more intent-based as opposed to keyword-based strategy.
In short, Performance Max is a new campaign type that uses Google’s automation and machine learning across advertising channels to help you achieve your pre-set campaign goal. Deployed in tandem with other Google Ads campaigns, Performance Max can round out your advertising strategy by enhancing your reach and optimizing overall performance.
How Does Performance Max Work?
At its core, Performance Max is about simplicity and automation. You provide the goal, and Google’s algorithms take over, using audience signals to identify potential customers across various platforms. It’s a goal-driven, audience-focused campaign that transcends keyword targeting to maximize the conversion value within the given budget. We’ll get into this in more detail later, but here’s a quick overview:
Goal Setting and Conversion Actions: You’ll start by selecting your primary campaign goal — whether it’s driving online sales, generating leads, or increasing traffic to your physical stores. Then, you’ll set up conversion actions that Google can track, like purchases or sign-ups.
Asset Input: You’ll provide various assets for the campaign, including headlines, descriptions, images, logos, and videos. These assets can be used across different ad formats and Google networks.
Audience Signals: While Performance Max campaigns automatically target potential customers, you can enhance campaign performance by providing audience signals. Again, we’ll review this in greater depth later, but for now all you need to know is that these are characteristics of an advertiser’s ideal audience (like interests or demographics), which help the algorithm identify the best audience segments to target.
Budget and Bidding: When you set a daily budget for your campaign, Performance Max will optimize bids in real-time to achieve the highest conversion value possible for the set budget.
Machine Learning Optimization: Google’s machine learning algorithms analyze the performance of different asset combinations, audience segments, and bidding strategies — and continuously adjust these elements to serve ads most effectively across Google’s entire range of advertising channels and inventory (and ultimately, drive more conversions).
Insights and Reporting: Performance Max provides insights and reporting tools that show how your ads are performing across different networks. This gives advertisers visibility into which asset combinations are working (and which aren’t), the types of customers reached, and how different channels are contributing to campaign goals.
Cross-Channel Reach: PMax campaigns can automatically place ads across all of Google’s advertising channels. This cross-channel approach is designed to help advertisers find the best opportunities to achieve their conversion goals, no matter where they occur.
In essence, Performance Max leverages Google’s advanced AI and machine learning capabilities to optimize your ad spend across all possible channels — aiming to achieve the best results for your specific goals without the need for manual adjustments in targeting, bidding, and ad placements.
Impact on Search Campaigns
Performance Max complements, rather than competes with, your existing Search campaigns and respects keyword targeting, up to a point. To get to grips with what that means for your Google Ads account, review the table below:
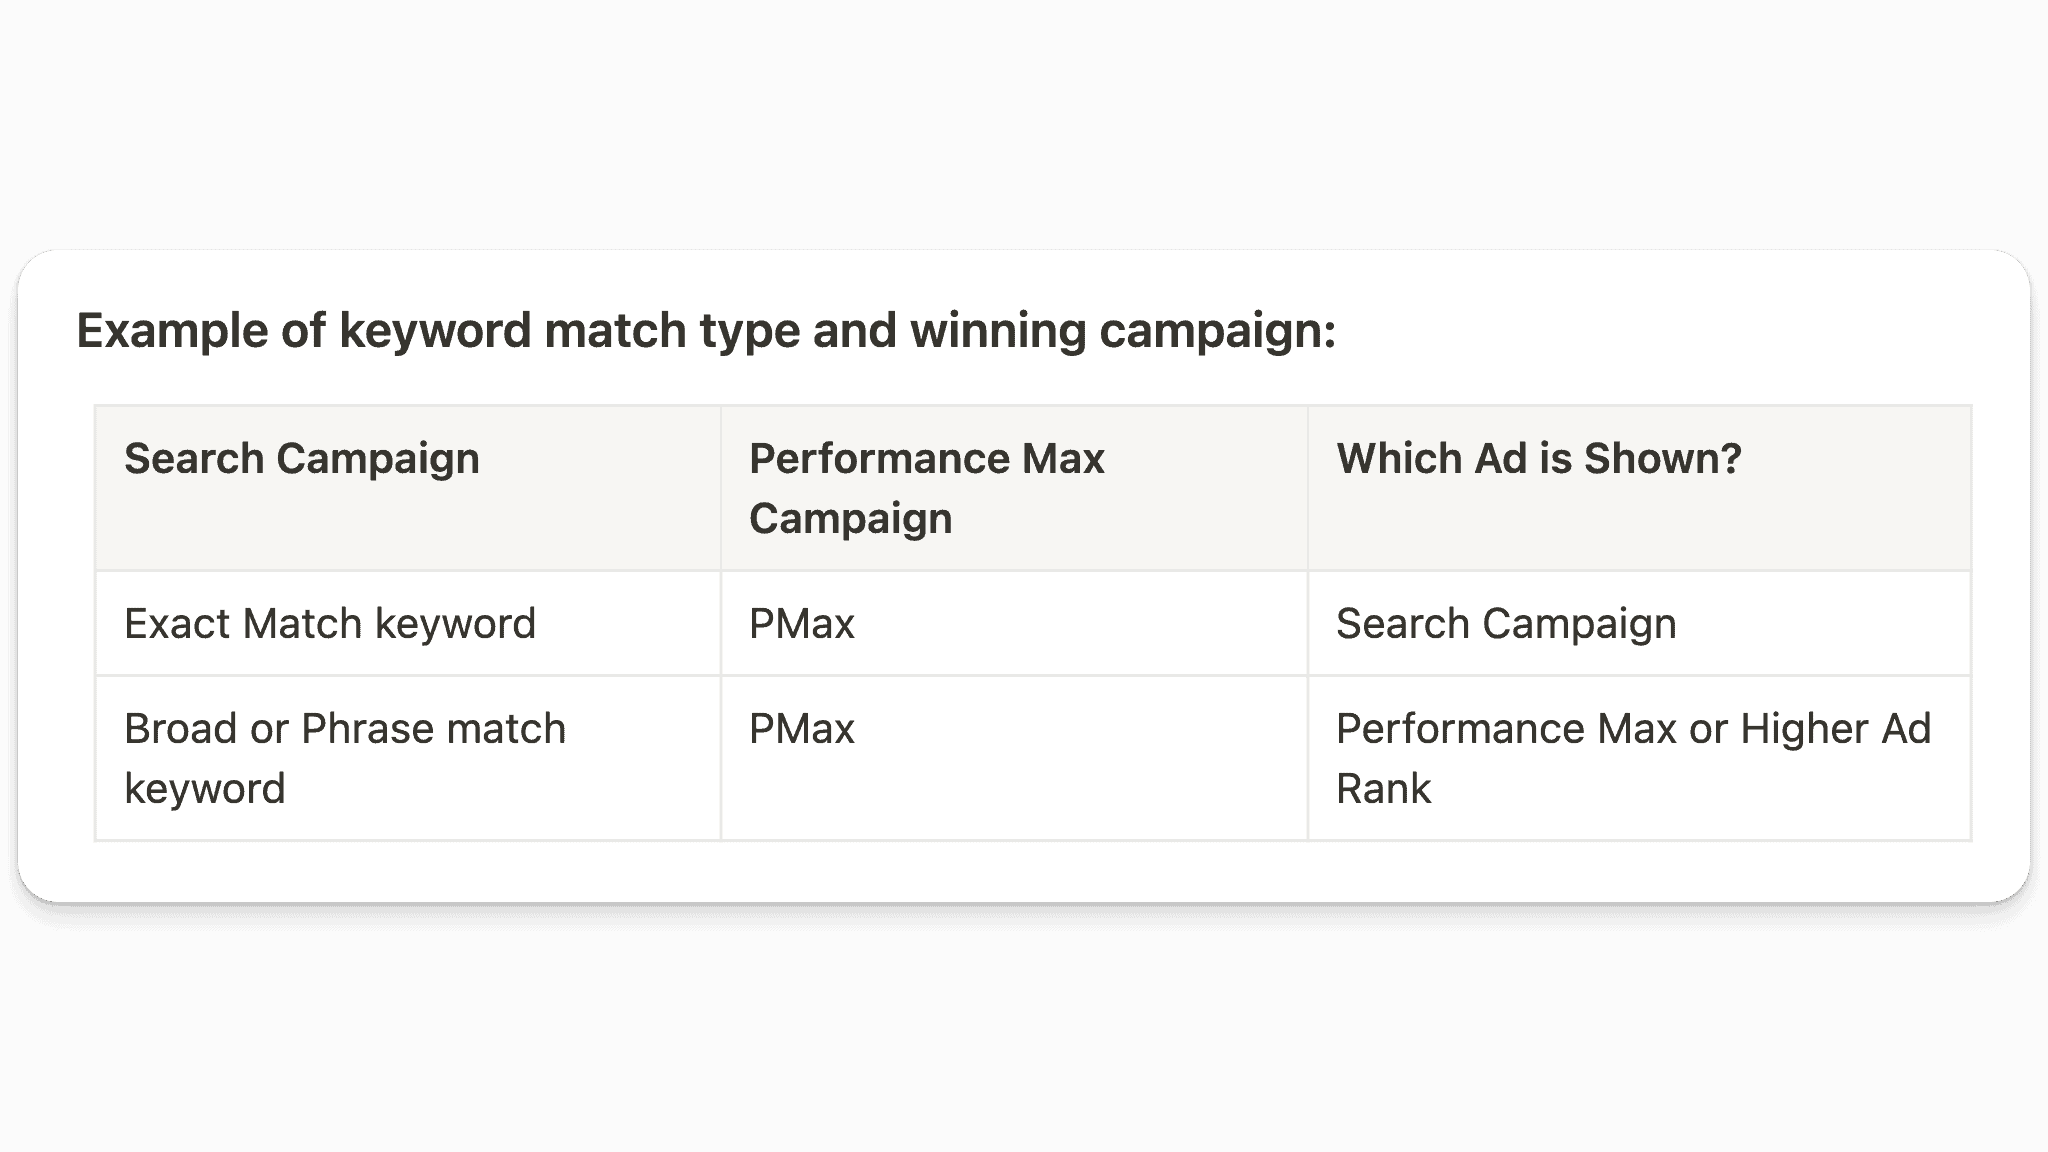
In general, Google prioritizes Search campaigns for Exact Match keywords, but selects either Performance Max or the campaign (or ad) with the highest ad rank for Broad or Phrase Match keywords.
That said, you can still make money, bid, and advertise on Broad and Phrase Match keywords in regular Search campaigns, although you may see some of that data in Performance Max as well. The best thing to do here, is review whether or not the results are good. If you are more or less where you want to be, you’re better off leaving it alone as there is really no way to fully control all search traffic.
However, there may be times when you see existing keywords showing in Performance Max campaigns instead of Search due to ineligibility. A Search keyword is not eligible to trigger an ad if:
The campaign is limited by budget
It has low search volume status
All creative assets or landing pages for the ad group are disapproved
All campaign or ad group targeting isn’t met
Impact on Other Campaign Types
We’ve discussed the way Performance Max interacts with Search campaigns, but how does it impact other campaign types? Well, here’s a quick graphic that makes understanding prioritization in Google Ads easy:
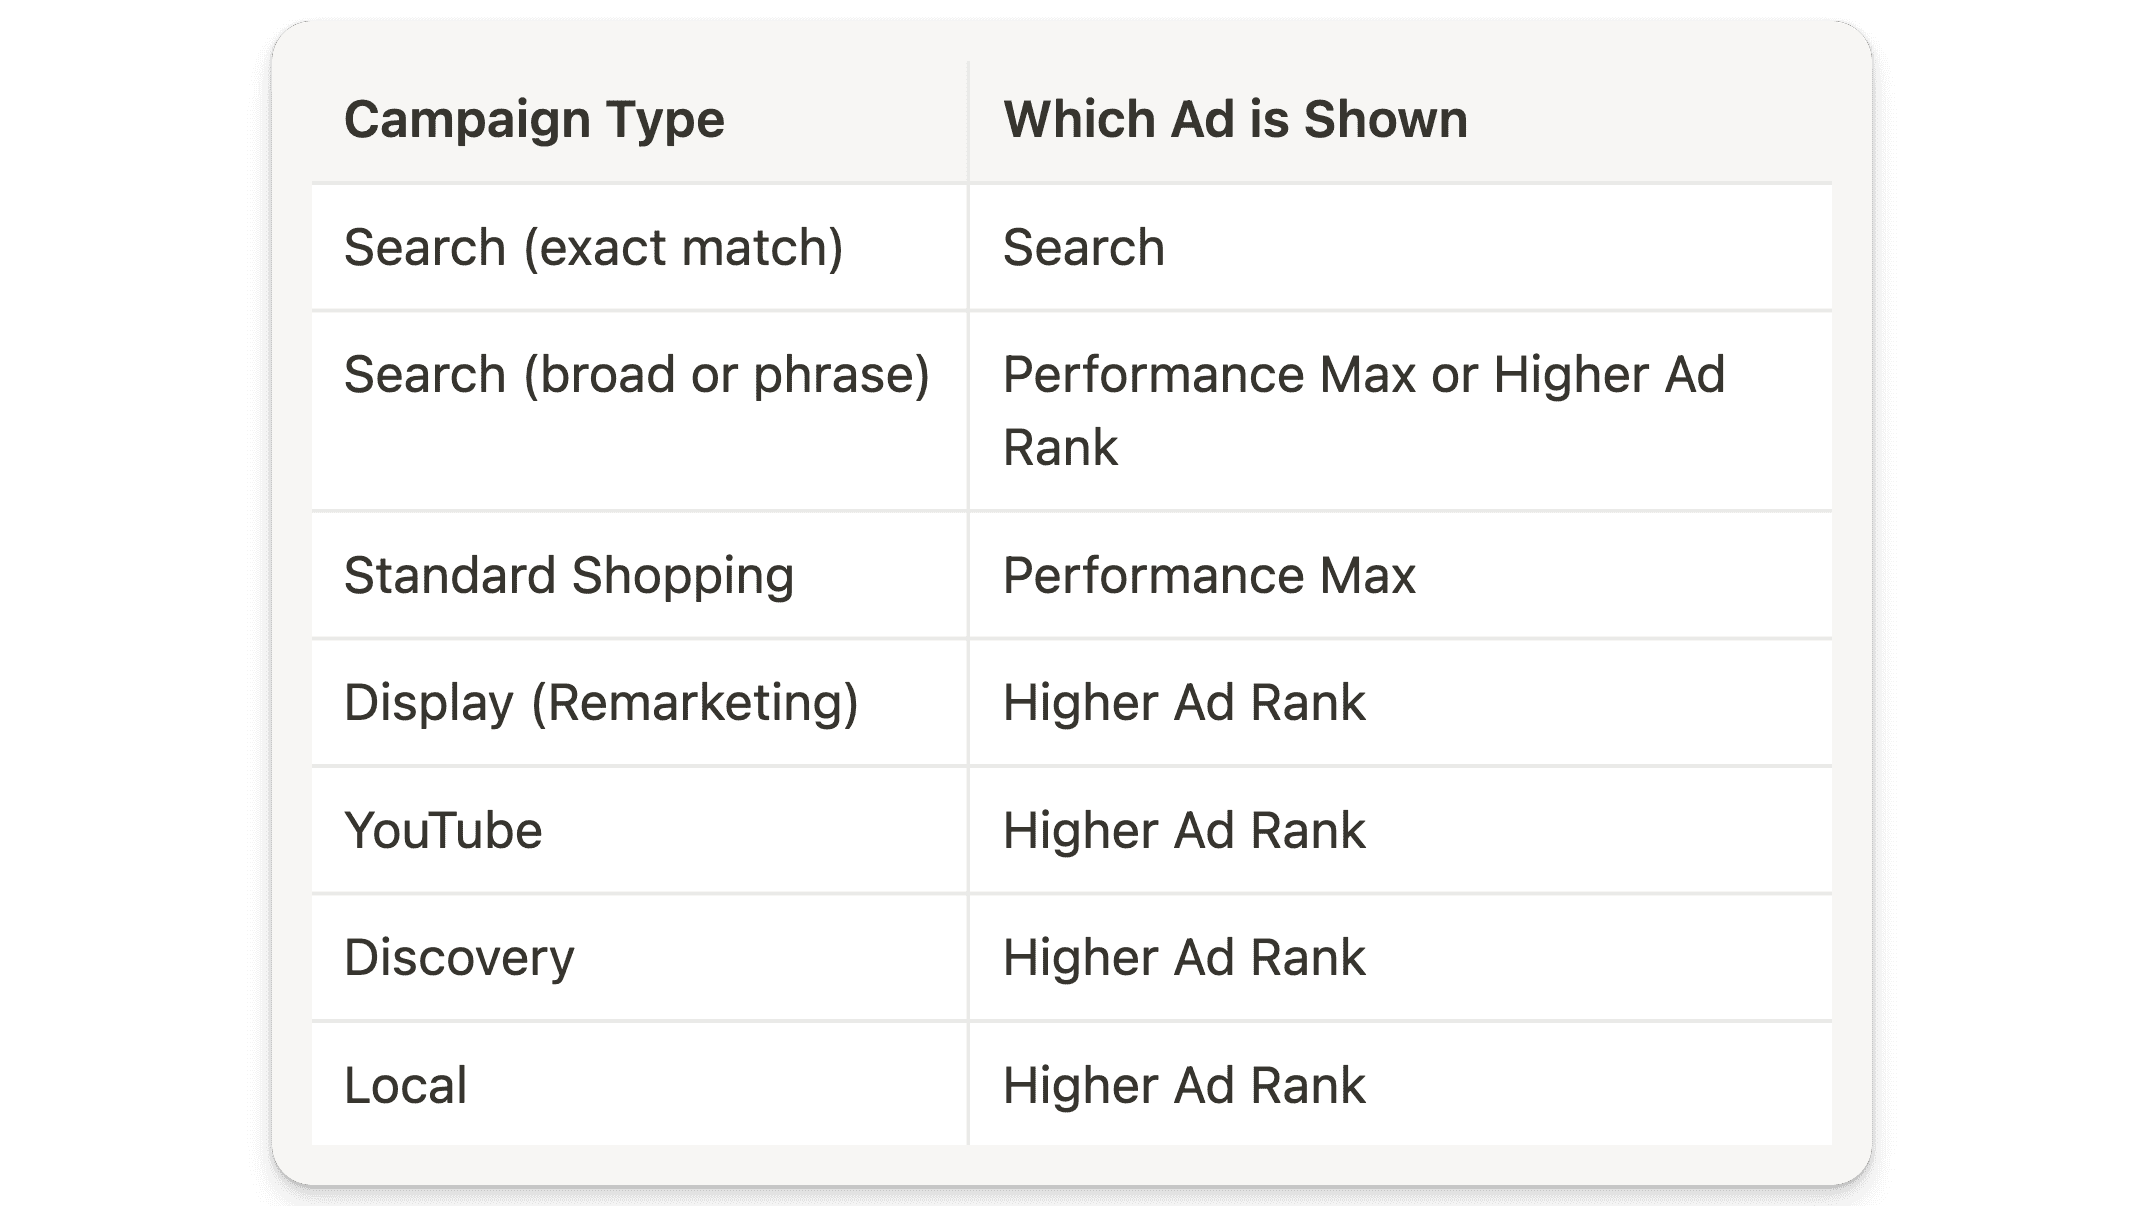
As you can see from the above, Performance Max campaigns are not the be-all and end-all of Google Ads campaign types. At Grow My Ads, we’ve found the best success when running pretty much all campaign types alongside Performance Max. There’s no denying PMax is powerful, and if you can get it to work (and it makes sense for your Google Ads account), you absolutely should use it — but you’ll want to continue to run other campaign types as well.
Performance Max Terminology
To fully understand Performance Max, you’ll need to get familiar with it’s unique terminology:
Asset Groups: Think of an Asset Group as your Ad Group in a standard campaign. Your Asset Group contains all of your ad creative, audience signals, and product listings.
Audience Signals: These are crucial for steering Google’s machine learning. They’re not fixed targets but initial guides (or “signals”) that alert the algorithm to which audiences are important to your product, and evolve over time. These are optional, and do not have to be used in every Performance Max campaign. Audience signals include:
Custom Segments
Remarketing Audiences
Detailed Demographics
Listing Groups: Listing groups are your product groups, and fetch data from your product feed. Similar to product groups in Shopping campaigns, these can be segmented and split out accordingly.
Pros and Cons of Using Performance Max
Pros
It Works: …and when it works, it works very well. For most of our ecommerce clients, Performance Max is driving 80% of revenue, if not more.
It’s Efficient: Performance Max effectively reaches channels previously overlooked by advertisers, maximizing exposure and conversion opportunities across the Google Ads network.
It’s Automated: Performance Max leans heavily into Google’s automation, simplifying campaign management.
Cons
Limited Insights and Control: Performance Max is sort of a black box, and you may face challenges in gaining deep insights and exerting control over campaign specifics. As a result, if things go sideways, it’s hard to diagnose why.
Cannibalization: There’s potential for your Performance Max campaign to take credit for what’s working in your other campaign types. We’d rather it not, but it (sometimes) does.
No Easy Way of Adding Negative Keywords: In most campaigns, you can add negative keywords easily. With Performance Max, it’s a little trickier.
Wasteful Spend: There’s a lot of wasteful spend happening in Performance Max, but only limited controls put in place to stop it. This is Google forcing you into some of their other (likely less profitable) ad placements.
Volatility: Performance Max campaigns are subject to wild swings (especially if you do not have the right conversion tracking in place, or for accounts with lower volume). This is getting better over time, but it’s still a very finicky campaign type.
Slow Learning: The learning phase can be lengthy, which means you may have to tough out any changes made to the algorithm for a week or so (until things return to normal).
URL Extension: Make sure to add exclusions for URLs you don’t want to send traffic to (like blog posts). If you don’t exclude these URLs, Performance Max will use them in campaigns.
Not Good for Lead Gen: We’ve spent $100,000s testing Performance Max for our lead generation clients, and 90% of the time the leads produced are junk. Hot take: Performance Max doesn’t work for lead gen.
Not 100% Machine Learning: Sometimes the way the algorithm responds to changes in a Performance Max campaign suggest more of an engineered response, and less true machine learning.
Thoughts and Strategies
Performance Max is one of the smartest campaign types Google has launched. But, while it is undoubtedly a potent tool in Google’s advertising arsenal, it’s not a panacea. Success with Performance Max requires strategic integration into your broader account strategy, aiming for complementarity rather than dependency. It’s vital to start with a basic approach and evolve your campaign structure as you gain more insights and experience. In plain language: your job is to feed Performance Max good data, and steer it toward your campaign objectives. That’s all.
The bottom line? When Performance Max works, it works really well. (Plus, Google will continue to push advertisers into PMax, so this is really an adapt or die situation.)
Also, bear in mind that Performance Max yields to finding the lowest hanging fruit first. That might make sense from a data-gathering perspective, but it isn’t always easy for advertisers to watch. There are some steps you can take to mitigate any potential damage, but by and large (especially at first) it’s to be expected. Equally, expect some wasteful ad spend. Performance Max will spend on placements that don’t make sense, and you have little to no control over it. Accept it as inevitable, and focus on what you can control.
Key Takeaways
Integration, Not Isolation: Performance Max should be part of a holistic digital marketing strategy with Google Ads. It is not the be-all and end-all of campaign types.
Monitor and Adapt: Stay vigilant about where your conversions in Performance Max are coming from, especially if you notice they are largely coming from brand terms and remarketing. This becomes extremely acute if you’re a lower spender.
Simplicity and Evolution: Don’t overcomplicate this. Begin with basic Performance Max campaign setups and evolve your strategies based on performance data.
In conclusion, Performance Max campaigns offer a unique opportunity to leverage Google’s extensive network through a single, automated campaign. By understanding its mechanics, impacts, and best practices, advertisers can harness the power of Performance Max to enhance their digital marketing efforts in Google Ads, driving more conversions and achieving their marketing goals with greater efficiency.
How to Set Up and Structure Performance Max Campaigns
Top 3 Essentials
Product Feed Optimization: The foundation of a successful Performance Max campaign is a solid, high-quality product feed. A common pitfall for many ecommerce advertisers is an under-optimized feed, especially when relying solely on basic integration tools like the Shopify App for the Merchant Center. There is no point spending money on Performance Max if your product feed isn’t fully optimized — so start here, first. You can also check out our YouTube video where we review the little tweaks you can make to optimize your Google Shopping feed for maximum growth. That said, this is what we’ve found moves the needle the most:
Ensure your product titles, descriptions, and images are clear, accurate, and optimized for search
Regularly update your feed to reflect product availability, pricing changes, and any special offers.
Budget Considerations: Performance Max campaigns require a minimum daily budget of $50 to be effective. So, if you can’t spend at least $50 a day on PMax, wait until you can. While success with lower budgets isn’t impossible, a budget of at least $50 per day significantly increases the likelihood of your campaigns benefiting from machine learning optimizations.
Correct Conversion Tracking and Settings: The accuracy of your conversion tracking directly influences the performance of your PMax campaigns. If you feed bad or incorrect data to the algorithm, you’ll get bad results. To avoid this:
Utilize the Google Ads tag for conversion tracking over GA4 imports. This is key because you can set up enhanced conversions with the Google Ads tag.
Enable enhanced conversion tracking for better attribution. If you are running a GA4 import, set up a Google Ads purchase tag with enhanced conversions, let it run for 30 days under ‘secondary,’ then compare the tags. If at that point it makes more sense to switch, switch (but DO NOT just set up a new tag and immediately switch it over).
Focus on purchases as the primary conversion goal for Performance Max campaigns. Just because someone makes it to your shopping cart, it doesn’t mean they are your target audience. Traffic that doesn’t make it to checkout is probably not the traffic you want to go after. You can (and should) set specific goals within the campaign settings. And, for our money, those goals should be exclusively around purchase data.
Campaign Structure Best Practices
When it comes to structuring your campaigns in Performance Max, simplicity is key. Overcomplicating your campaign structure can (and often does) hinder performance. At Grow My Ads, we’ve seen so many clients build out multiple PMax campaigns and allocate too little budget to each — resulting in ineffective campaigns with limited data and poor results. Instead, you should aim to consolidate your efforts as much as possible without sacrificing strategic segmentation. The bottom line: keep it simple when starting out.
Here are a few additional points to keep in mind:
Consolidate: The goal is to consolidate as much as possible. This does not mean putting all of your products in one asset group and calling it a day, but rather taking a more nuanced approach.
Increase Data: Smart Bidding works best with more data. This is why consolidation is usually better. You need around 50+ conversion per month from a Performance Max campaign for it to run smoothly. When you have less segmentation, you get more concentrated data, which trains Google’s machine learning to drive better and better leads. This is especially critical if you’re just starting out, as you’ll want as much data in one campaign as possible.
Use an Optimized Campaign Structure: Your campaign structures will depend on the product categories, products, and amount of SKUs you sell.
That said, there are several reasons to segment campaigns. You can benefit from segmentation when there are:
Budget or Bidding Differences: We’re going to be bidding higher on our best sellers than we bid on our low performers, for example.
Campaign Settings: It’s a good idea to have some segmentation if you are targeting different geographical areas
Seasonality: If you have certain products that do well during certain holidays or seasons, it can make sense to break those out into their own segmented campaign types (for example, Halloween costumes at Halloween).

New Products or Product Categories: Introducing a new line of products? Testing them in a separate Performance Max campaign can help you collect data on what works (and what doesn’t).
Zombie Products: “Zombies” are products that get 0 impressions or clicks in your main Performance Max campaigns. Separating them out into their own campaign can be useful, as this will force the algorithm to start giving them impressions and clicks. Remember, Google is incentivized to hit your predetermined campaign goal. Therefore, it is going to double down on the products and audiences that it knows perform well. If you want to experiment and test new products, you’ll have to force it to give them clicks (by creating a new campaign).
Beginner’s Guide to Performance Max Campaign Structure
When you’re first starting out with PMax, campaign structure is key. This is what we find works best for beginners:
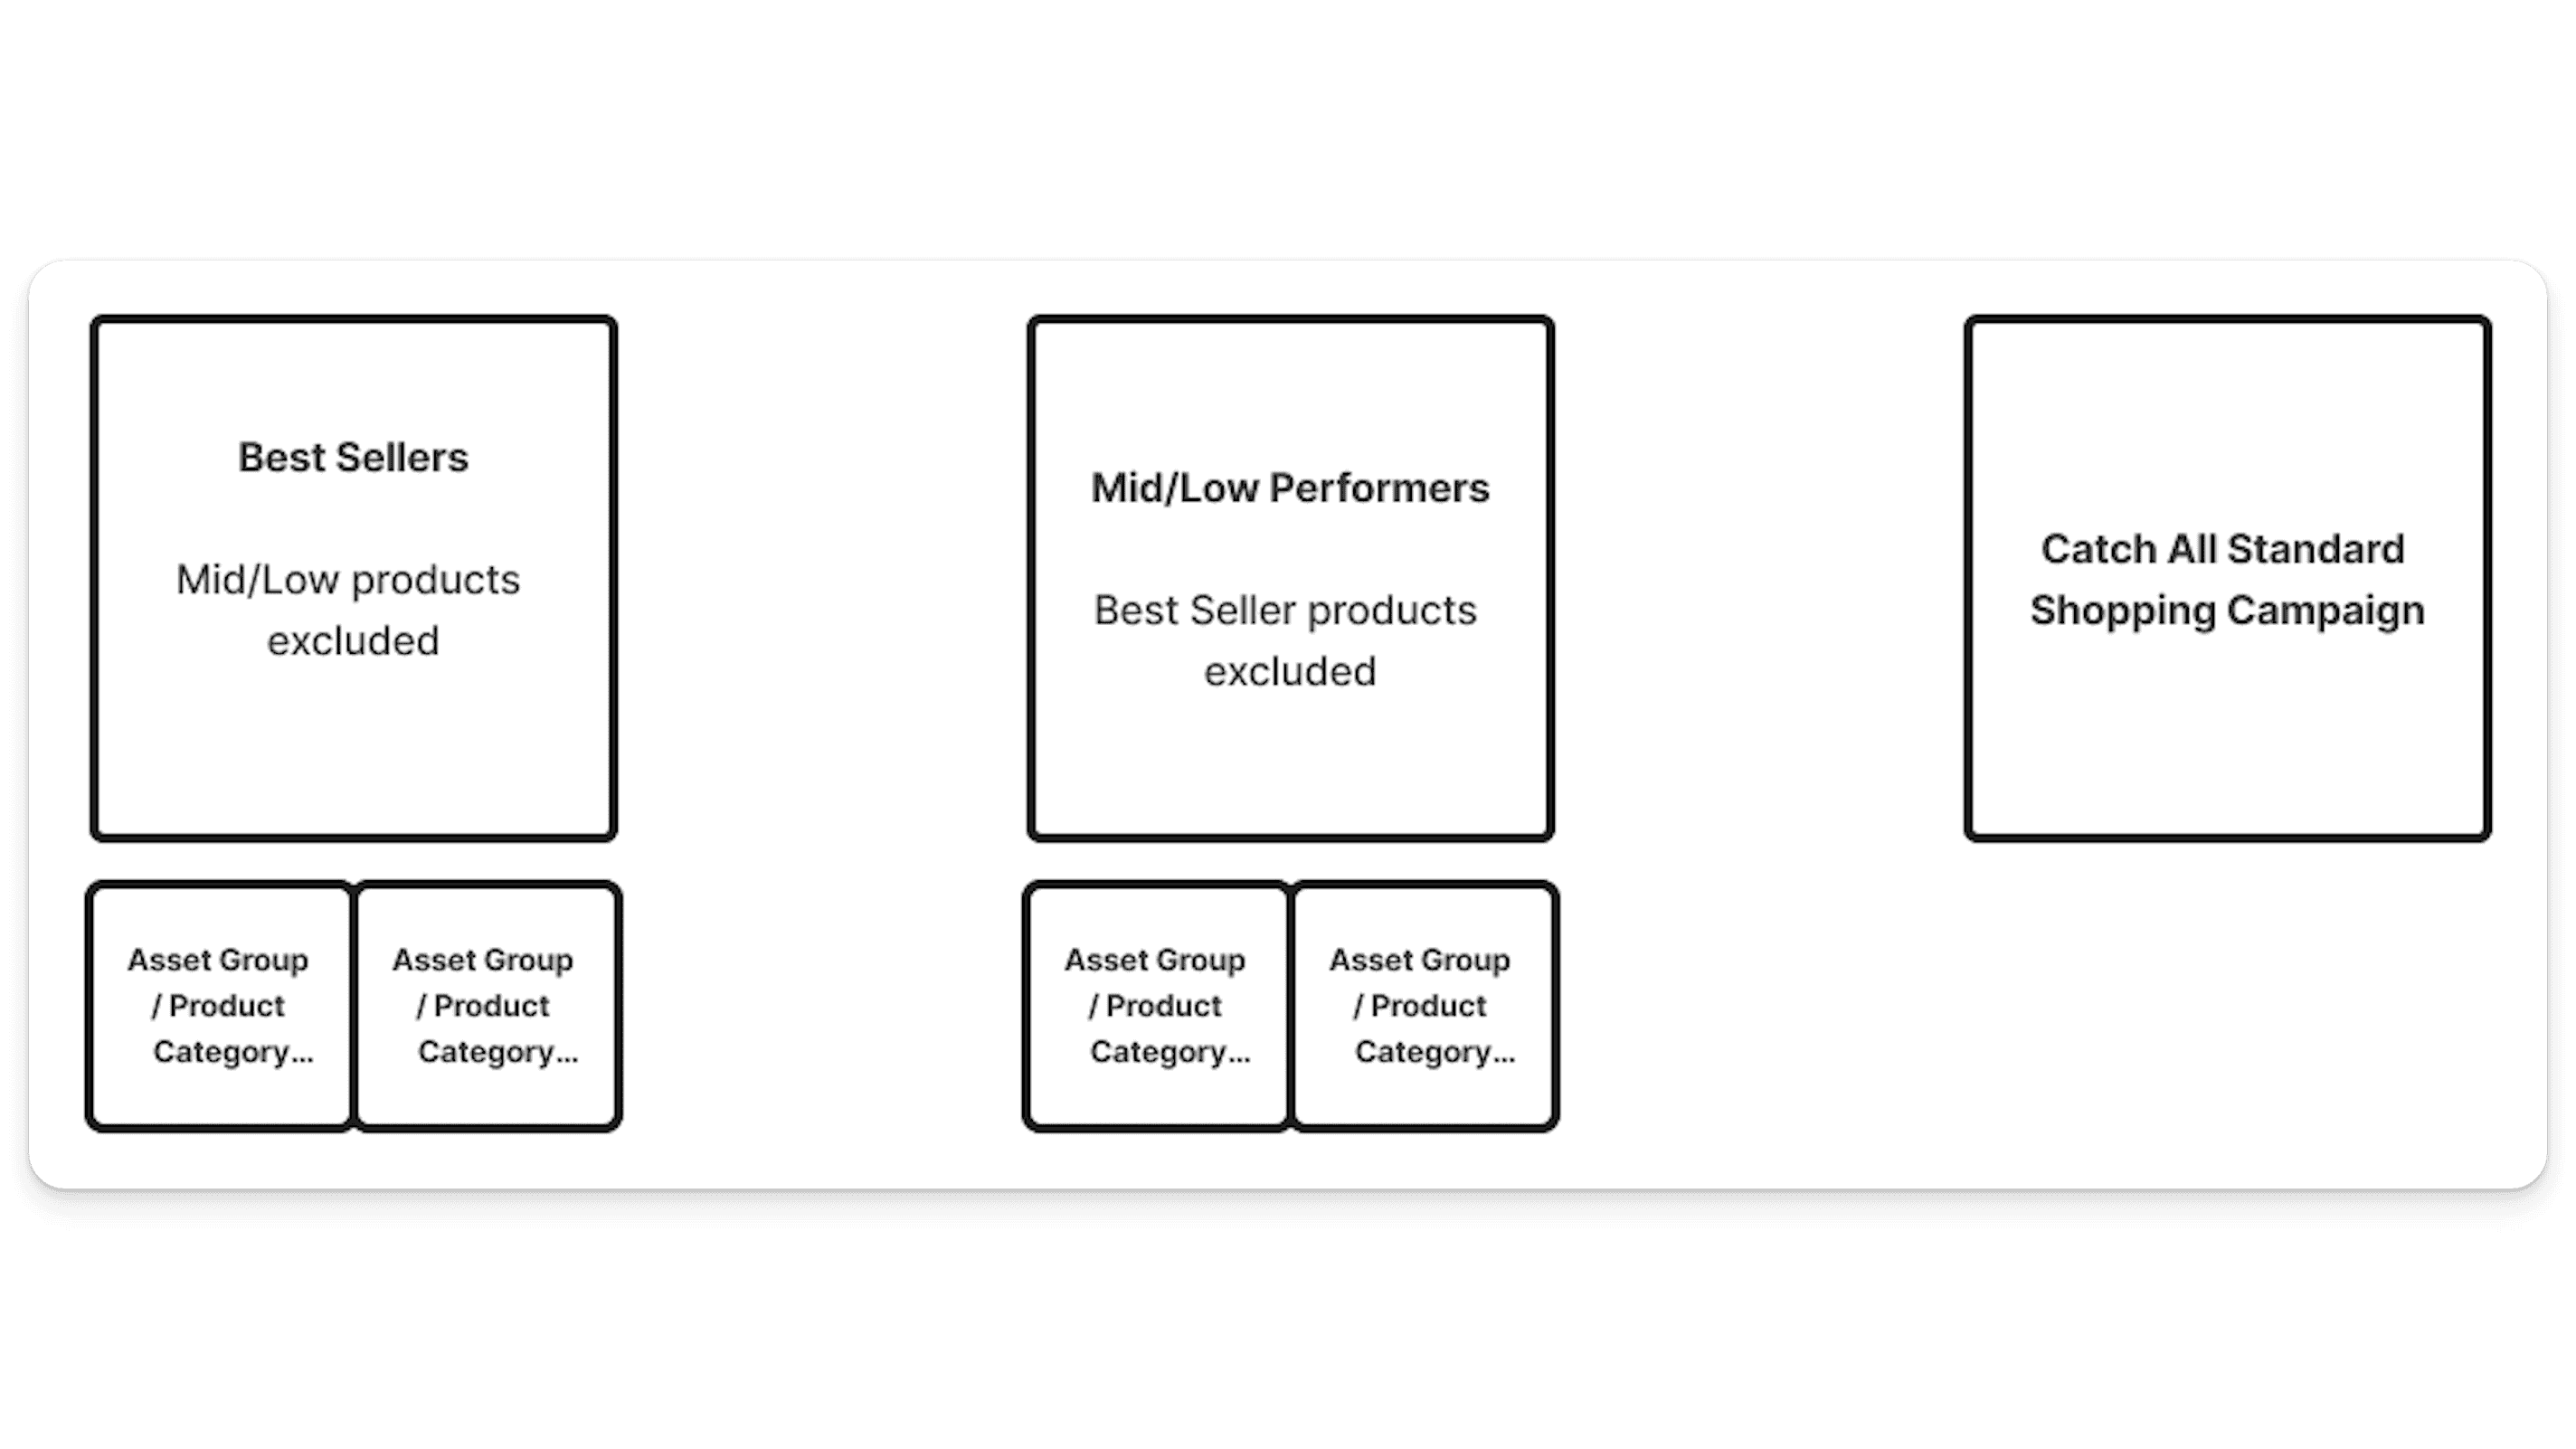
Start with a best-selling product or product category. These are the products that you already know sell really well on your website or on other channels. Within your Best Sellers campaign, you can break out the asset groups by product categories or brands. Be sure to include only your best-selling products in this campaign.
Then, build a second campaign for your Mid/Low Performers. When creating this campaign, remember to exclude your Best Sellers to avoid cannibalization. The goal with this campaign is to find products that also sell quite well, and then add them to your Best Sellers campaign.
Finally, build a Catch All Standard Shopping Campaign as a safety net.
This is a very solid campaign structure for those new to Performance Max. That said, if you do not have the budget to generate at least 50 conversions per month from your Mid/Low Performers campaign, stick with a Best Sellers campaign and let your mid/low performing products live in the Catch All Standard Shopping Campaign. The goal is to feed the algorithm enough good data to help it identify your ideal audience.
Advanced Performance Max Campaign Structures
For larger accounts or those with complex needs, a more nuanced approach may be necessary. In these cases, this is the structure we tend to recommend:
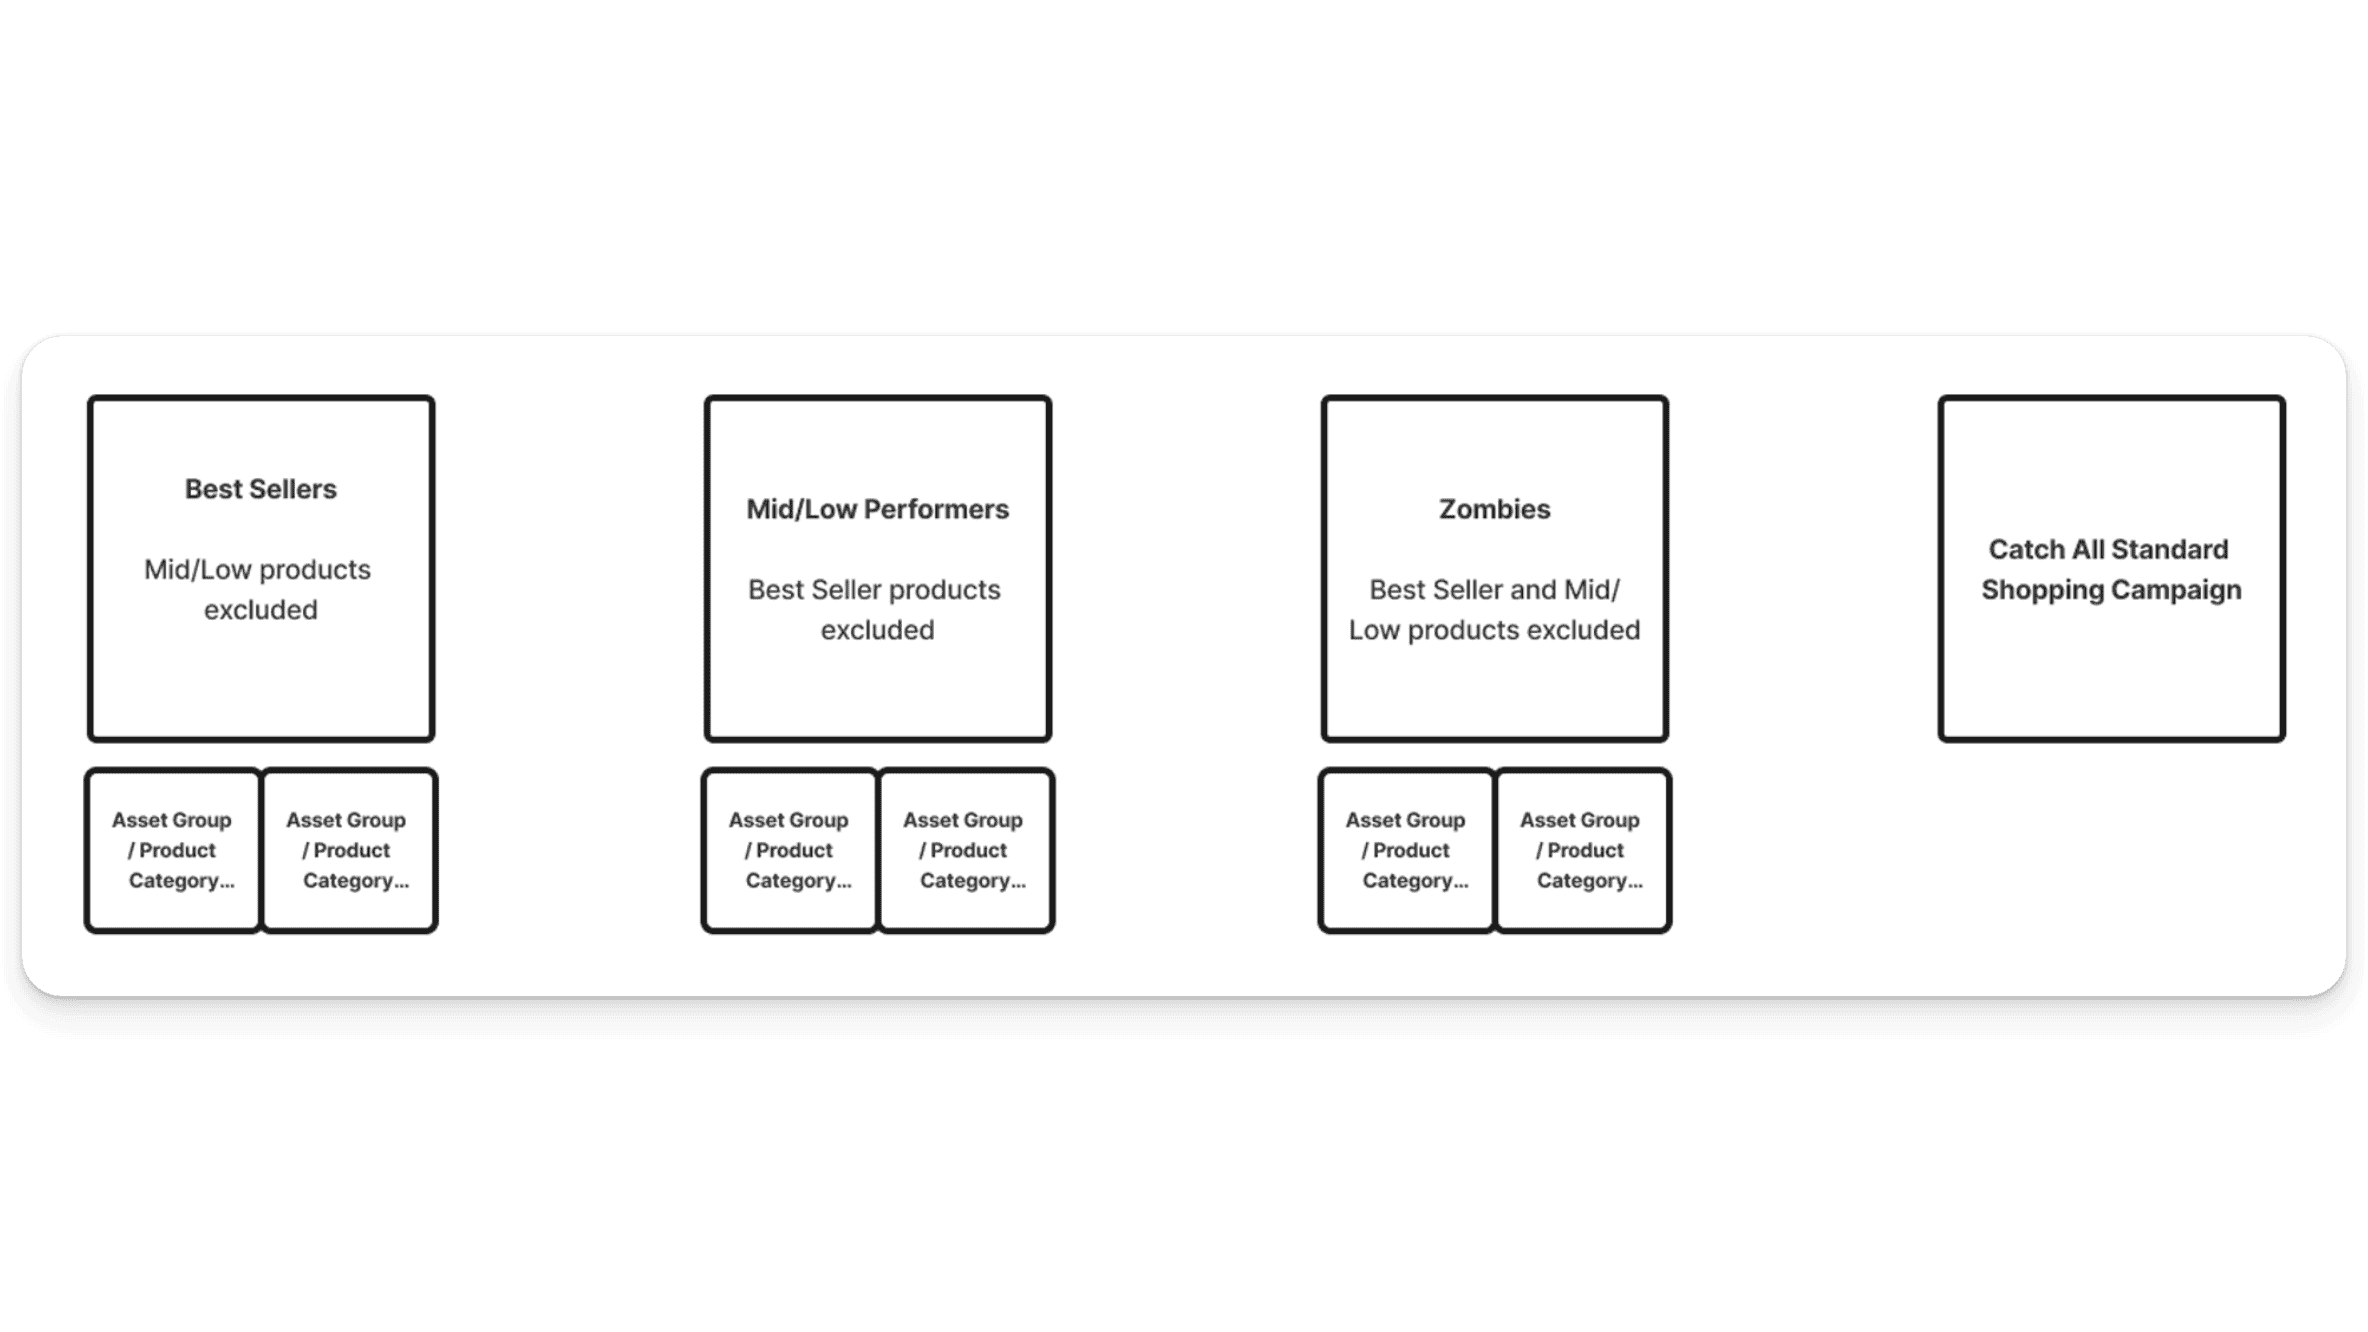
First, you’ll have your Best Sellers campaign (with mid/low performing products excluded, and asset groups split out by product categories or brands depending on what strategy seems best for your particular store). Ideally your spend here is uncapped (assuming it is hitting your campaign goal).
Then, as before, you’ll create a second campaign for your Mid/Low Performers (with your Best Sellers excluded). You’ll want to allocate enough budget to this campaign to ensure it can hit 30-50 conversions a month.
Where things start to differ from the beginner’s campaign structure is with the Zombies campaign. “Zombies” are products that do not get any impressions or clicks in your Mid/Low Performers campaign. By moving these (extremely) low performing products out into their own campaign, you force Google to give these products clicks — which enables you to better diagnose the problem. When building a Zombies campaign, be sure to exclude your Best Sellers, as well as your Mid/Low Performers. You may not be able to get the zombie products to work, but you’ll want to give them a chance, so we recommend spending at least $50 per day.
Finally, create a Catch All Standard Shopping Campaign as a safety net to capture any products which have been accidentally excluded from your main Performance Max campaigns, or to mitigate any other issues that might cause these products not to fire in PMax.
If you are running a big account or are spending a lot on Performance Max, replicate this structure for product categories as necessary. For example, you might have separate, identically structured campaigns for Office Furniture and Bedroom Furniture. So, you’ll want office furniture Best Sellers, office furniture Mid/Low Performers, and office furniture Zombies. Ditto bedroom furniture. The Catch All campaign can include everything from both categories.
How to Handle Underperforming Products
Products that do not perform well in the Mid/Low Performers PMax campaign should be moved to a Standard Shopping campaign for more granular control. This allows for manual adjustments and testing before potentially reintegrating successful products back into your Performance Max campaigns.

Why do we recommend this? Simple. If you have products or product categories that aren’t doing well in the Mid/Low Performance campaign, we don’t want to give up on them yet. So, instead of excluding them all together, move them to your Standard Shopping campaign. If they start to work, you can revive them by moving them back into one of your Performance Max campaigns. If they don’t, it may be time to reconsider spend.
Best Sellers Performance Max + Standard Shopping Hybrid
This is a great option if you don’t have the budget for multiple campaigns. Here, instead of running a Mid/Low Performers campaign, you can simplify it down to Best Sellers and Standard Shopping. This hybrid approach allows you to leverage the strengths of both campaign types to maximize overall performance.
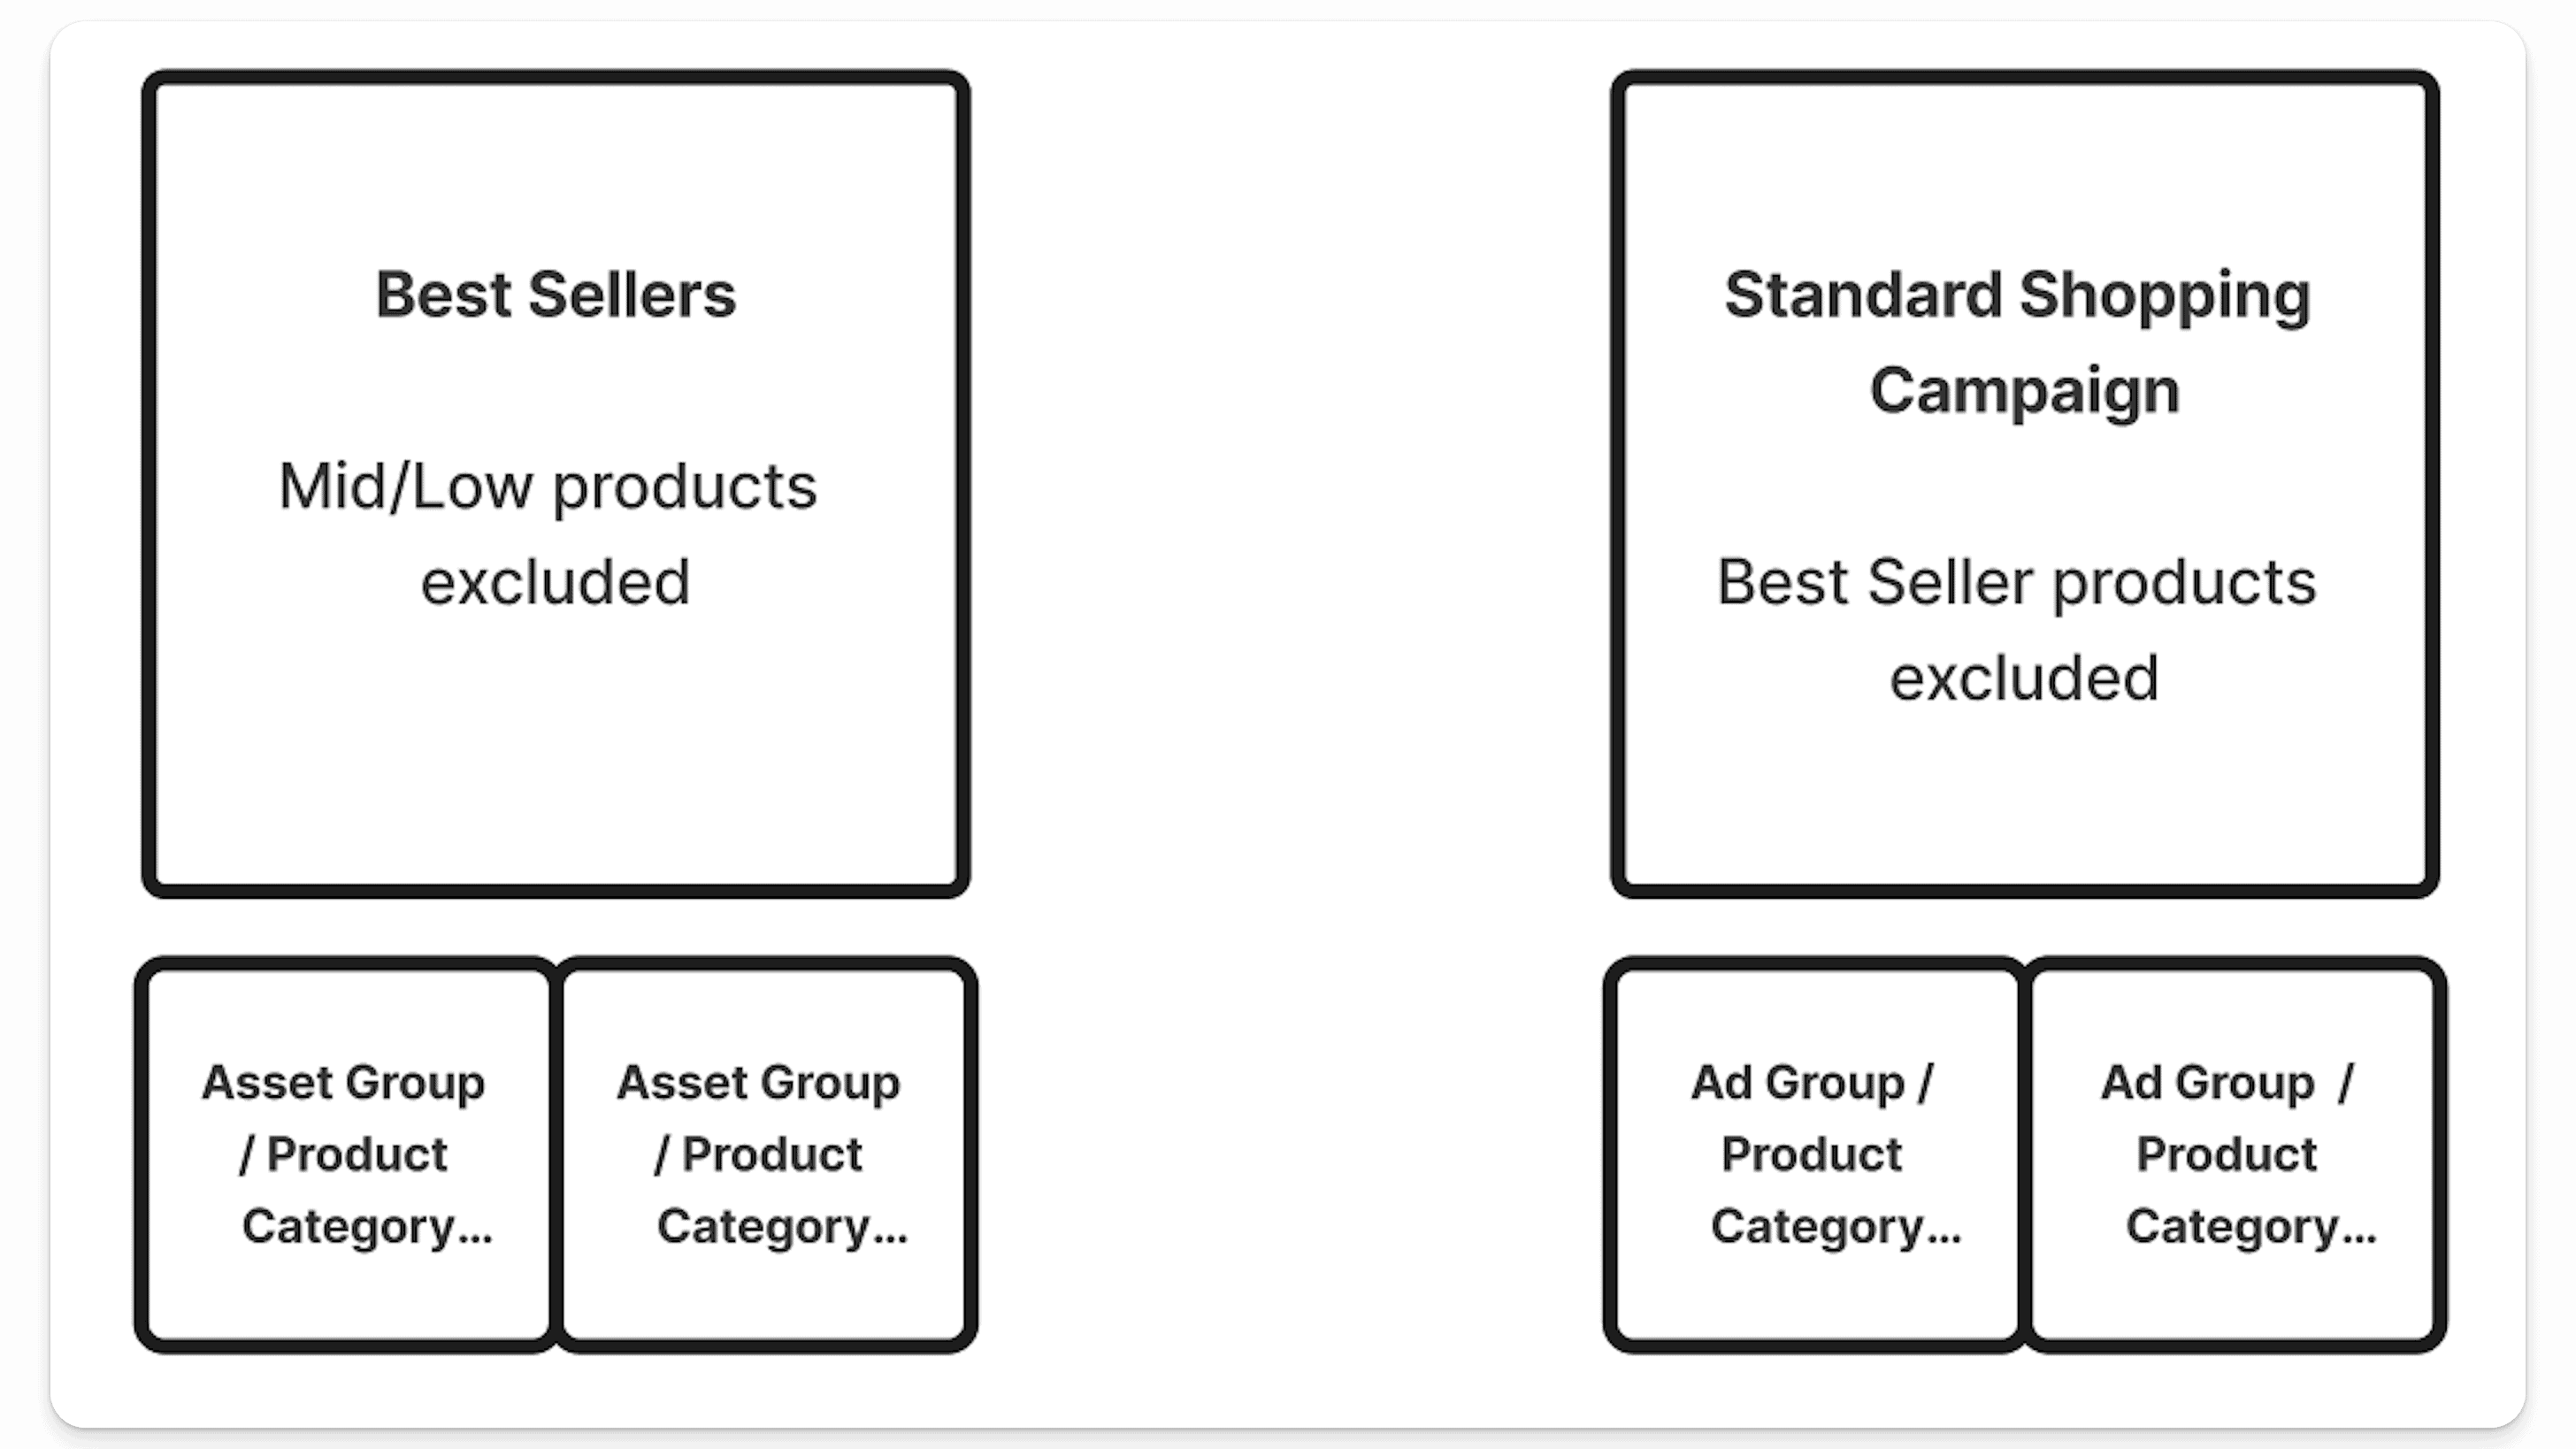
In this scenario, your Performance Max Best Sellers campaign is the kingmaker. This is where all of your top products and product categories would go. Everything else lives in your Standard Shopping campaign.
As before, this is not set in stone, and if certain products do well in Standard Shopping you can move them into your Best Sellers campaign.
Asset Group Structure and Best Practices
When it comes to Asset Groups, you have two options: Feed-Only and All Assets. Here’s a quick overview of each:
Feed-Only Asset Group: This replicates Smart Shopping, and involves running a product feed with no assets. The only inventory your ads will show on are Shopping ads and Dynamic Product Remarketing ads. This is a very conservative way of testing Performance Max.
All Assets Group: With All Assets, you are giving Google the ability to show your ads on all of their ad inventory — from Display to YouTube. This is what Google had originally intended Performance Max to do. Feed-only is a bit of a loophole right now.
If you’re just starting out, start with a Feed-Only Asset Group. Once you’ve gotten that dialed in, you can start adding assets.
Best Practices
The goal of Asset Groups is to group related products or product categories together and create the most relevant asset creative to match those products or product categories. Lumping all products into one Asset Group is not a good idea. Having men’s shaving products and women’s hair dryers in the same Asset Group makes no sense, as it will be impossible to create asset creative that is relevant for both of these audience types (without being too generic). Instead, you’ll want something like the example below:
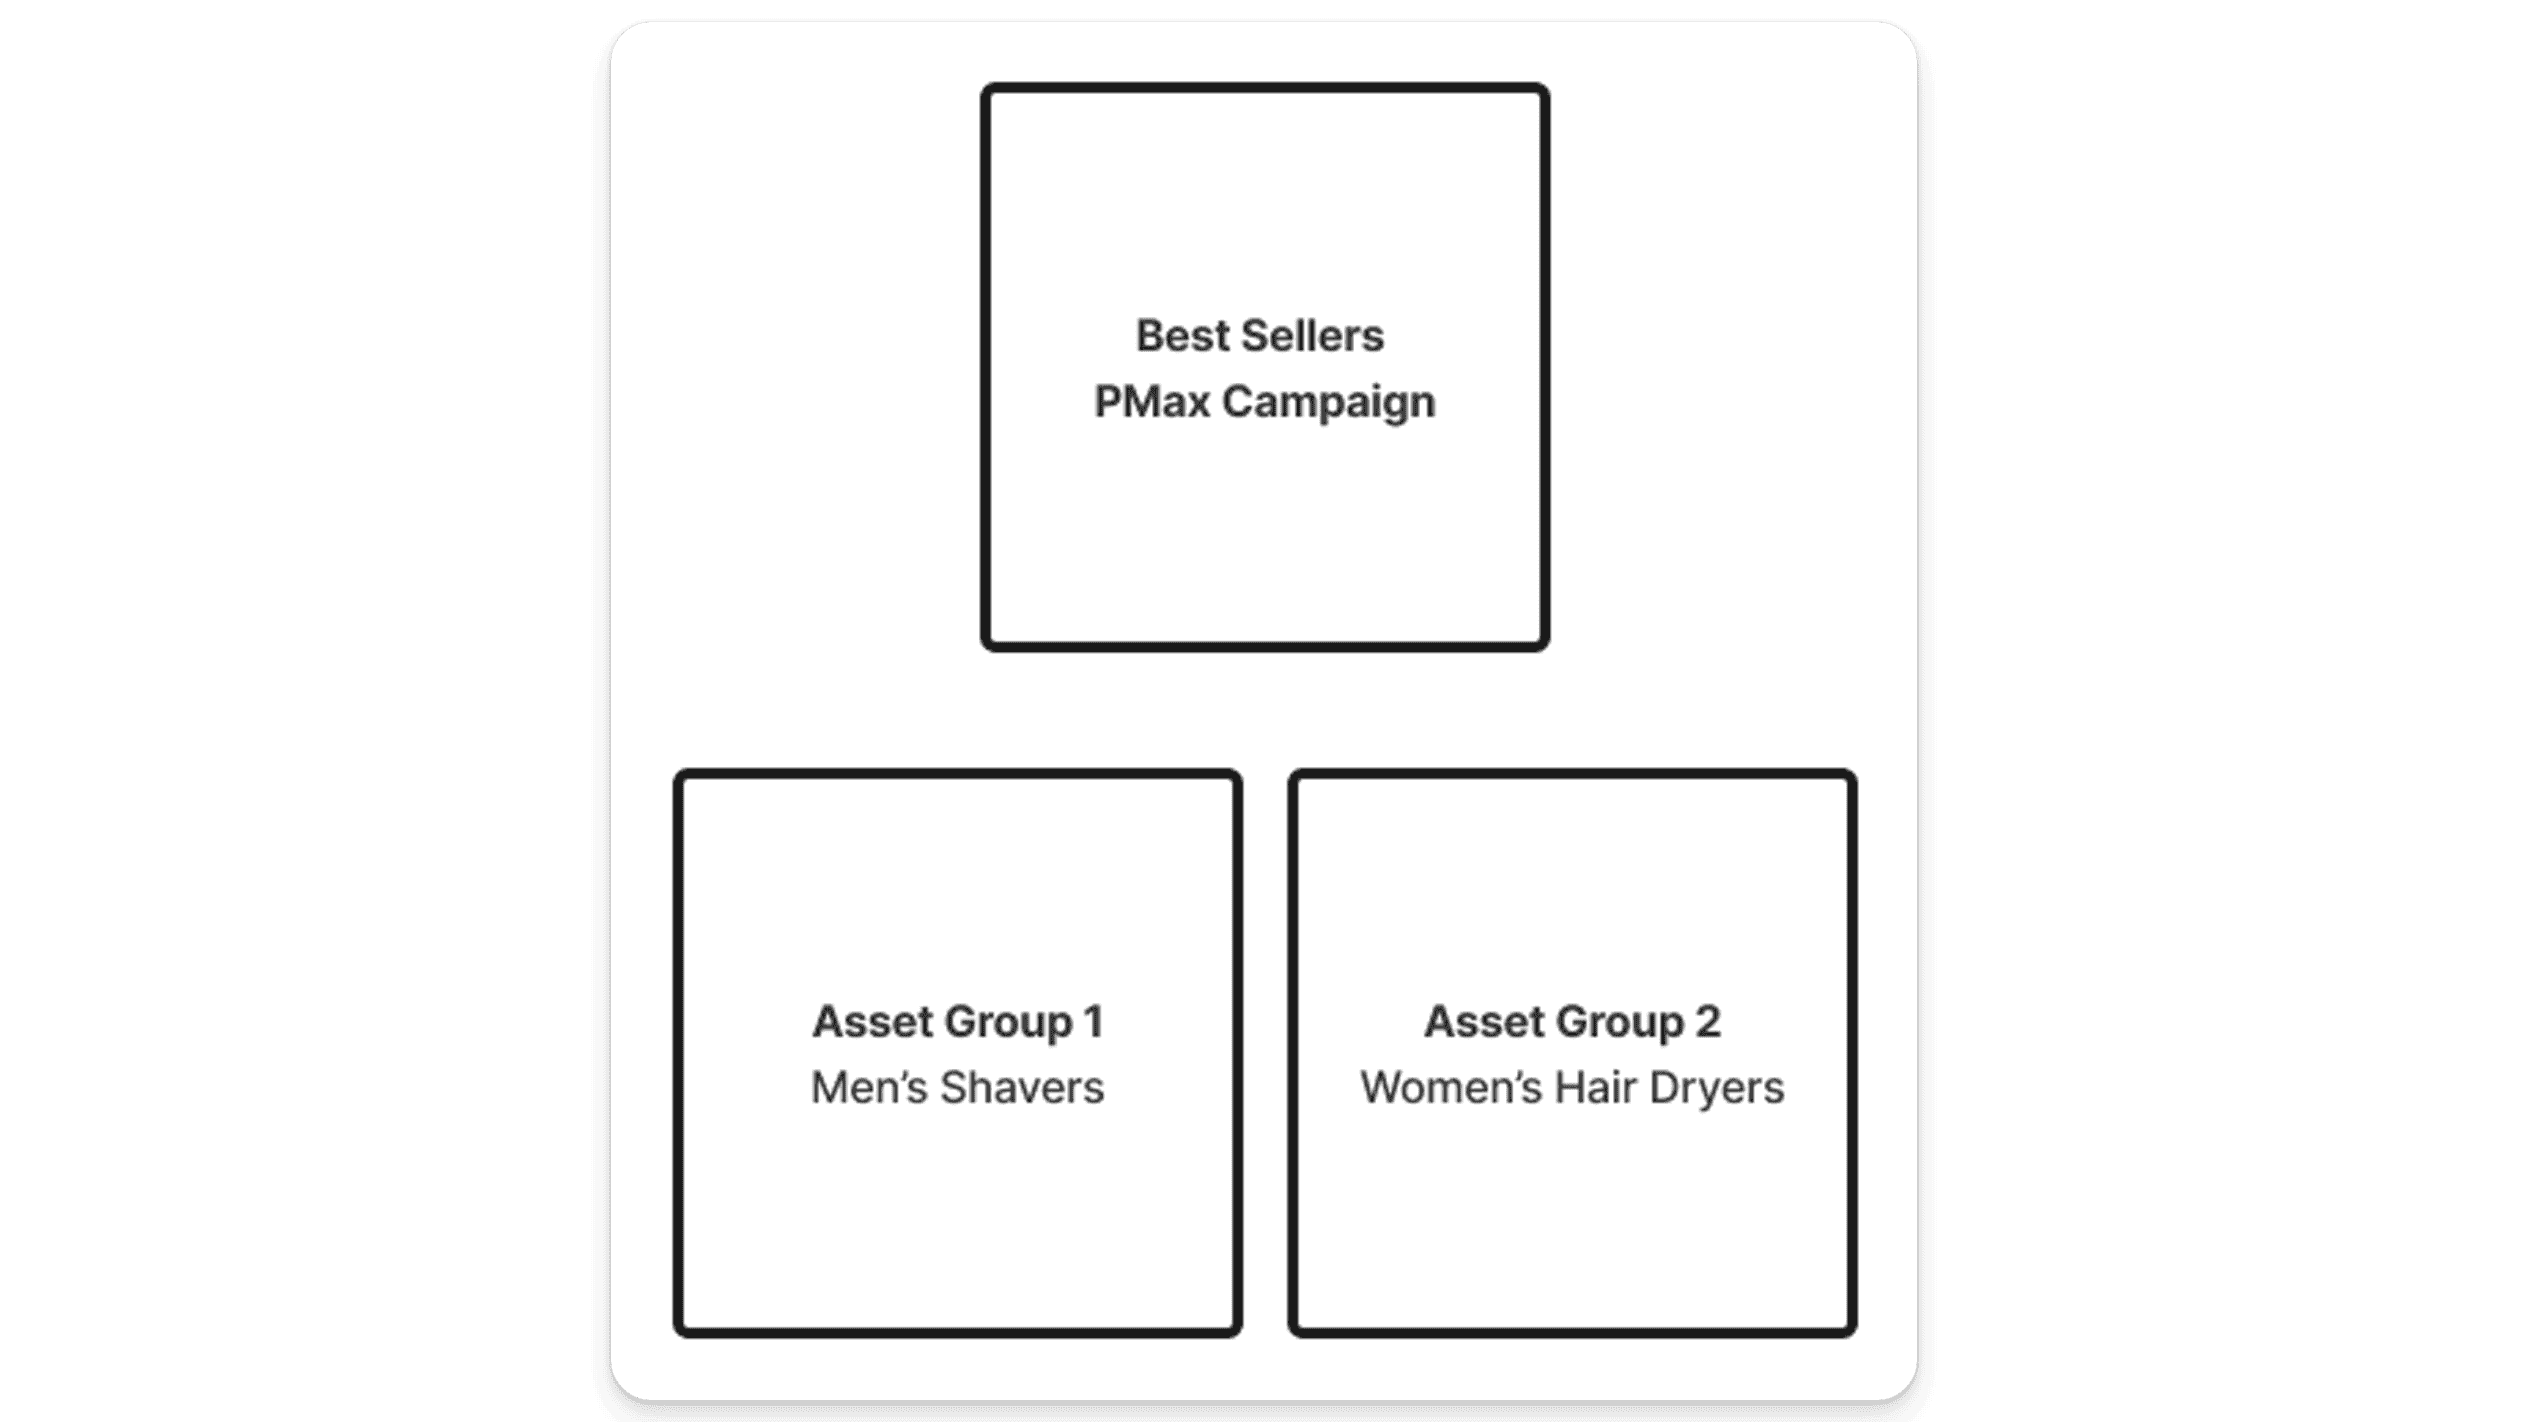
Here we have multiple product categories inside of this one Best Sellers Performance Max campaign — one Asset Group for Men’s Shavers, and another for Women’s Hair Dryers. With this arrangement, we can build out images, ad copy text, and video around both of these very different products.
Quick note: do not build out duplicate Asset Groups just to test different Audience Signals. Google will split your traffic between them, and your account may be ruined.
How to Set Up Feed-Only Asset Groups
Setting up a feed-only asset group in Google Ads is pretty straightforward. First off, create a new asset group. Then skip everything else except making sure your products are set up in listing groups:
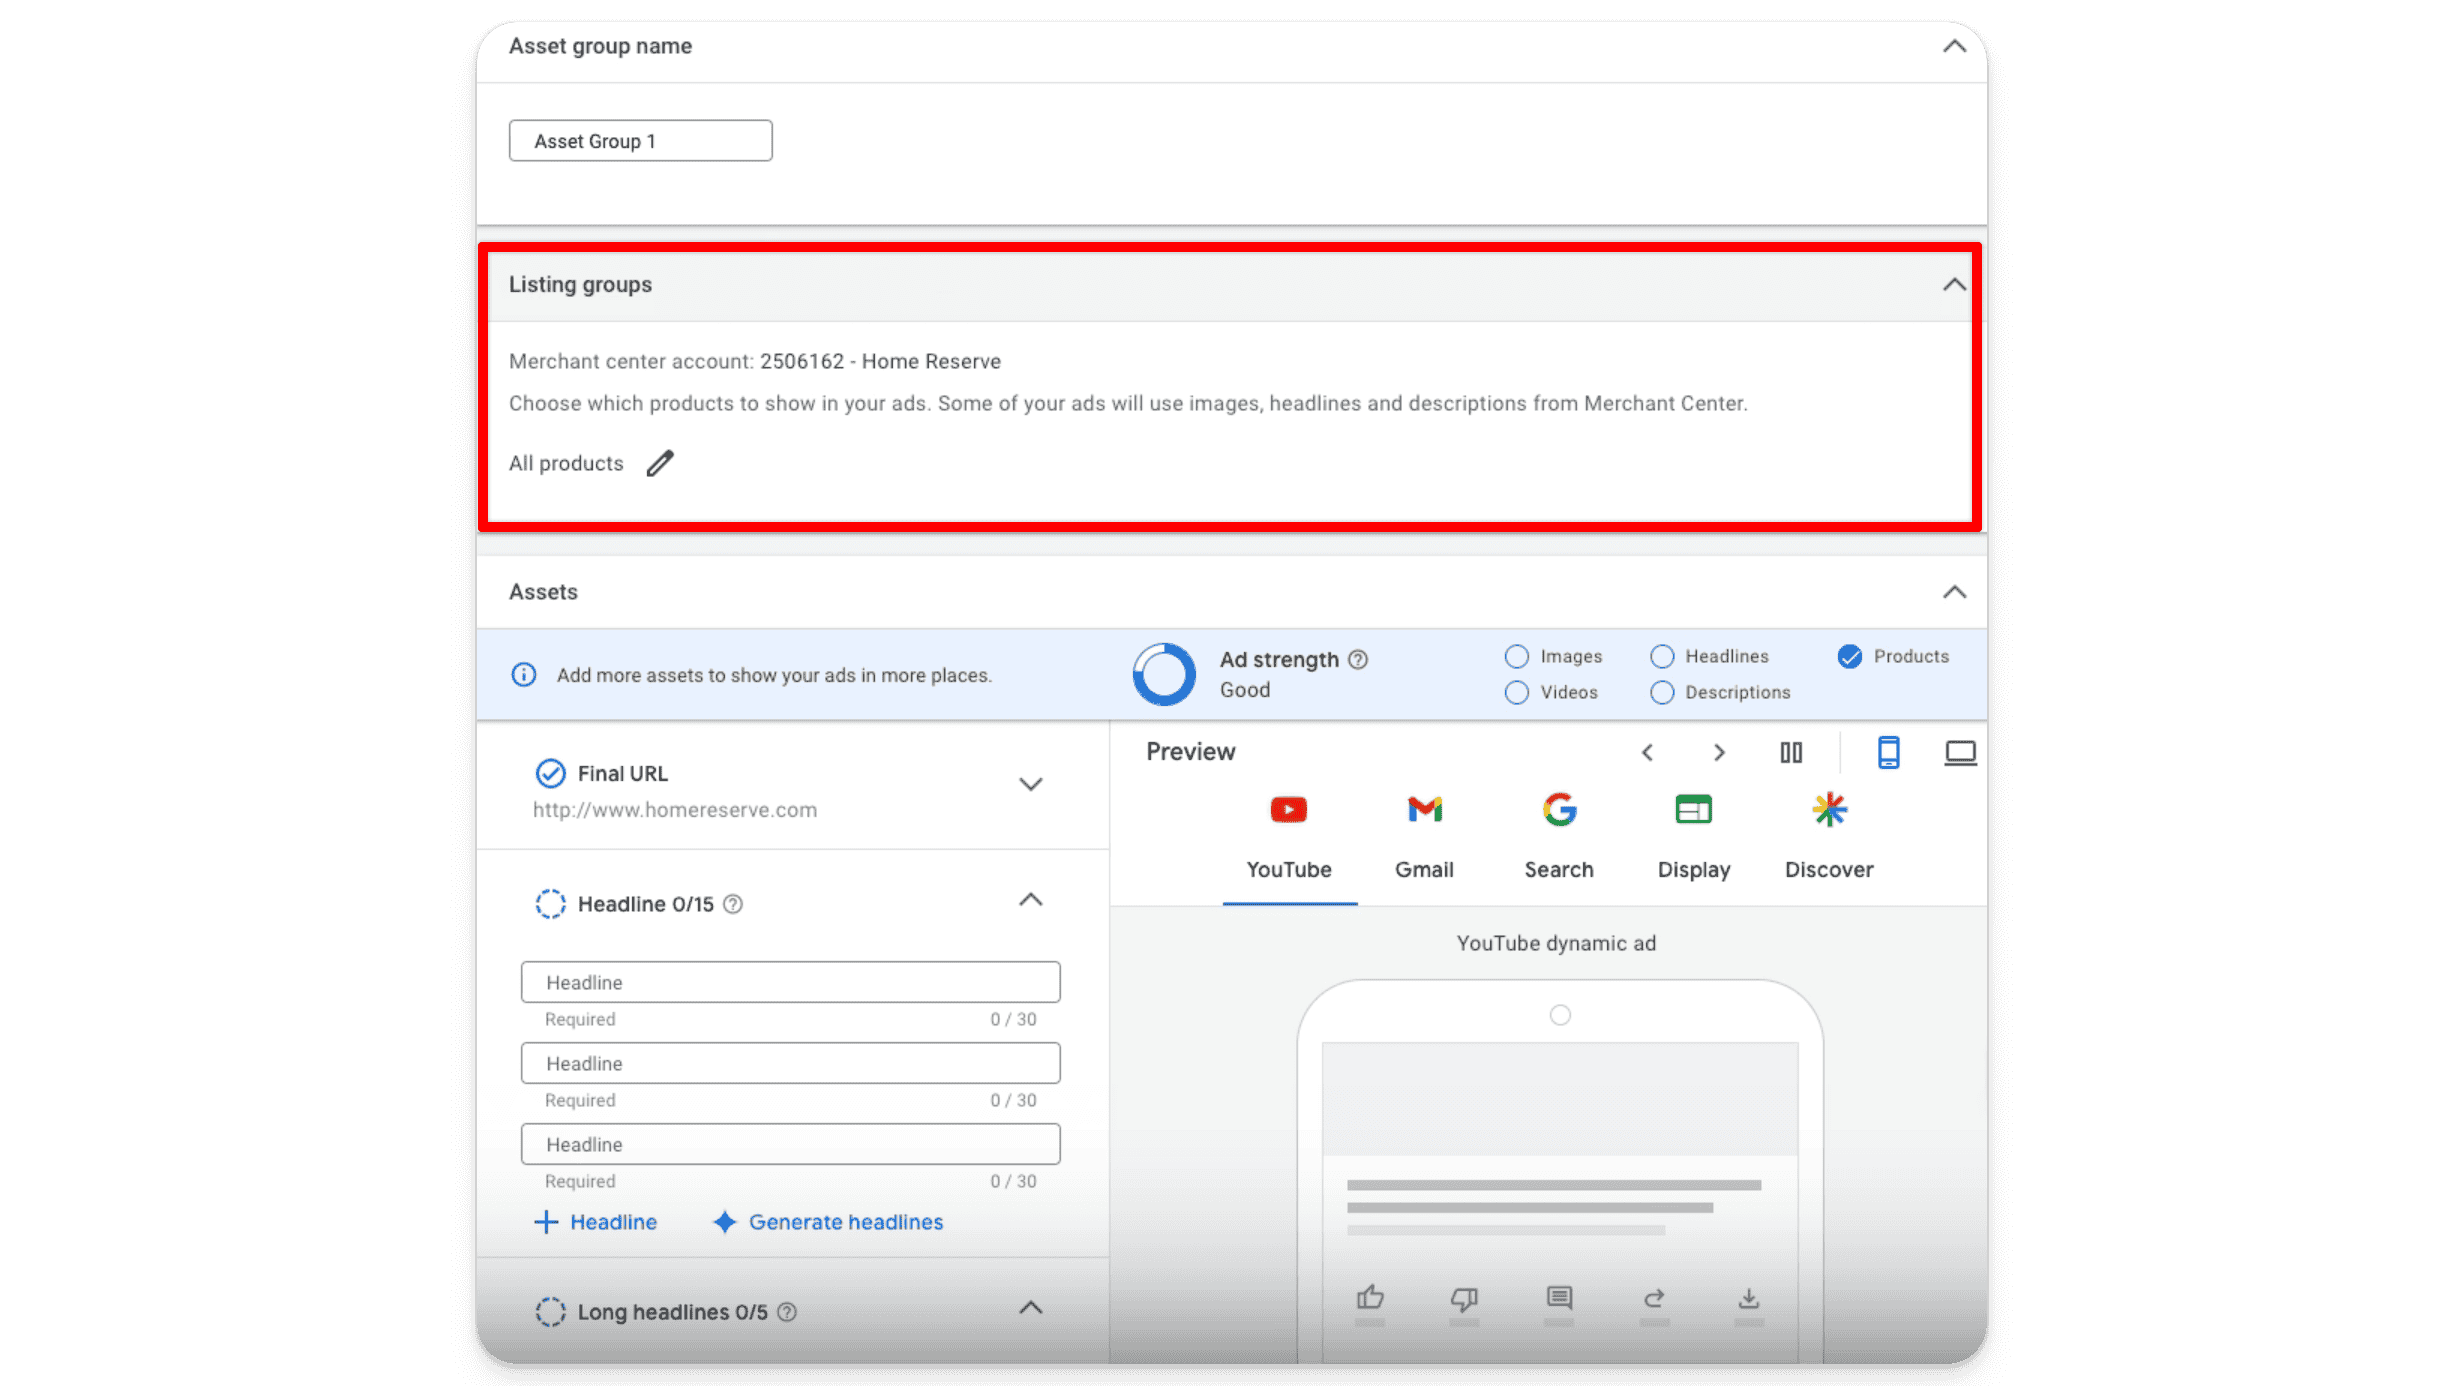
That’s it — no frills, no fuss. Just your products, and nothing else. If you’d like to get a bit more targeted, you can add audience signals (but this isn’t necessary).
Then, hit save and you’ve set up a feed-only asset group!
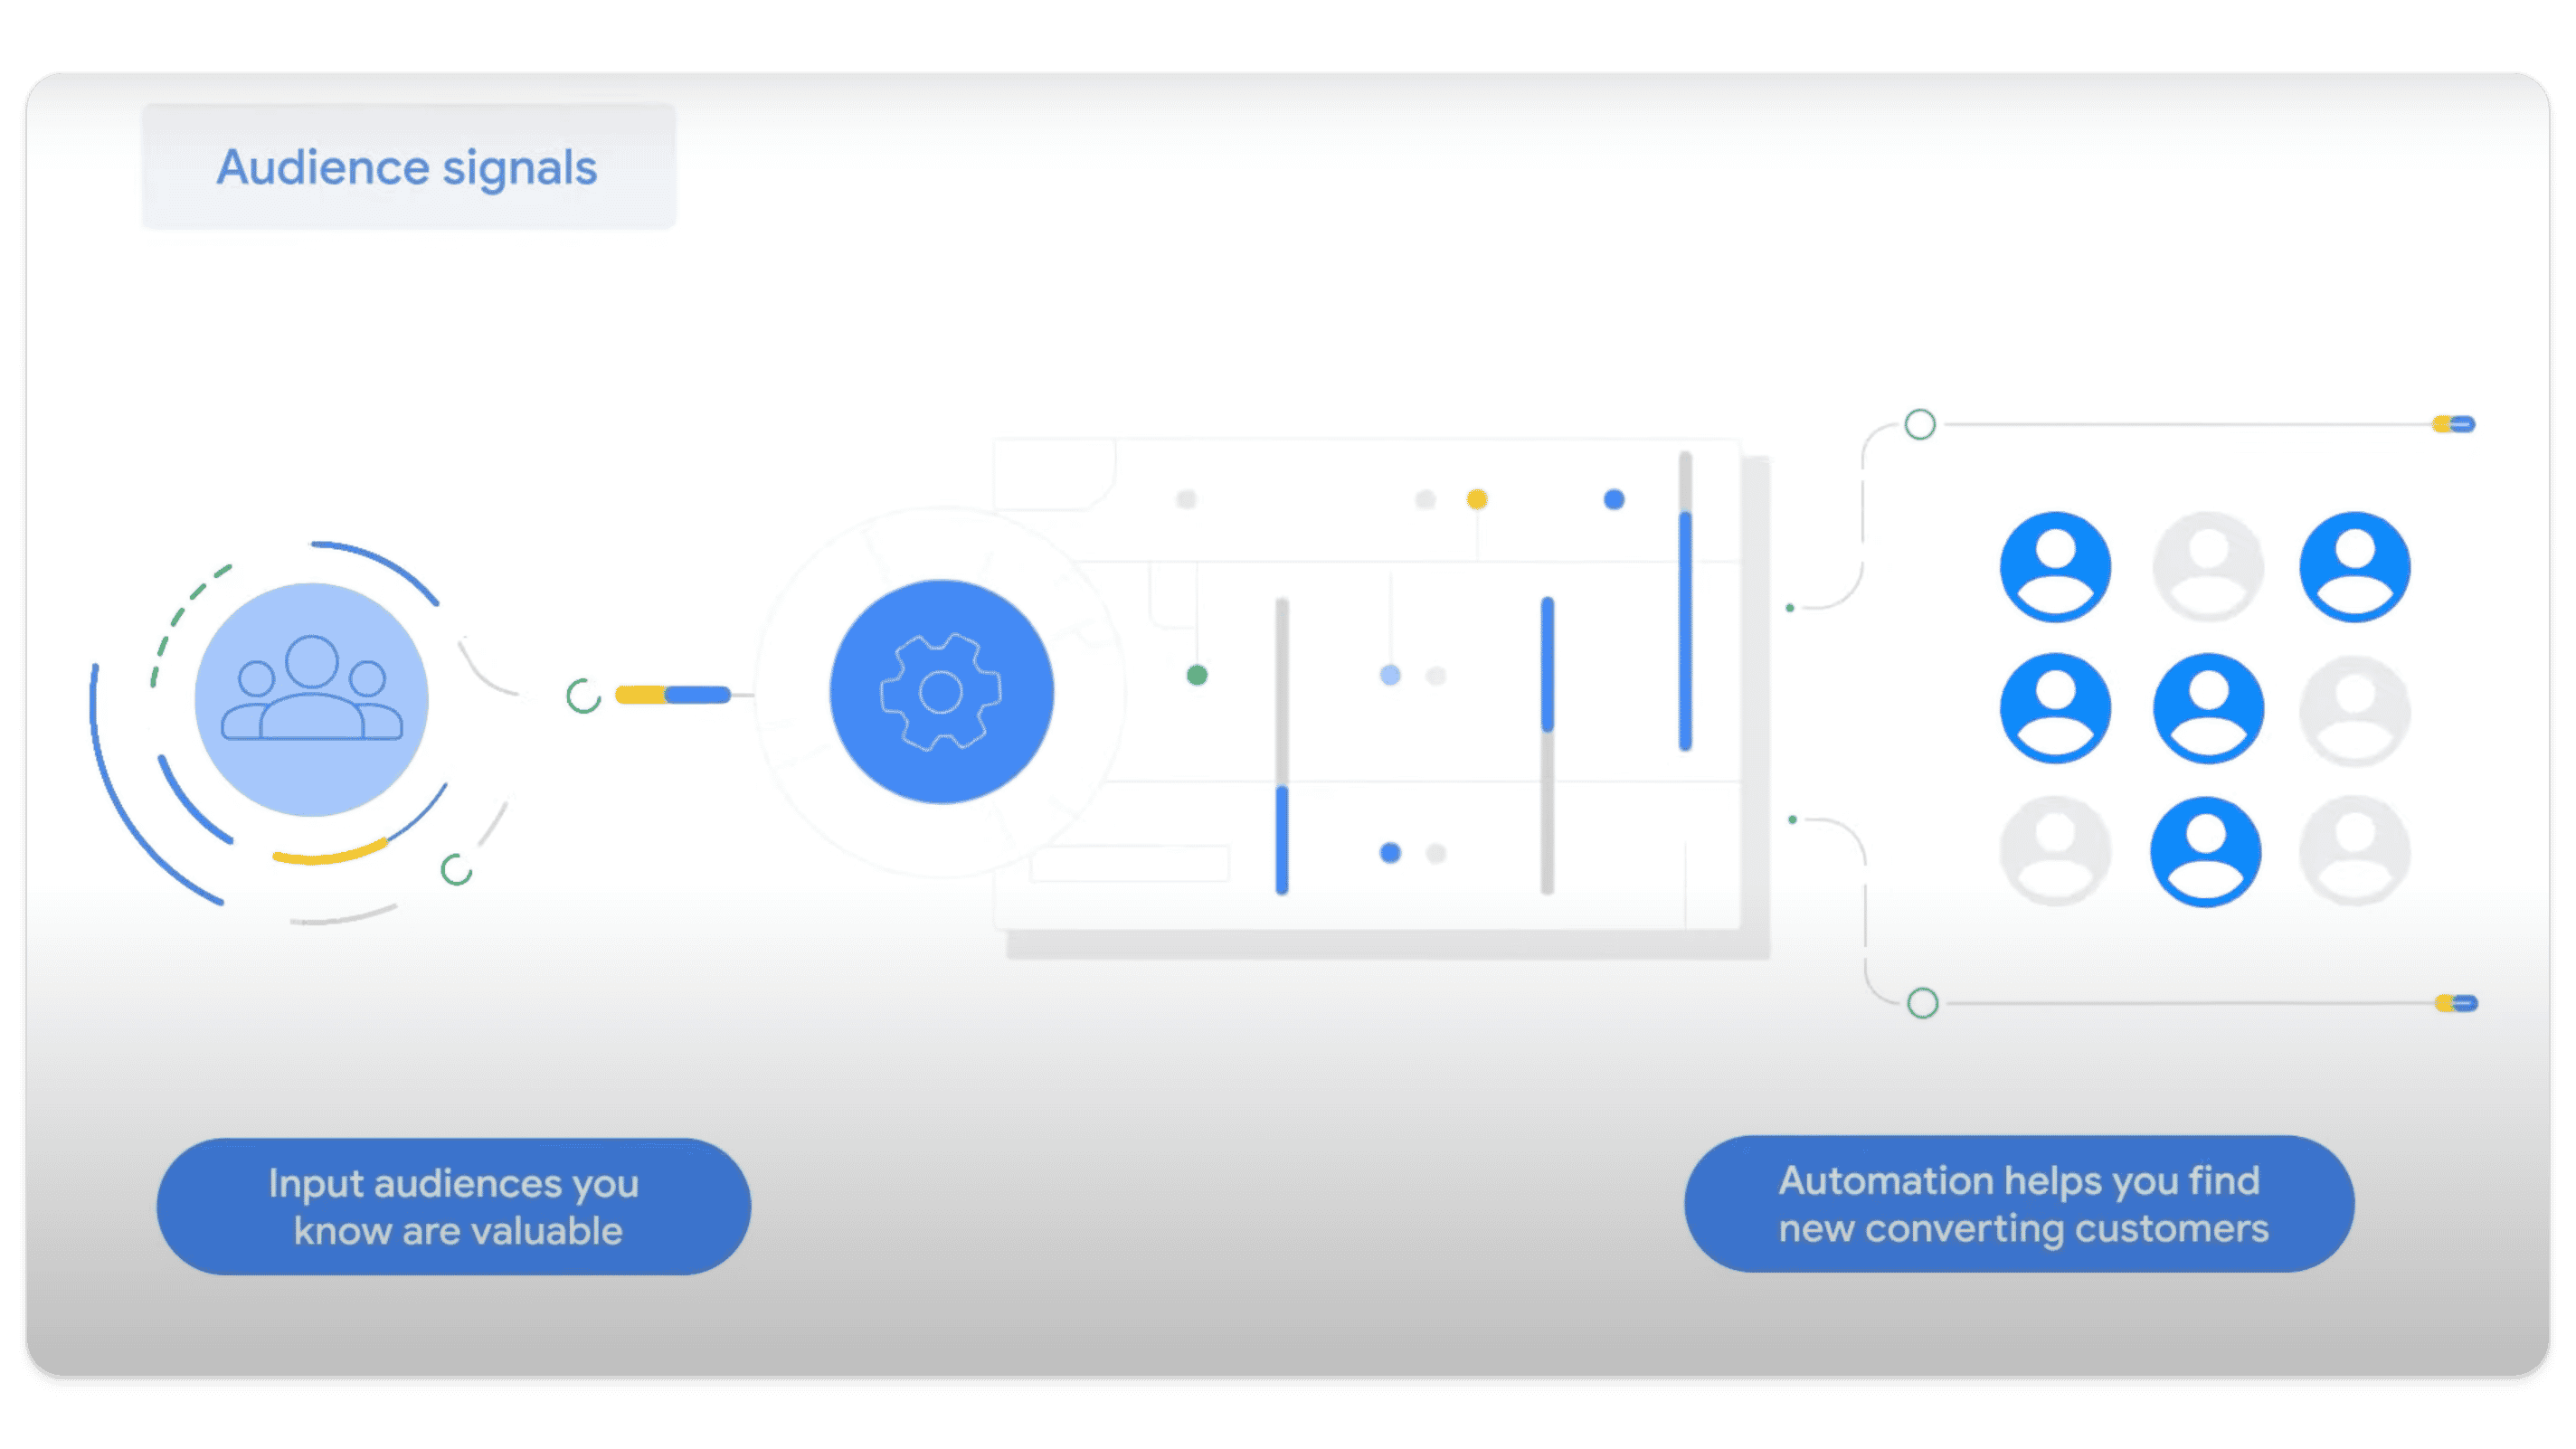
Audience Signals
Audience signals help steer Google’s machine learning in the right direction. This is especially important in the beginning (for new accounts, new campaigns, or even new asset groups where you do not have a lot of conversion data), but becomes less important over time. Google will not just target your audience signal — it is simply your way of telling the algorithm what audiences are important to your products. As the algorithm begins to accumulate more and more conversion data, it will go off on its own. That’s why it is usually best to keep audience signals simple.
Audience signals can include:
Custom segments
Search themes
Remarketing audiences
Interest and detailed demographics (like in-market and affinity)
Audience Signals Best Practices
If you are running a new account, you should put your top performing search terms in the Search Themes. However, if you have an account that has been running for a long time, has lots of historical data, and is performing well, then there’s no need to use Audience Signals when building out new Asset Groups. Google already knows who your audience is.
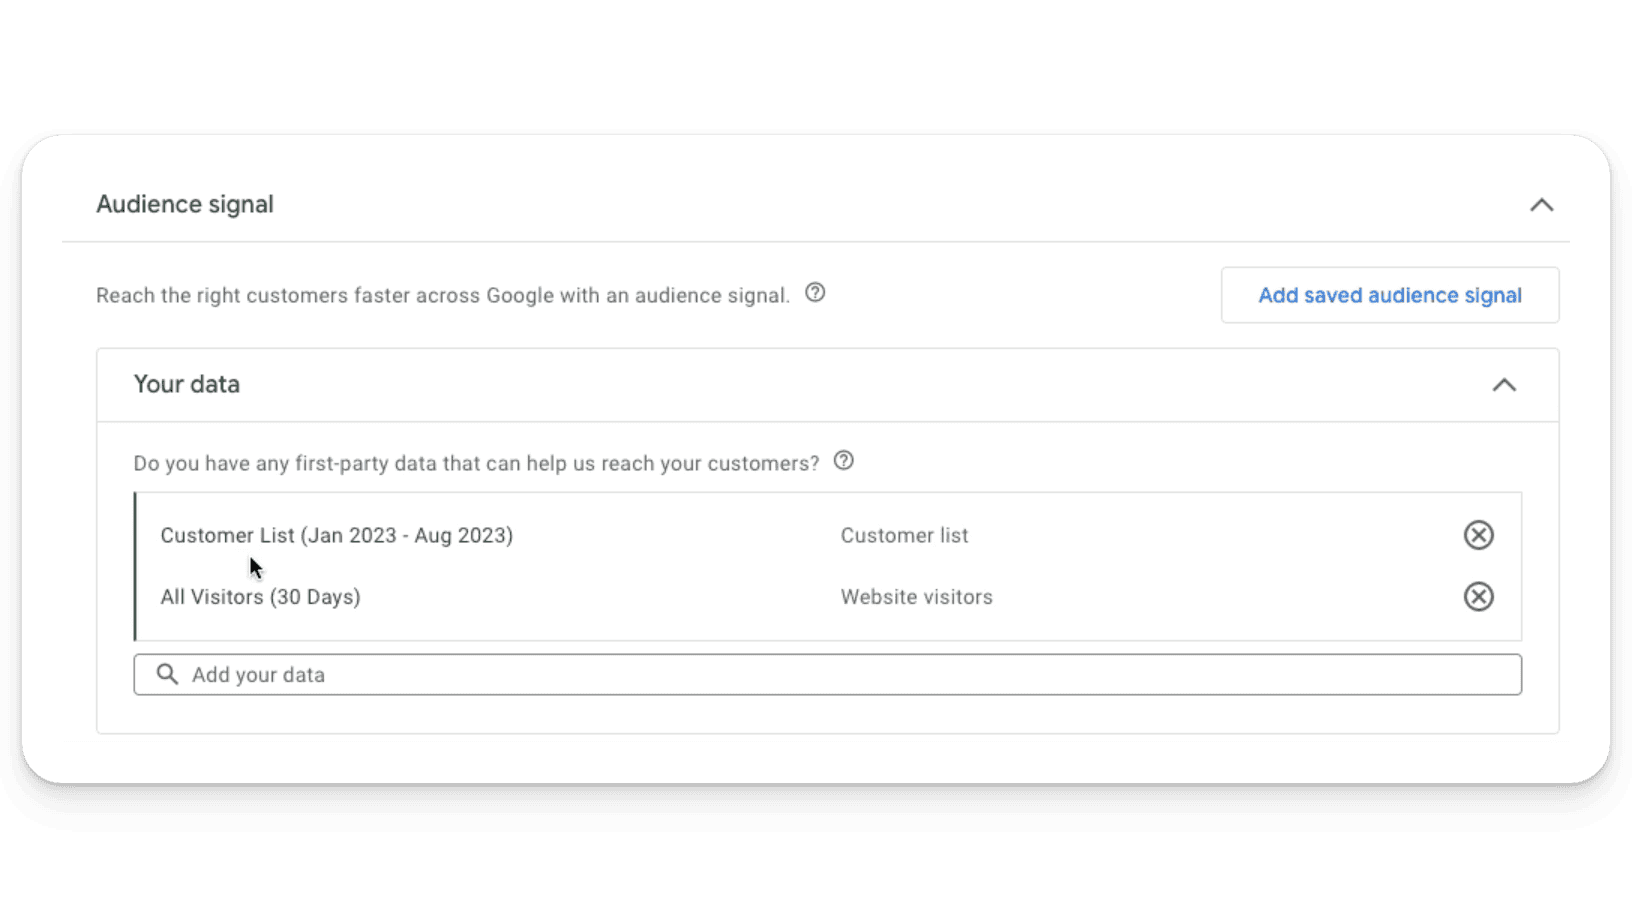
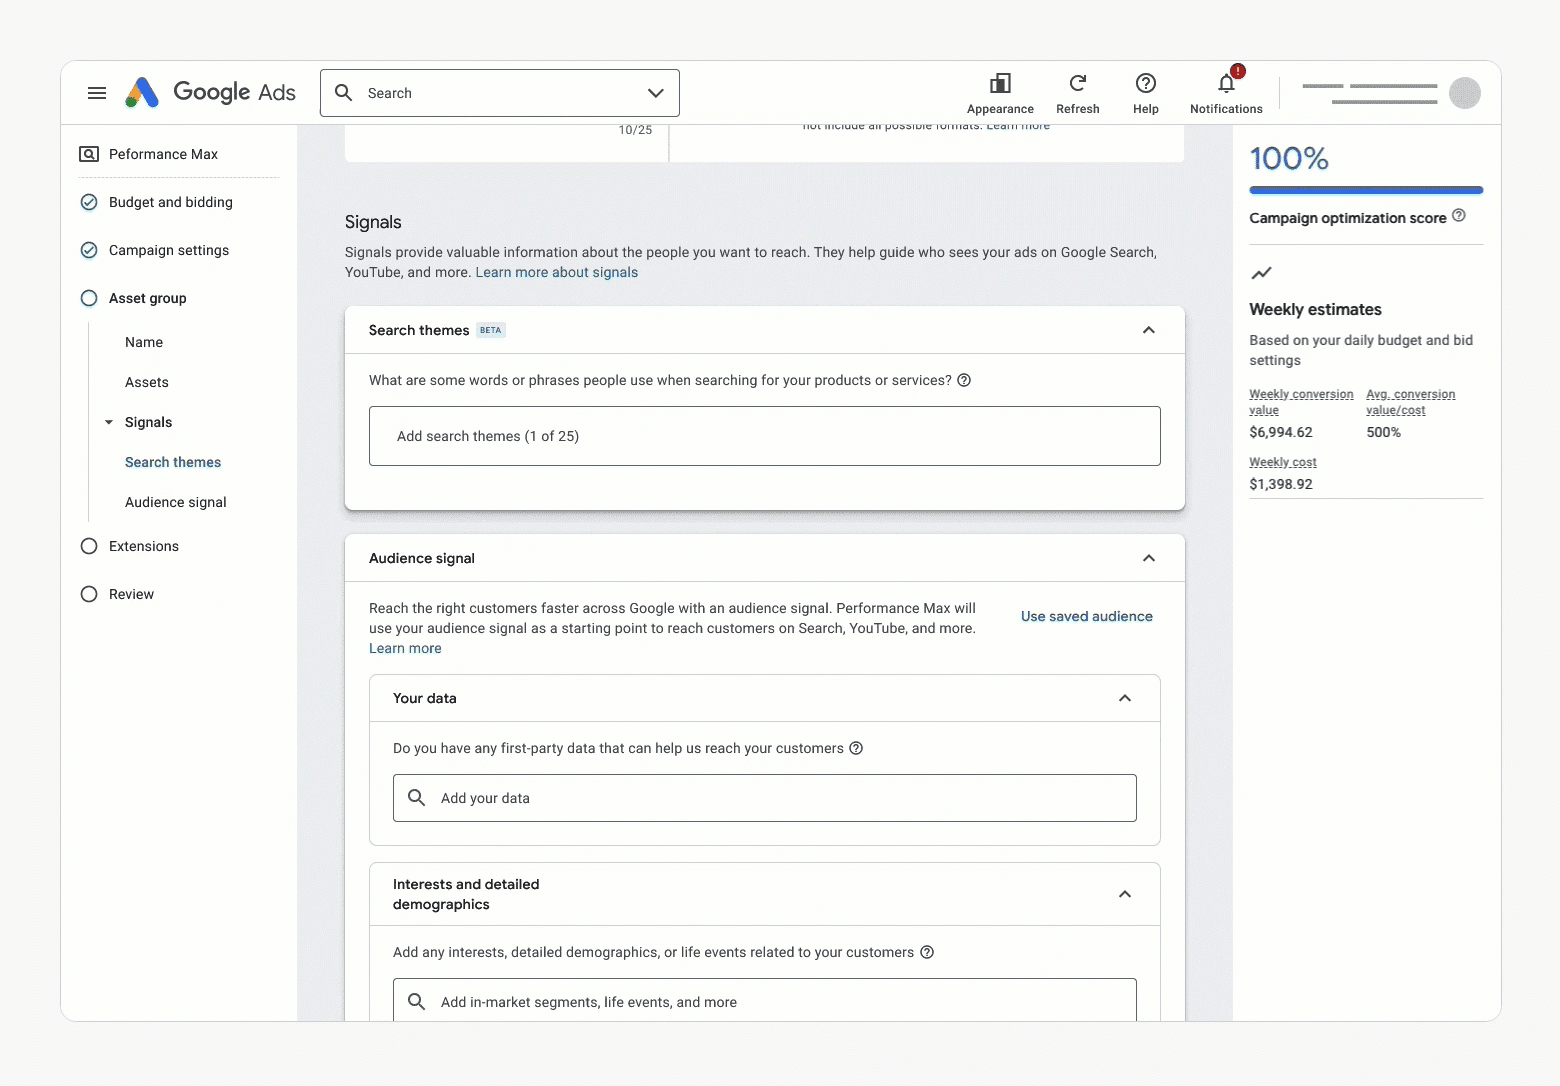
How to Set Up Audience Signals
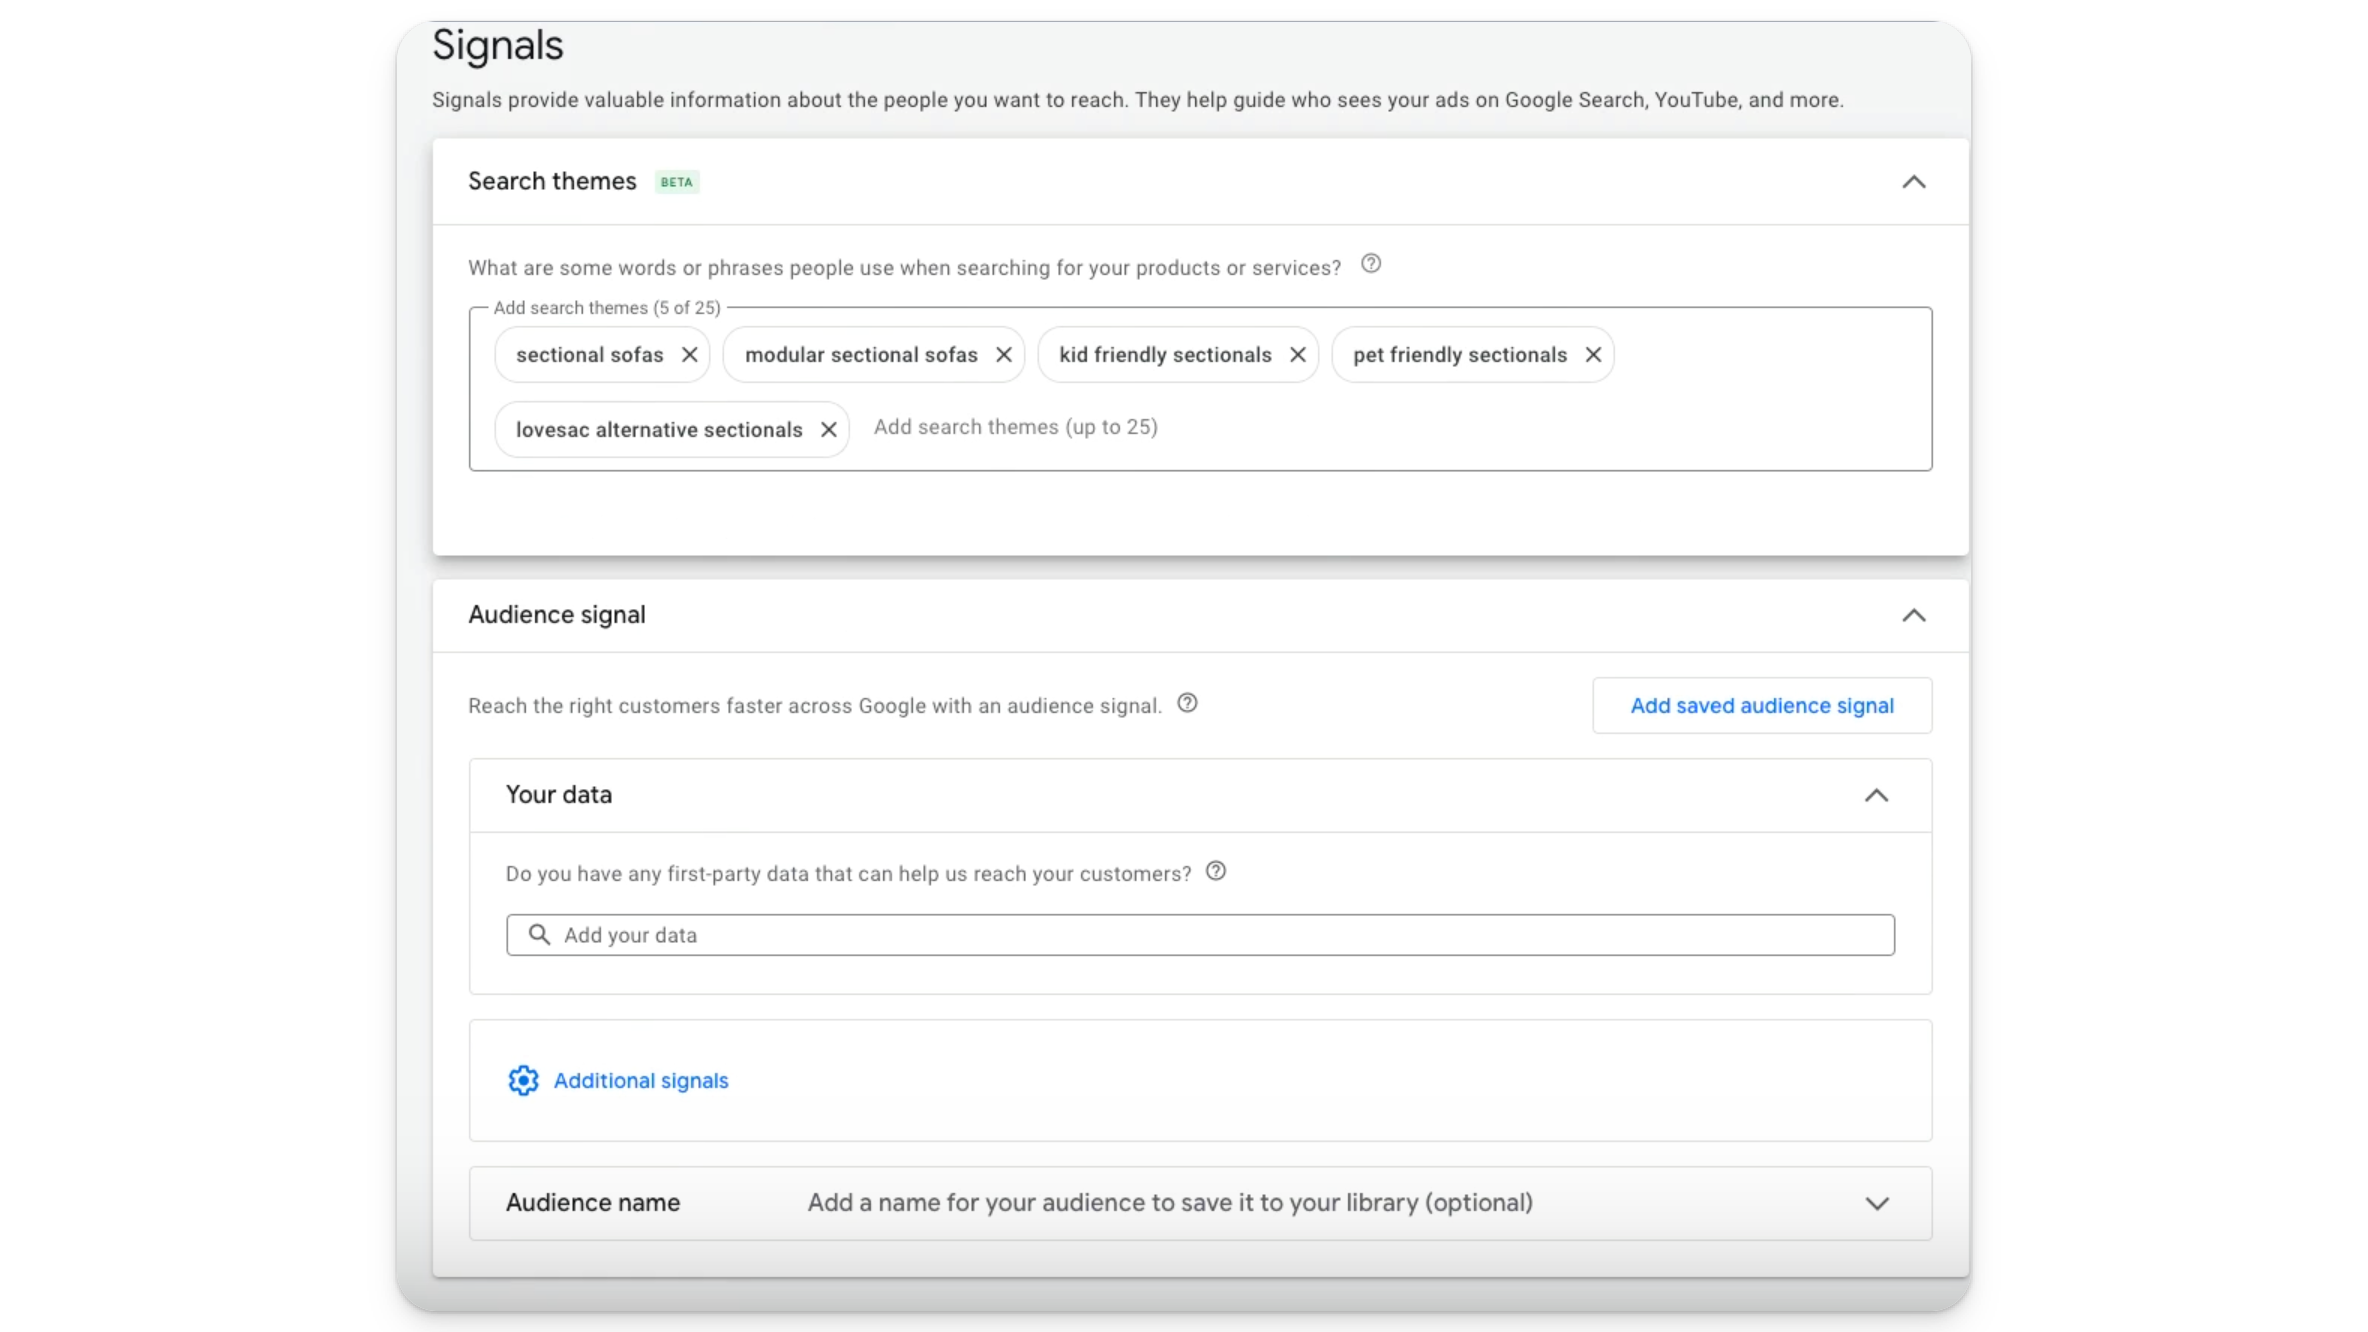
First, find the Audience Signals section.
Then, add your top search themes for the product category that you’re building around. A good rule of thumb here is to add as many as necessary (up to 25), but no more. Redundancy is not rewarded.
Next, under Audience signal, we like to sprinkle in customer lists — so if you have them, add them. If you don’t have a customer list, select all converters and all visitors. This may look something like this:
You can further refine your signal by adding detailed audience demographics and interests. Alternatively, you can let the algorithm figure this out on its own, as it usually does a good job.
If you save all of this, it turns into an Audience which you can then name.

Again, Audience Signals are just signals. They signal to Google what you think the algorithm should be going after based on the insights you have, but Google will go beyond what you give it.
The Art of Asset Optimization in Performance Max Campaigns
Assets refer to the various creative and structural elements that you’ll need to provide in order to create ads. So, when uploading assets for your PMax campaign, it’s important to get it right. First off, here are your asset requirements from Google:

Ad Copy Text
Ad copy text encompasses the entire written portion of your advertising message. It includes headlines, descriptions, and call-to-action (CTA) phrases.
Effective ad copy is crucial for attracting the audience’s attention, generating interest, and encouraging viewers to take a specific action, like visiting a website, making a purchase, or signing up for a newsletter. Good ad copy text can significantly improve the performance of advertising campaigns by increasing click-through rates (CTRs), conversion rates, and overall return on investment (ROI).
The biggest ad copy needle movers are:
Call to action
Offers (price and promotions)
Benefits and features
If you’re looking at the spec sheet above and pulling your hair out at the thought of writing 15 headlines, don’t. These are just guidelines. If you find yourself filling in fluff or variations on the same headline, it’s time to stop. What you currently have should be more than enough for Google to test.
Images
When it comes to adding images to your Performance Max campaign, there are a few things you’ll want to avoid. These include:
Images with text or logos over them
Blurry images
Generic images unrelated to your Asset Group products
Buttons
YouTube Video
Unfortunately, if you don’t give Google a video, they will create one for you (and it won’t be pretty). You want to give Google some sort of video at all costs. If you don’t have a YouTube video, you may have to live with Google’s auto-generated garbage. But there are ways around this — look for or create:
Customer testimonial videos (make sure to ask permission first)
Product demos
Educational and entertaining videos
User or influencer generated content
In the beginning, PMax often drives a lot of traffic to your YouTube video. Over time, however, the algorithm realizes the video is not converting, and it will be seen less and less frequently (in general). This is not something you want to spend an enormous amount of money on, but putting something together yourself is usually better than what Google will come up with.
Customer testimonial videos seem to work best.
Product Feeds
Having a well optimized product feed is key to the success of any Performance Max campaign. For an in-depth breakdown on how to optimize your product feeds, watch this video.
Asset Extensions
Here again, we’re looking to keep things simple. All you’ll want to do is add the relevant extensions. Available extensions at the campaign level include:
Sitelinks
Callouts
Prices
Calls
Structured snippets
Locations
Lead forms
Promotions
When deciding which extensions to use, add the ones that make the most sense for your campaign or asset group.
How Does Bidding Work in Performance Max?
Launching a new account or campaign in Google Ads can be a daunting task, especially when it comes to bidding and budgeting. However, with a strategic approach, you can maximize your return on ad spend (ROAS) while controlling your budget effectively. Here’s a step-by-step guide on how to start strong and adjust your strategy for optimal performance:
Starting Off: Use a Maximize Conversion Value or Maximize Conversions Bidding Strategy
When kicking off a new campaign or account, consider beginning with either the Maximize Conversion Value or Maximize Conversions bidding strategy. These are designed to optimize your campaign for the highest possible conversion rate right out of the gate. By not setting a target ROAS (or tROAS) cap initially, you give your campaign the freedom to gather valuable data and achieve maximum conversions. Ideally, you’re aiming for 30-50 conversions in one campaign over a 30 day period. This will provide the algorithm with the data it needs to dial in your campaign. You’re probably not going to be profitable in the first month or two, so if you can’t handle that going in, Performance Max may not be the campaign type for you.
Transitioning to Target ROAS (tROAS)
After your campaign has been running for one to two weeks, evaluate its performance and consider switching to a tROAS bidding strategy. This transition is crucial and should be based on the conversion volume and budget at your disposal. It’s important to set your tROAS to a level that the campaign is already achieving. For instance, if your campaign currently has a 250% ROAS, setting your tROAS target at 400% could be detrimental. Instead, aim for a 10-20% increase above your current performance to ensure a smoother transition and avoid shocking the algorithm. In this example, setting your tROAS to 270% would tell Google you want it to do a little bit better, without sending the algorithm into a tailspin.
Incremental Adjustments
Once you’ve switched to tROAS, allow another week or two for the campaign to adapt. Reassess the data. Then, begin to incrementally increase your tROAS target towards your desired goal. This gradual approach helps the smart bidding algorithm adjust more effectively, for optimized performance over time.
Budget Control and ROAS
Managing your budget is equally critical in achieving and maintaining a strong Return on Ad Spend (ROAS). If you’re hitting your ROAS targets but are limited by budget, increasing your budget may initially lead to a dip in ROAS. This is because Google will likely react to the increase by expanding your audience reach, which can introduce variability. Allow some time for the campaign to adjust to this new spending level, and for the algorithm to work with the new data it is currently gathering.
Conversely, if your campaigns struggle to meet their ROAS goals after a budget increase, consider gradually reducing your budget. This strategy encourages the smart bidding algorithm to narrow its focus to your most effective audience segments, also known as the “low-hanging fruit.” Again, Performance Max always takes the path of least resistance, so as you constrict the budget you become more efficient.
Pro Tip for Bidding and Budget Adjustments
When adjusting bids or budgets, avoid making large, sudden changes. Smart bidding algorithms favor stability and can be disrupted by any significant shifts. To ensure a smooth adjustment process, work within 10%-20% increments when changing your bids or budgets.
By following these guidelines, you can effectively manage your Google Ads campaigns, optimizing for conversions while controlling your budget. Remember, the key to success lies in starting aggressively, making informed adjustments based on performance data, and incrementally moving towards your desired outcomes. Happy bidding!
What are Search Themes?
Search themes are a new feature in Performance Max campaigns that allow advertisers to provide additional context about their business and products, beyond what is available through assets, feeds, and landing pages. This feature empowers marketers to leverage their own expertise alongside Google’s AI to expand their reach across all channels, including Search, which is critical for both visibility and engagement.
You might think of search themes as bridging the gap between what you know people are searching to find your product or service, and what Google thinks it should target. They’re signals (which Google will bypass over time, once it builds up enough conversion data in the campaign).
Leveraging Search Themes: Practical Applications and Benefits
Search themes can be particularly beneficial in scenarios where the existing content does not fully capture the breadth or the novelty of the product or service offered. For example, when launching a new product category or updating offerings with unique features that are not yet well-represented on your website. By utilizing search themes, advertisers can guide Google’s algorithm towards the most relevant search queries — effectively bridging the knowledge gap and increasing the likelihood of reaching their target audiences.
Moreover, this feature respects brand exclusions and account-level negative keywords, so you’ll retain control over where your ads are not shown, preserving brand integrity and campaign focus.
How Do Search Themes Work?
Setting up search themes is fairly straightforward. Advertisers can add up to 25 search themes per asset group in a Performance Max campaign, allowing for customization and specificity. It’s essential to select themes that are broad yet relevant to the product or service, avoiding overly narrow or long-tail keywords. This approach ensures that the algorithm has enough flexibility to find the best possible placements (without sacrificing your intentions).
In terms of broader campaign structure, here’s how search terms are prioritized by Google:

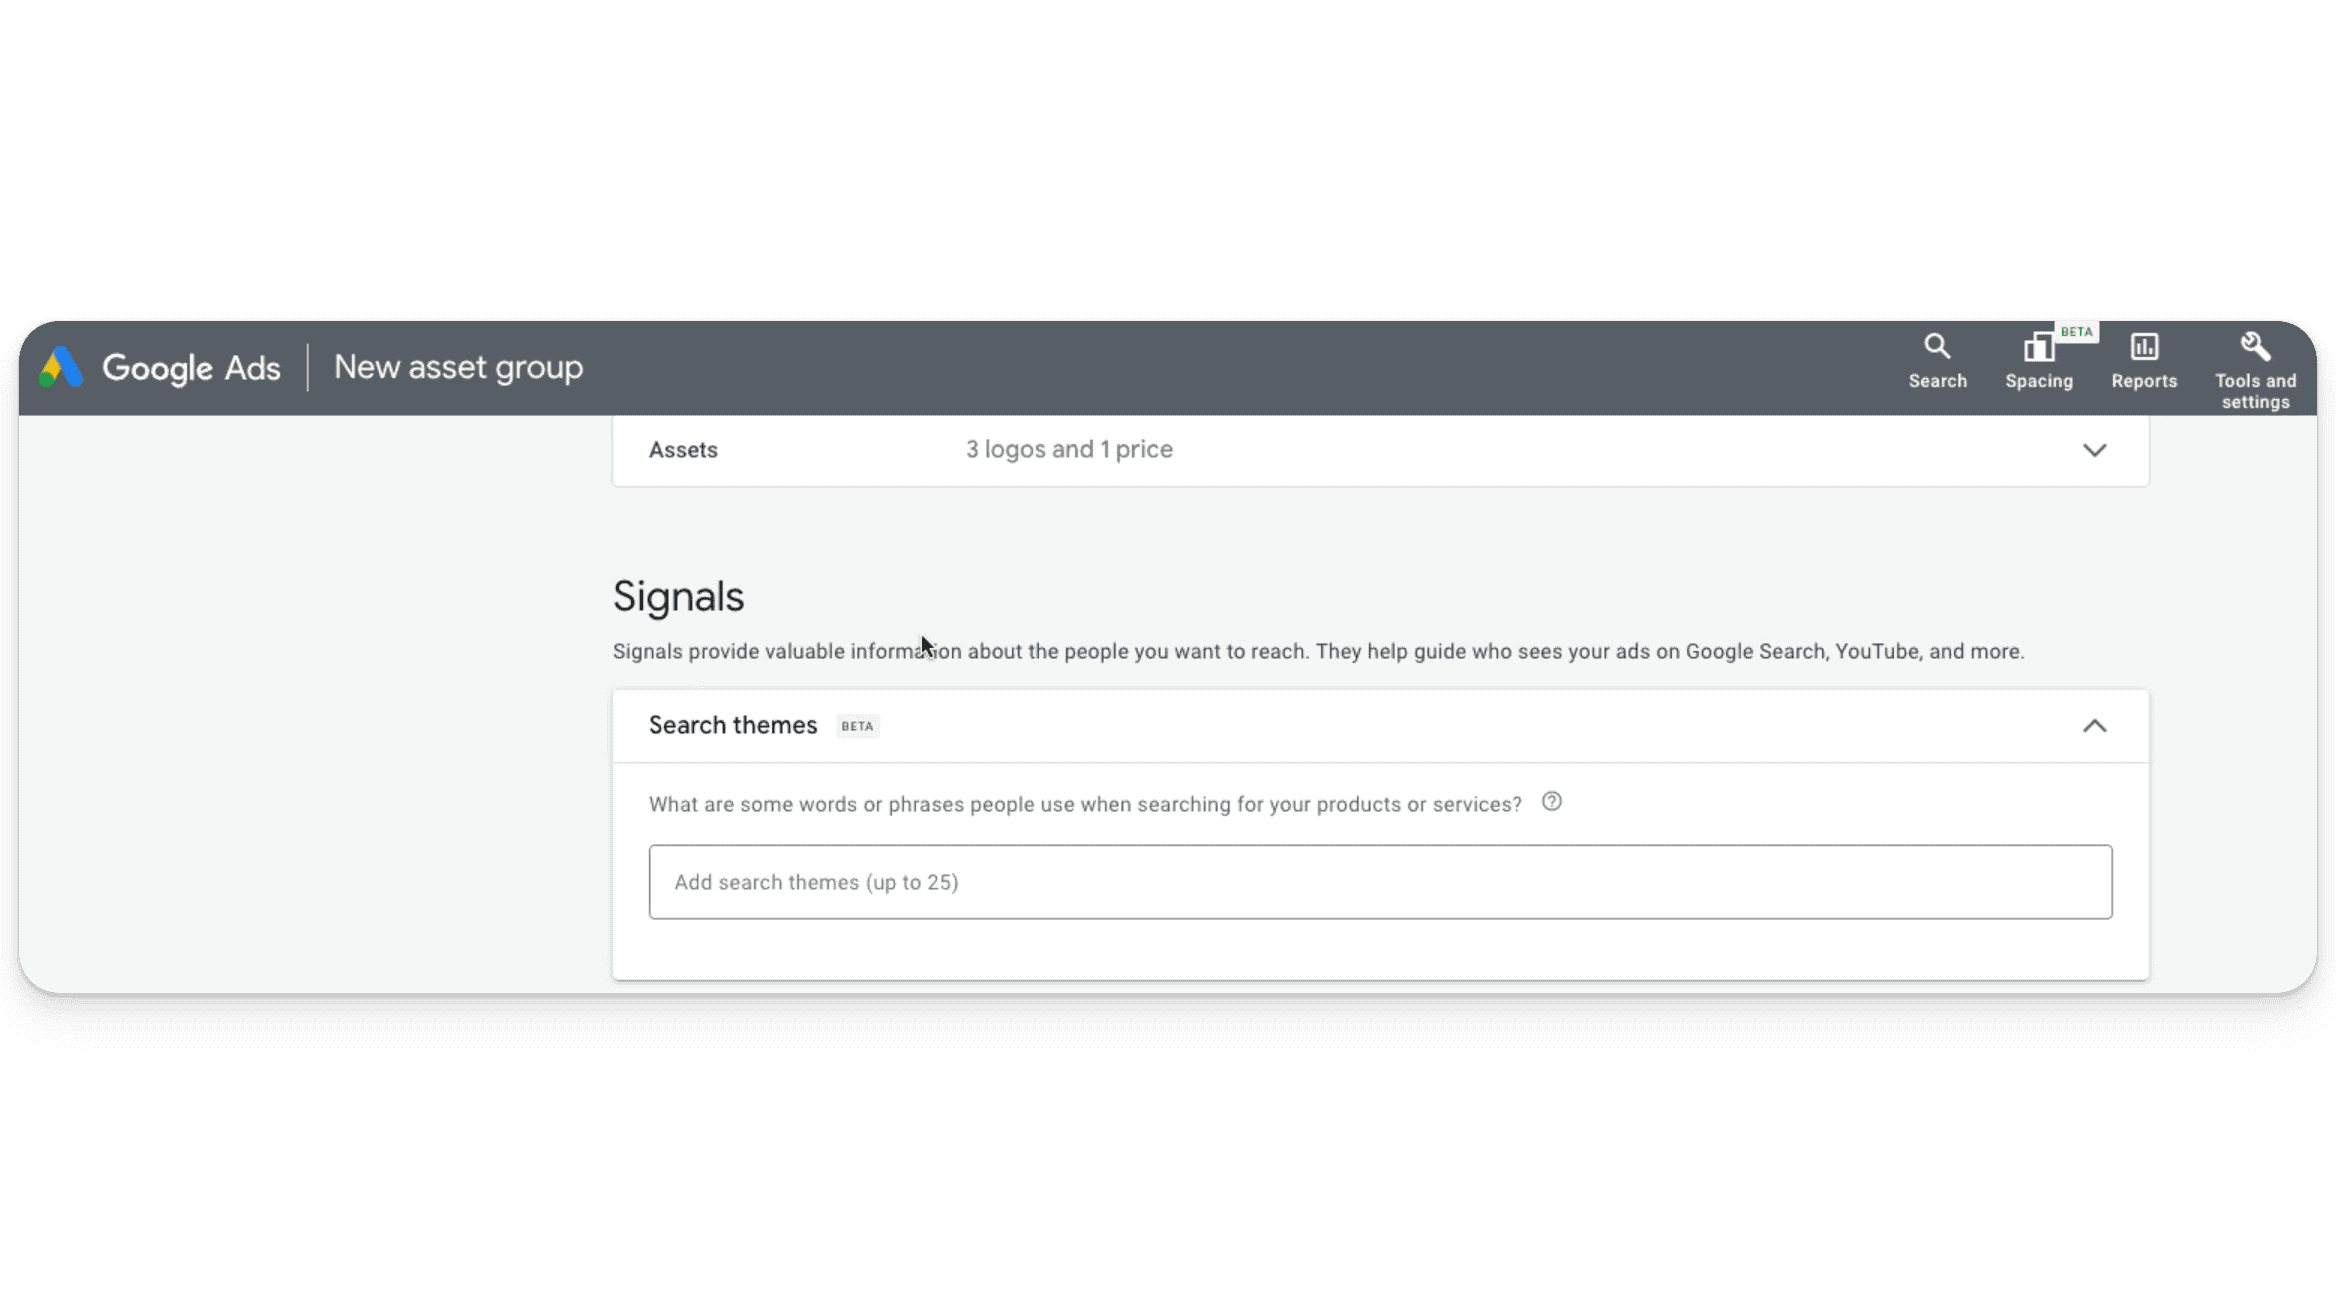
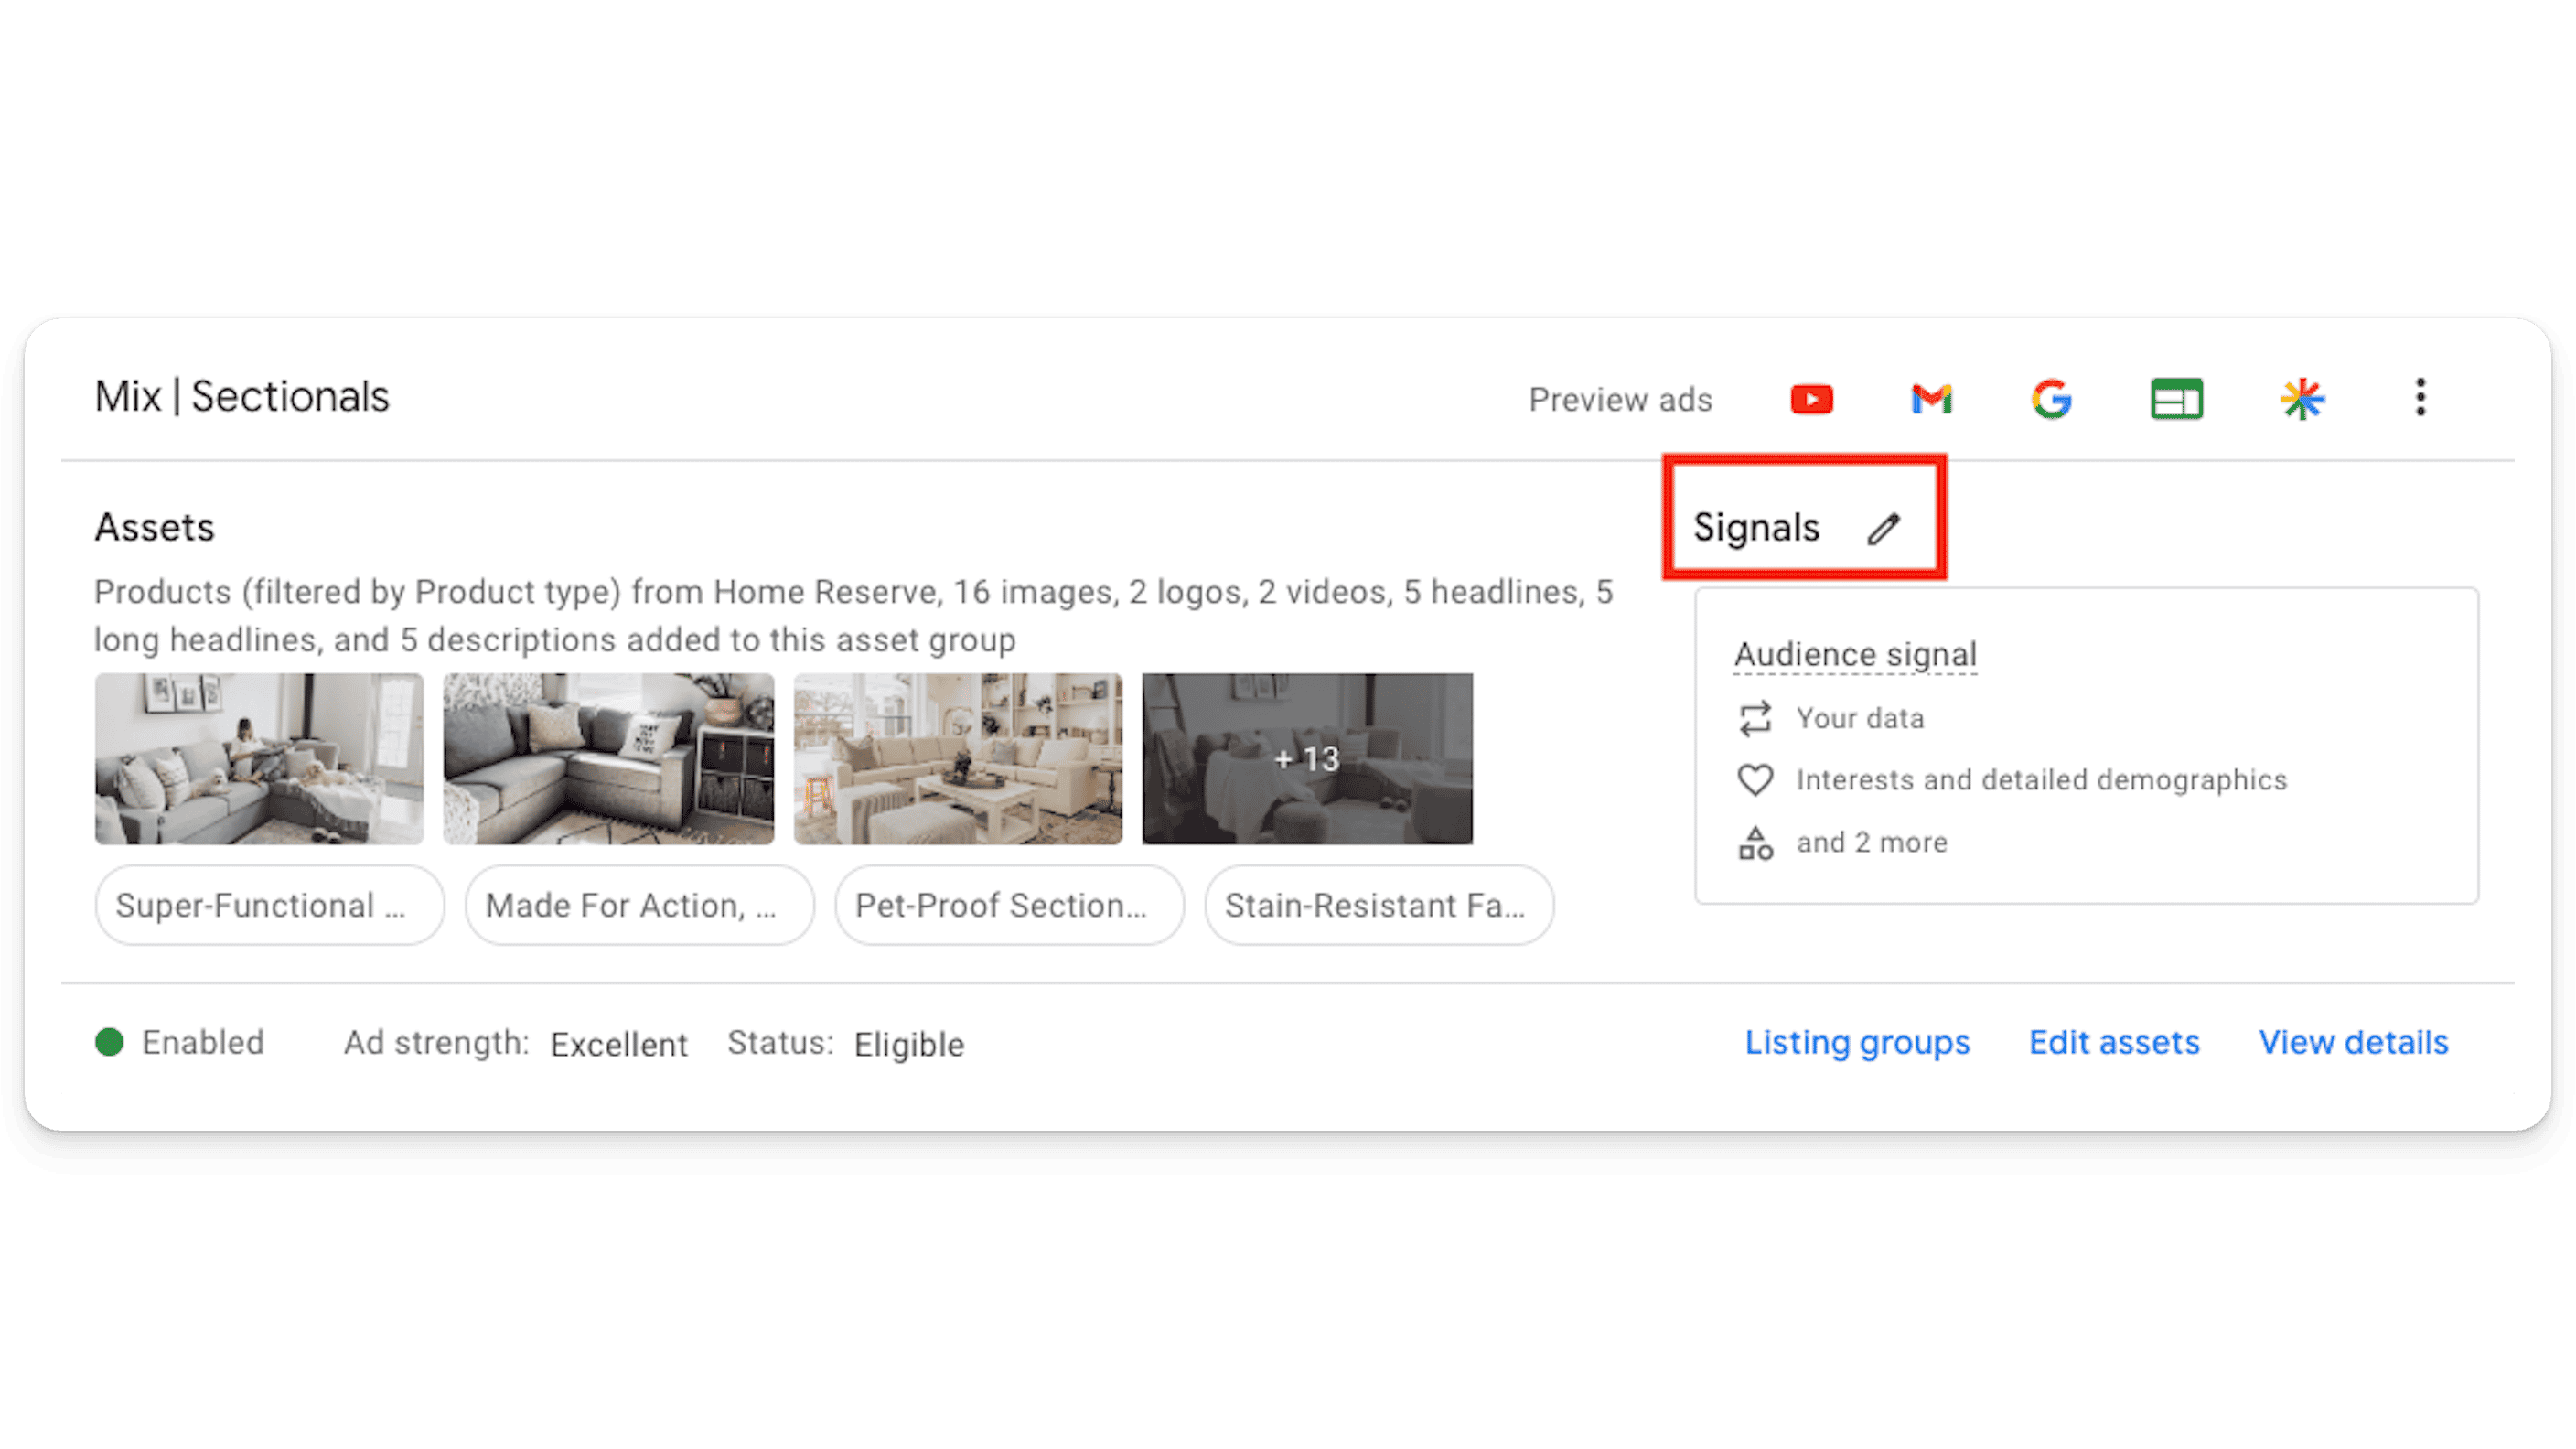
How to Set Up Search Themes
Happily, setting up Search Themes is easy. At the Asset Group level inside of your Performance Max campaign, simply click the pencil icon next to Signals near your Audience signal settings.
Then enter up to 25 search themes in the search theme field.
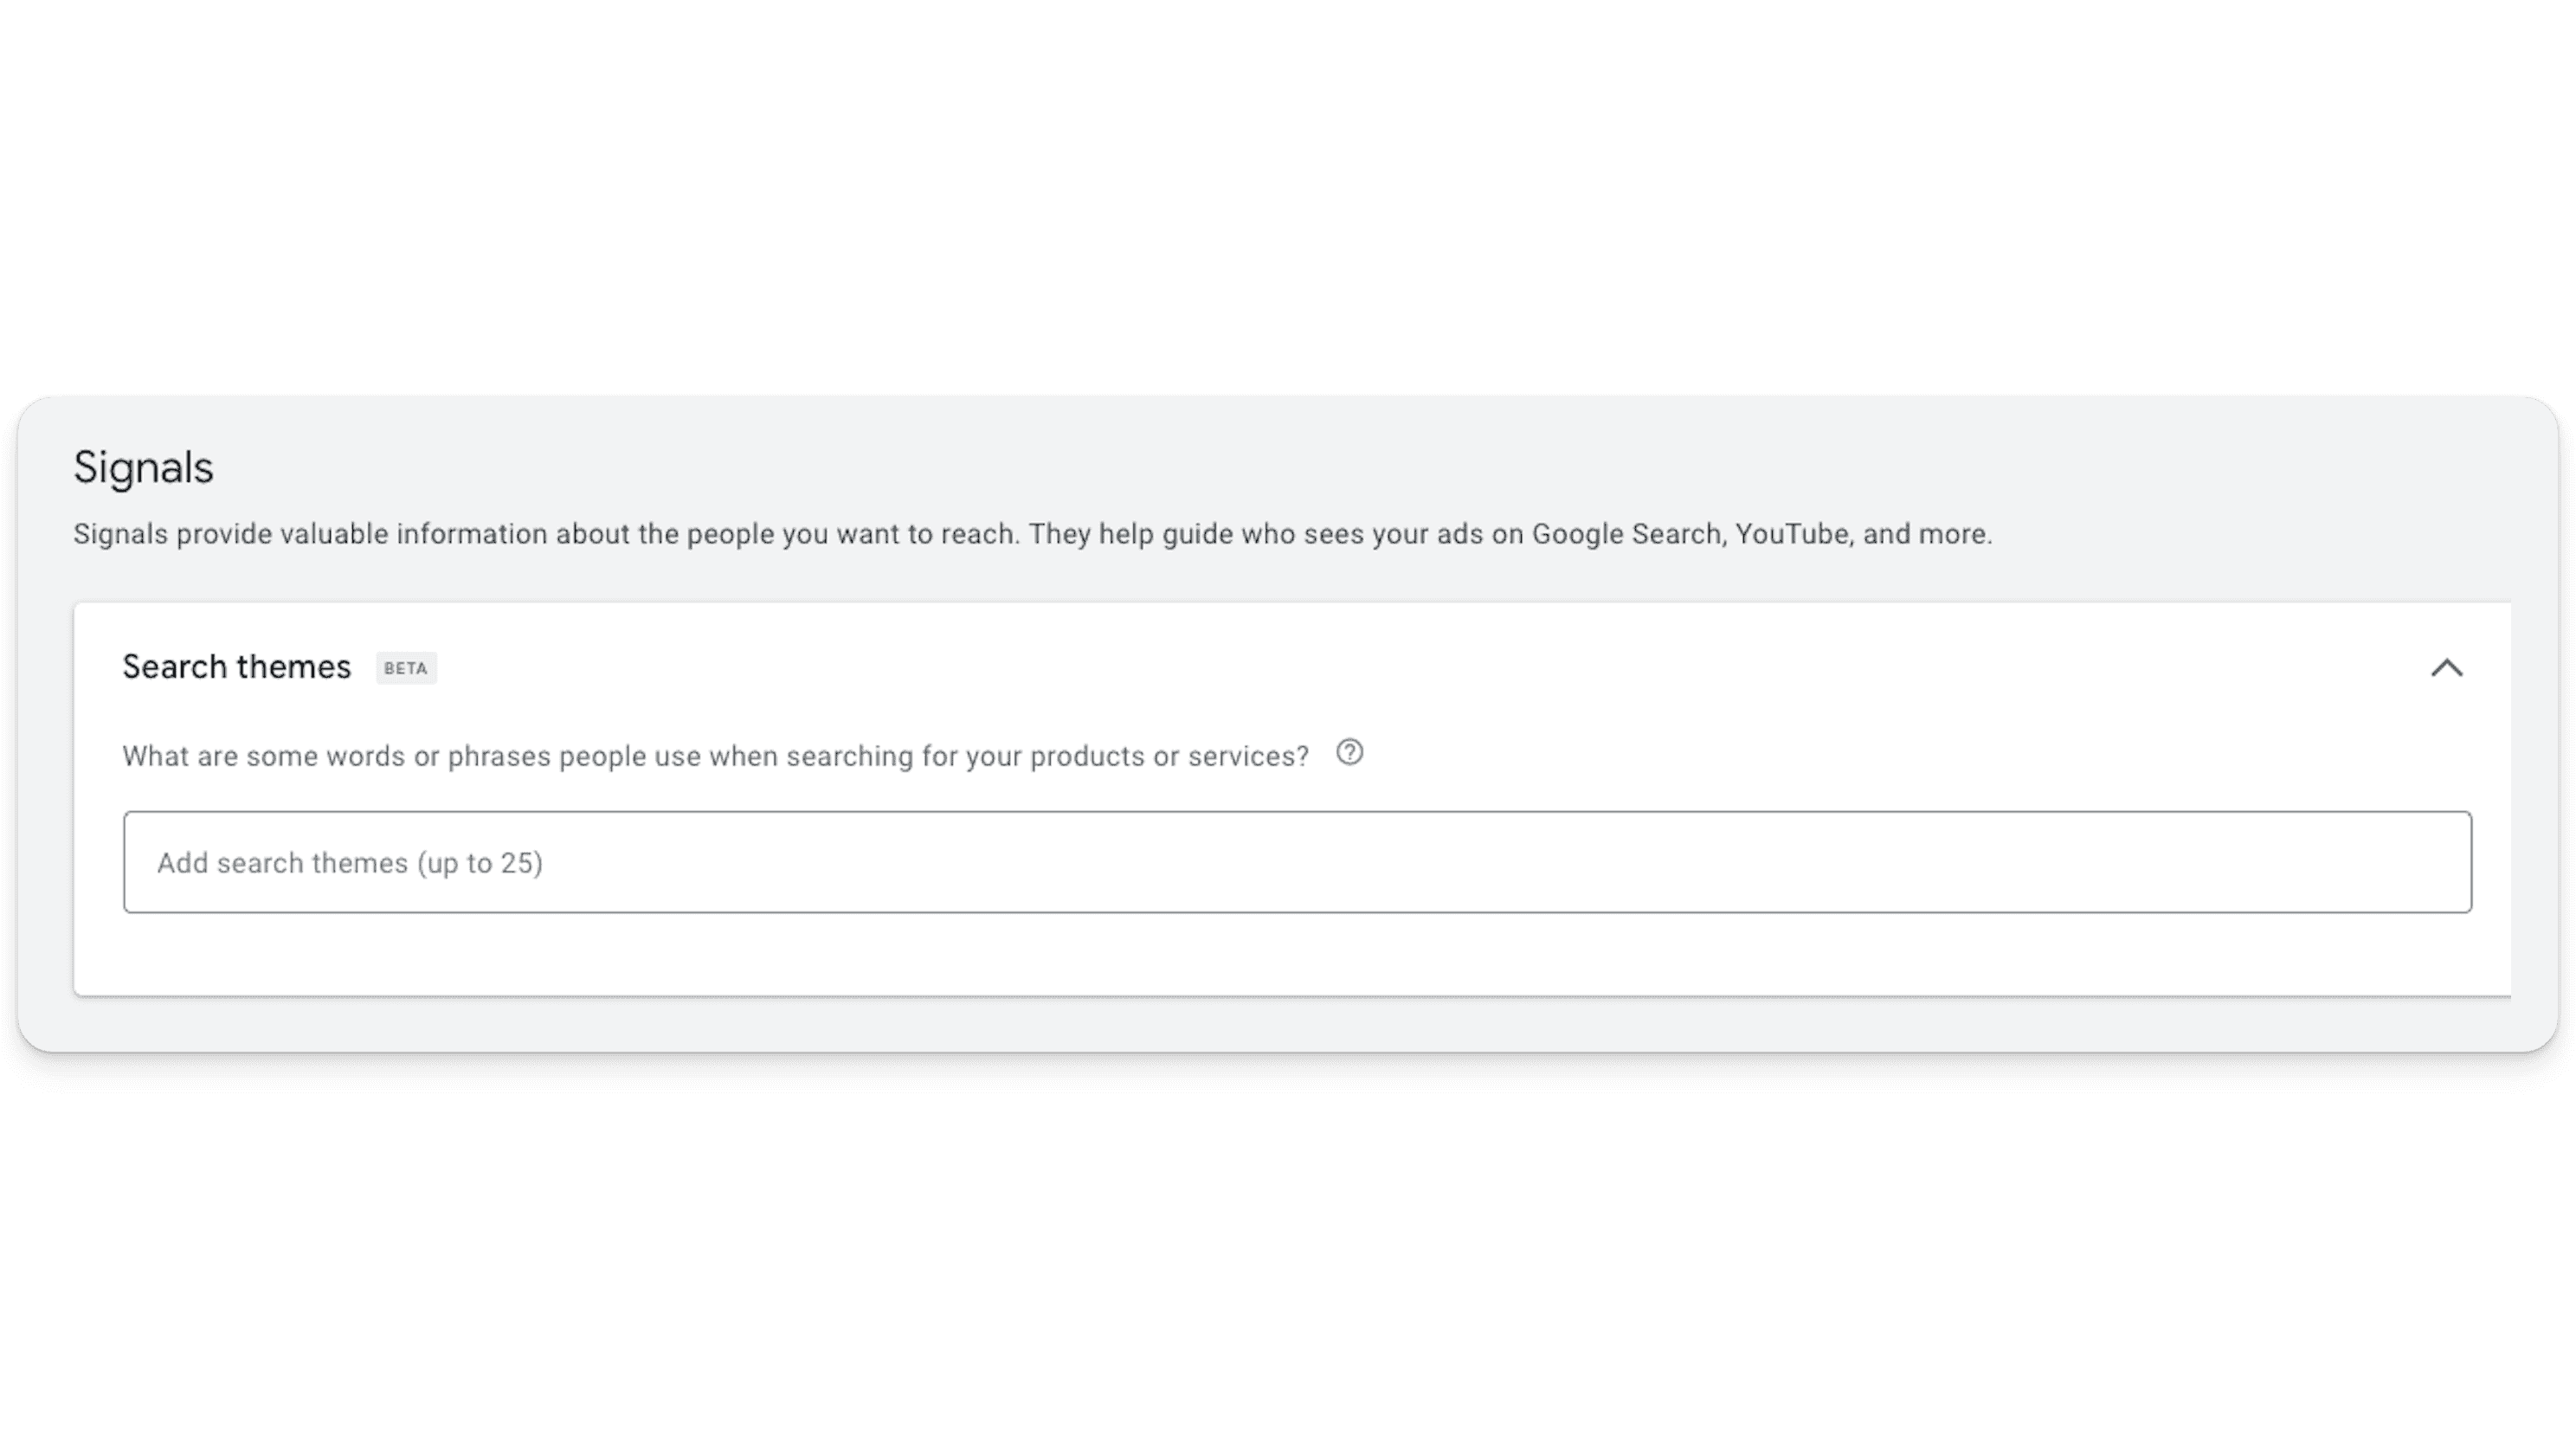
That’s really all there is to it!
Final Thoughts on Search Themes
The introduction of search themes in Google Ads Performance Max campaigns represents a significant step forward in search advertising. By allowing advertisers to share their insights and knowledge about their business and customer interests, Google Ads can better target and optimize ad placements, leading to more effective campaigns. Search themes are most effective when used to warm up a new Performance Max campaign. And remember, they are just signals (not keywords)!
How to Set Up a Performance Max Campaign (In 6 Easy Steps)
Ready to set up your Performance Max campaign? Here’s a quick walkthrough on how to (properly) set up PMax, ensuring you leverage Google’s powerful machine learning to meet your advertising goals.
Step 1: Define Your Goals
Start by defining your advertising goals. Performance Max campaigns are goal-oriented, so your campaign’s success hinges on the clarity of your objectives. Are you aiming for more online sales, leads, website traffic, or brand consideration? Your goal will determine how Google optimizes your campaign.
Step 2: Set Up Your Campaign
Sign in to Google Ads
Create a New Campaign: Navigate to the ‘Campaigns’ tab, click the ‘+’ button, and select ‘New Campaign.’
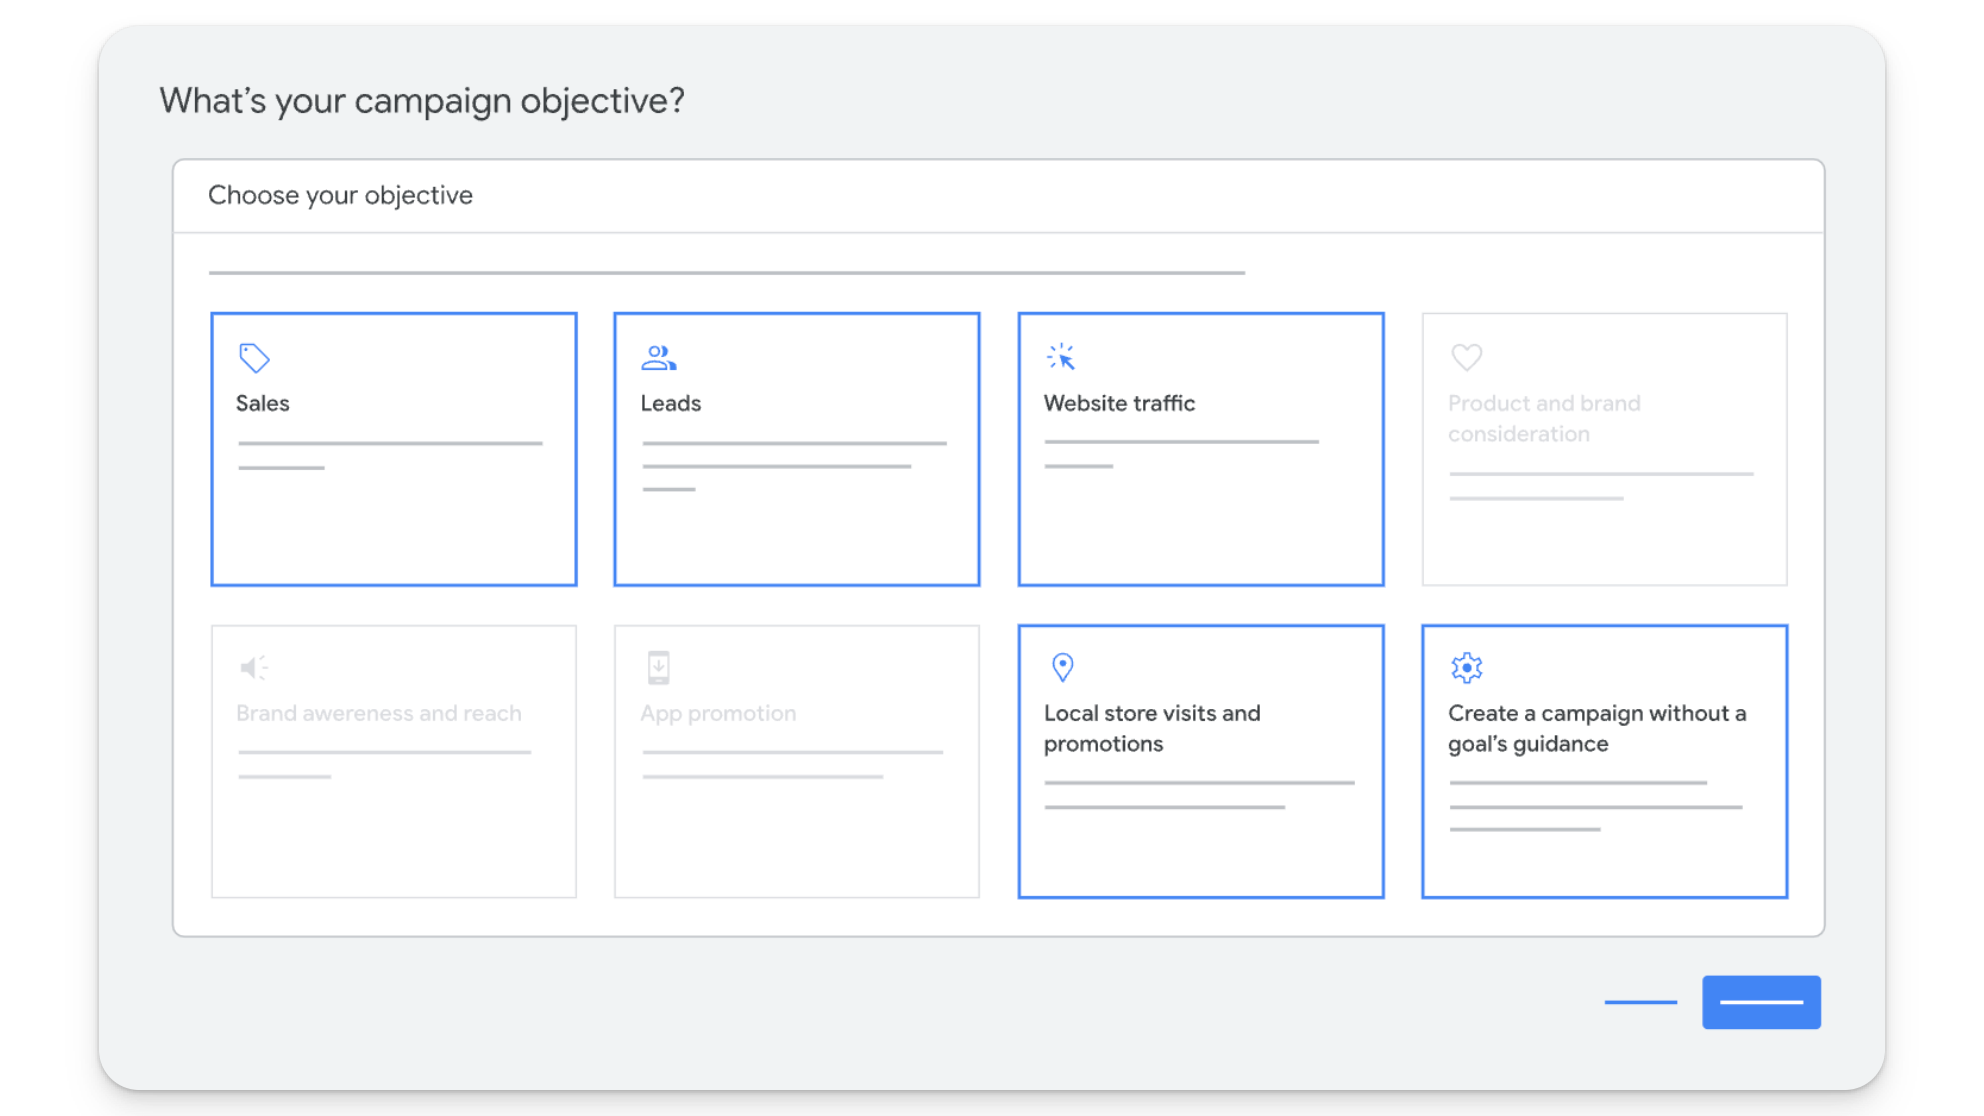
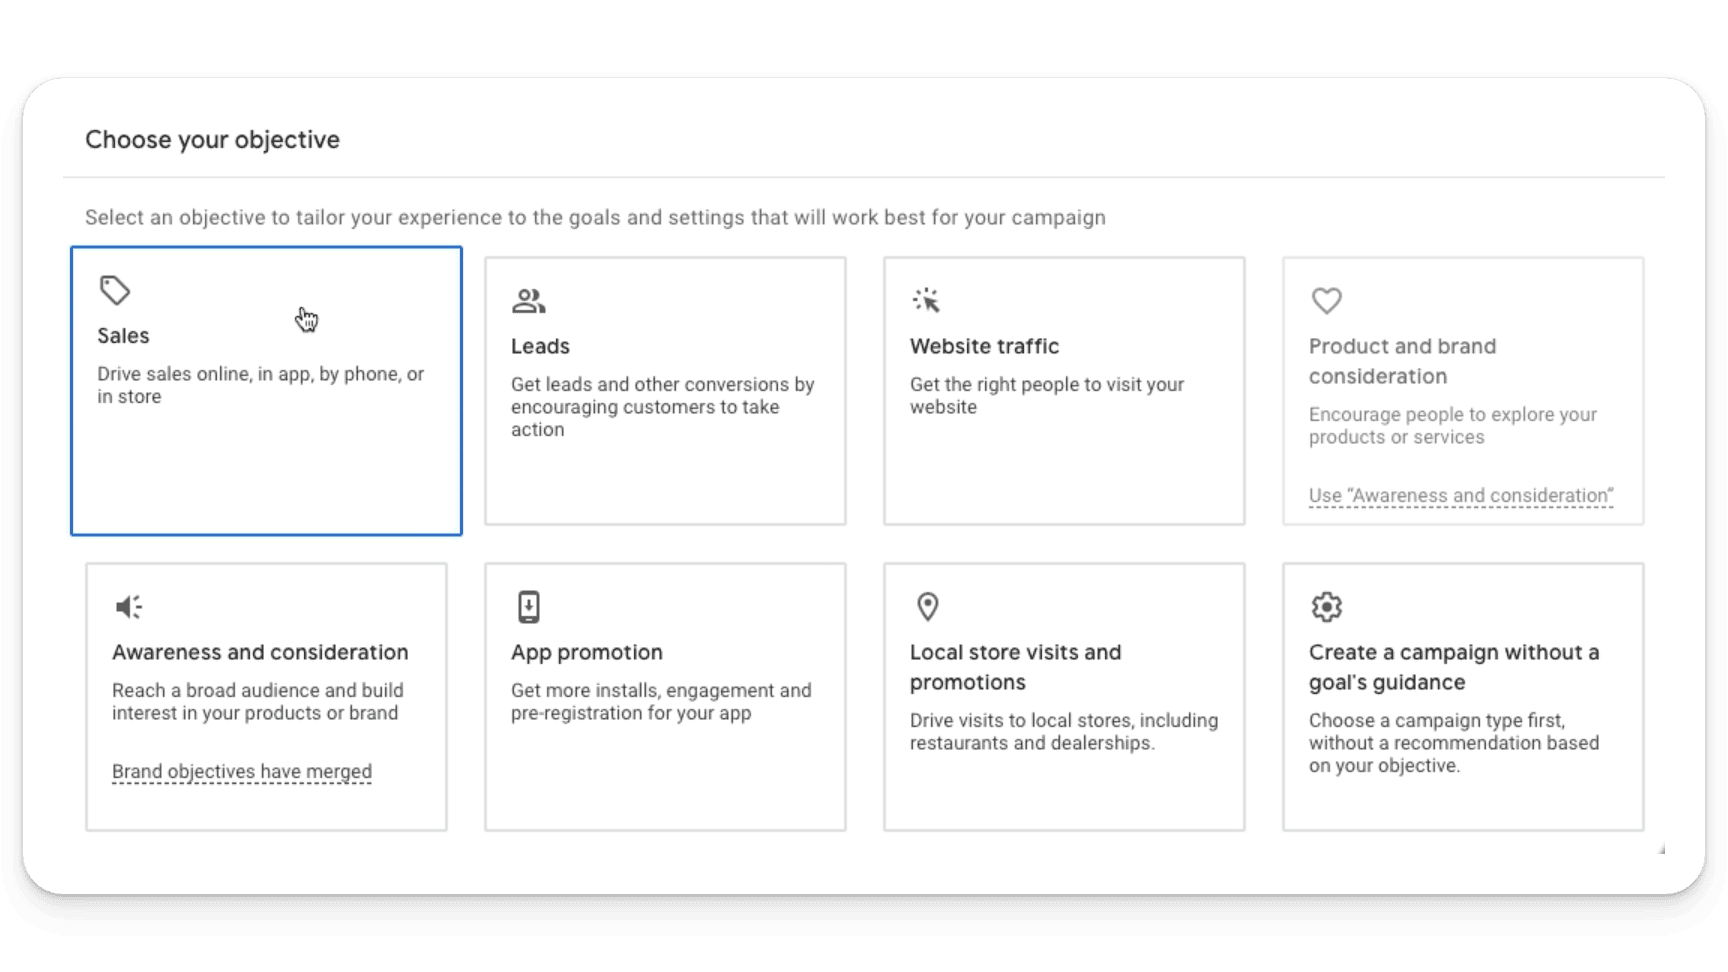
Choose Your Objective: Select the goal that aligns with your business needs. Google Ads will optimize the settings it shows you when building out your campaign based on your choice. In the example below, we’ve selected ‘Sales,’ though typically ‘Create a campaign without a goal’s guidance’ would be our first choice. This is entirely up to you.
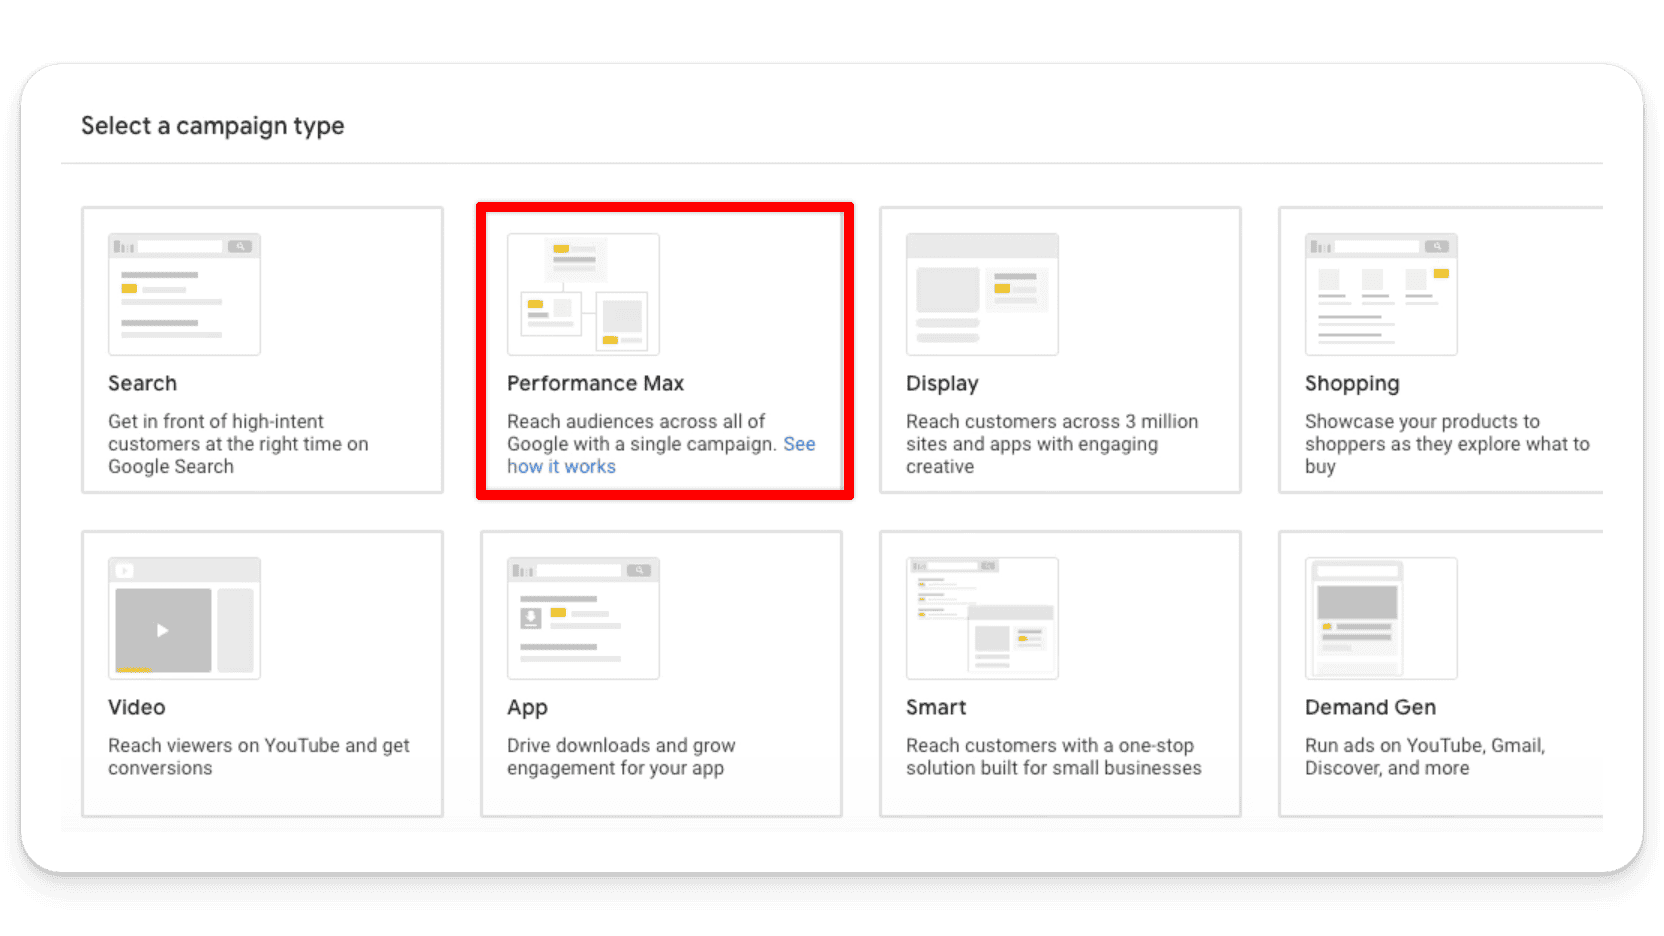
Select ‘Performance Max’: From the campaign type options, choose “Performance Max.”
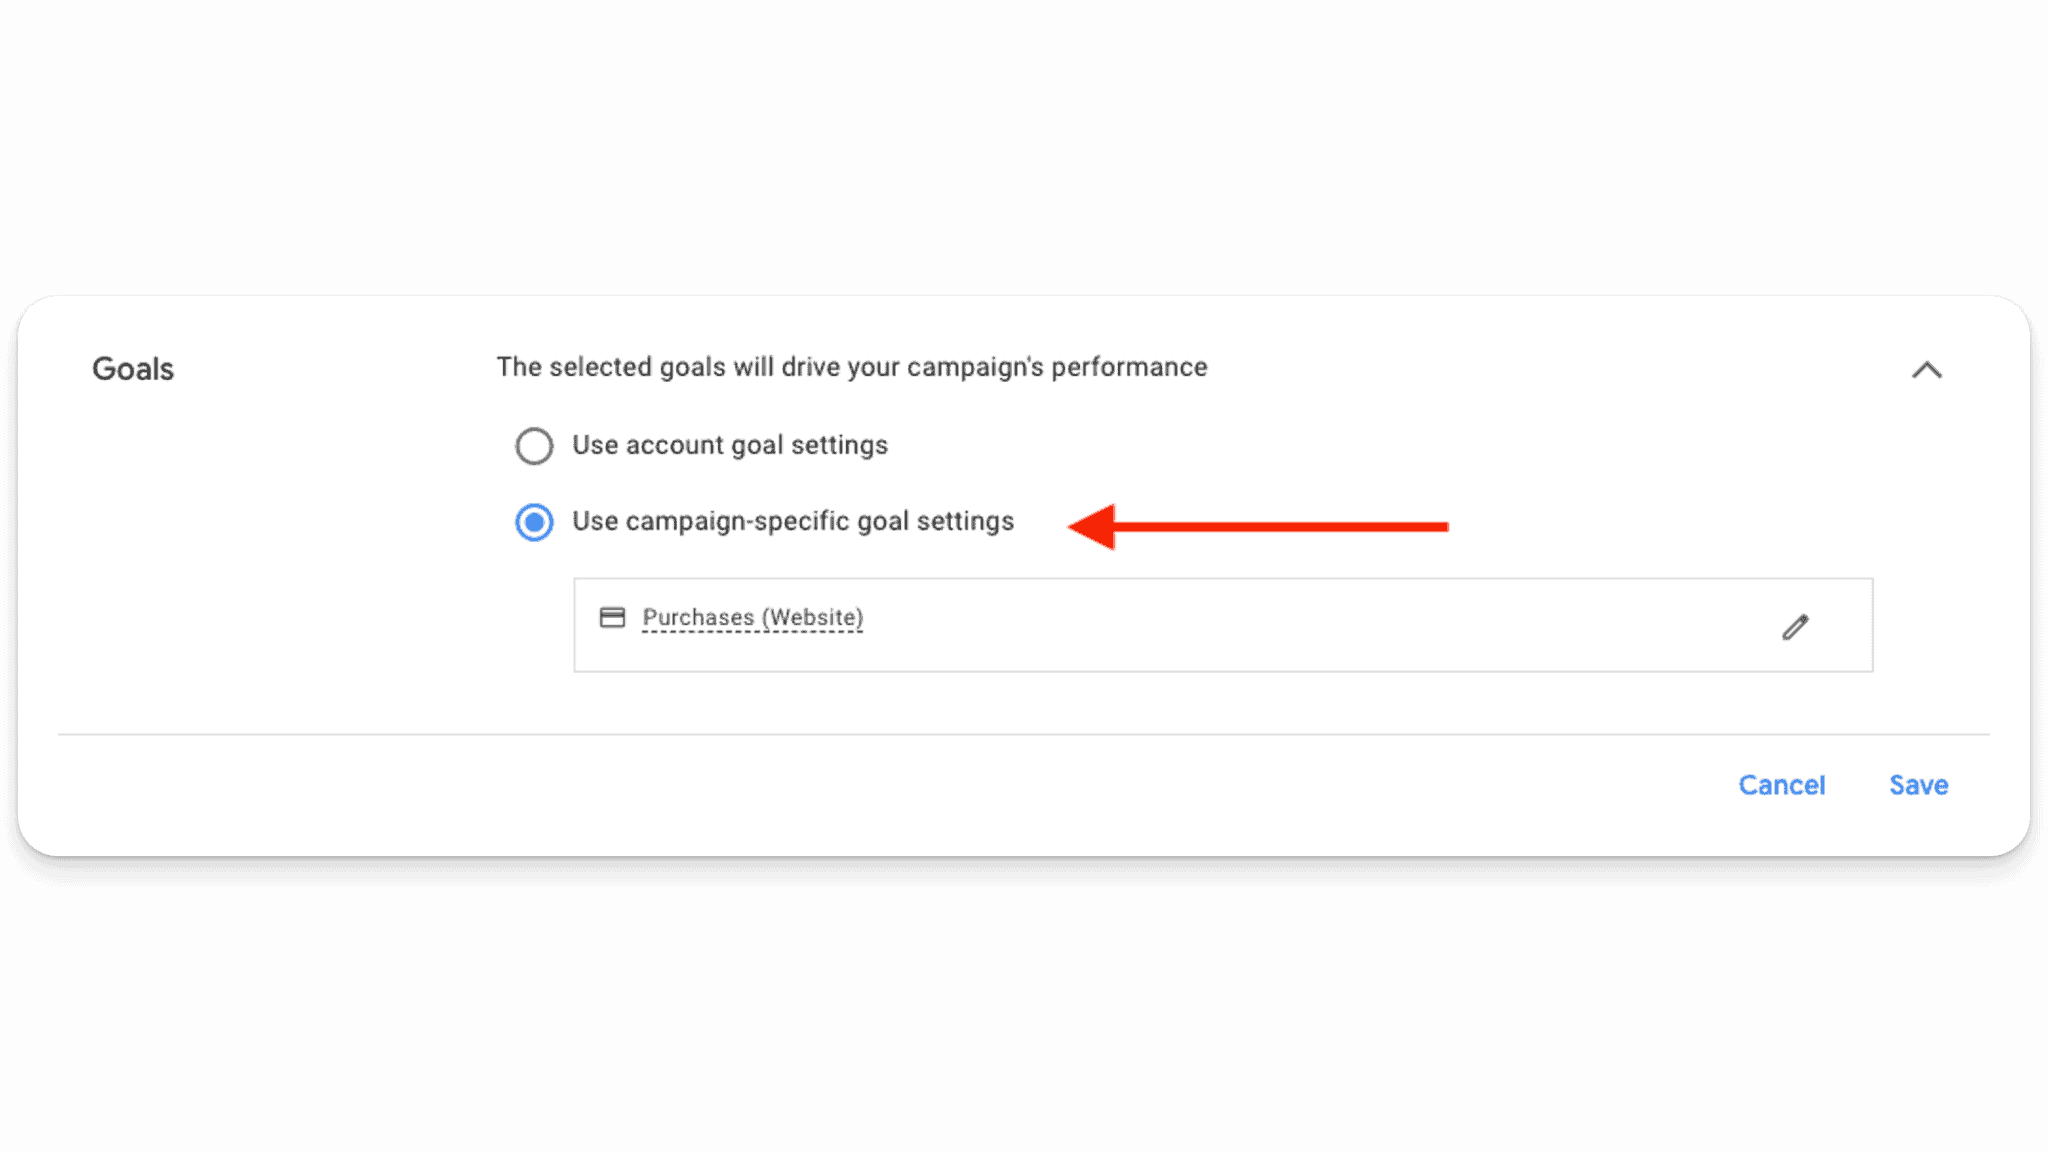
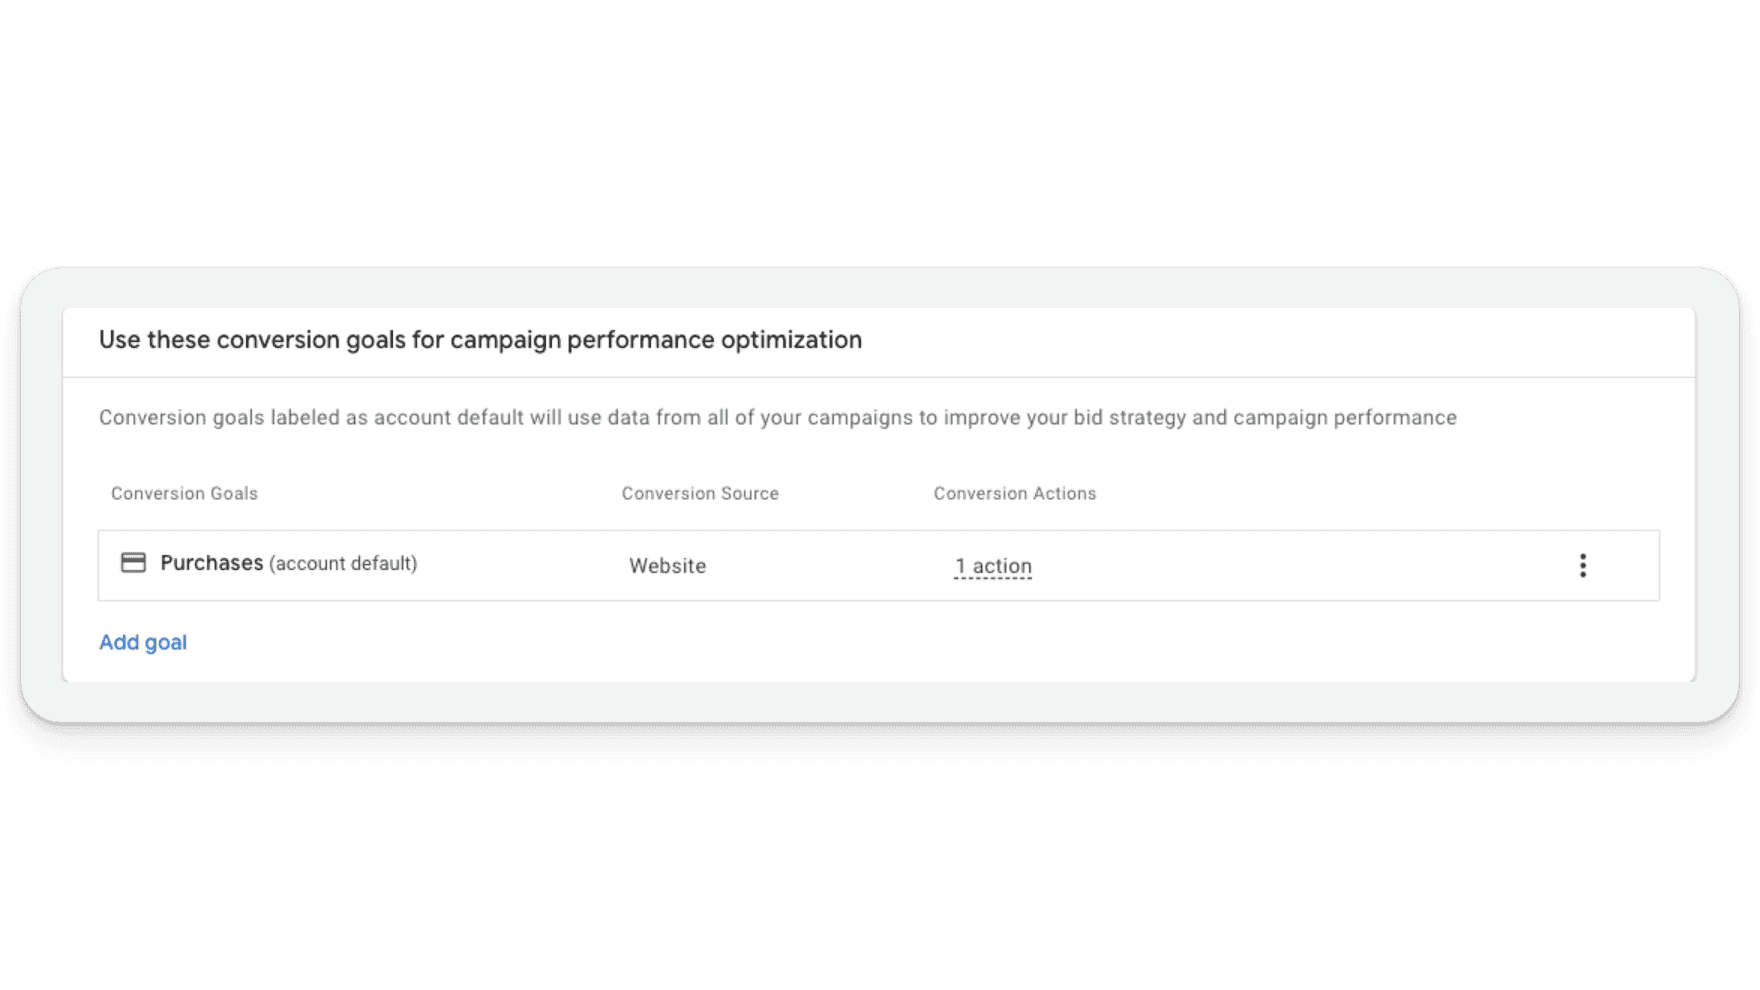
Follow the Prompts: Input your specific campaign settings, such as locations and languages. For conversions, we recommend selecting macro conversions, like ‘purchases’ or ‘phone calls’ only.
Step 3: Configure Your Budget and Bidding
Set your daily budget and bidding strategy. Performance Max campaigns offer various bidding strategies tailored to different goals, such as ‘Maximize conversions’ or ‘Maximize conversion value.’ Decide which aligns best with your objectives and resources.
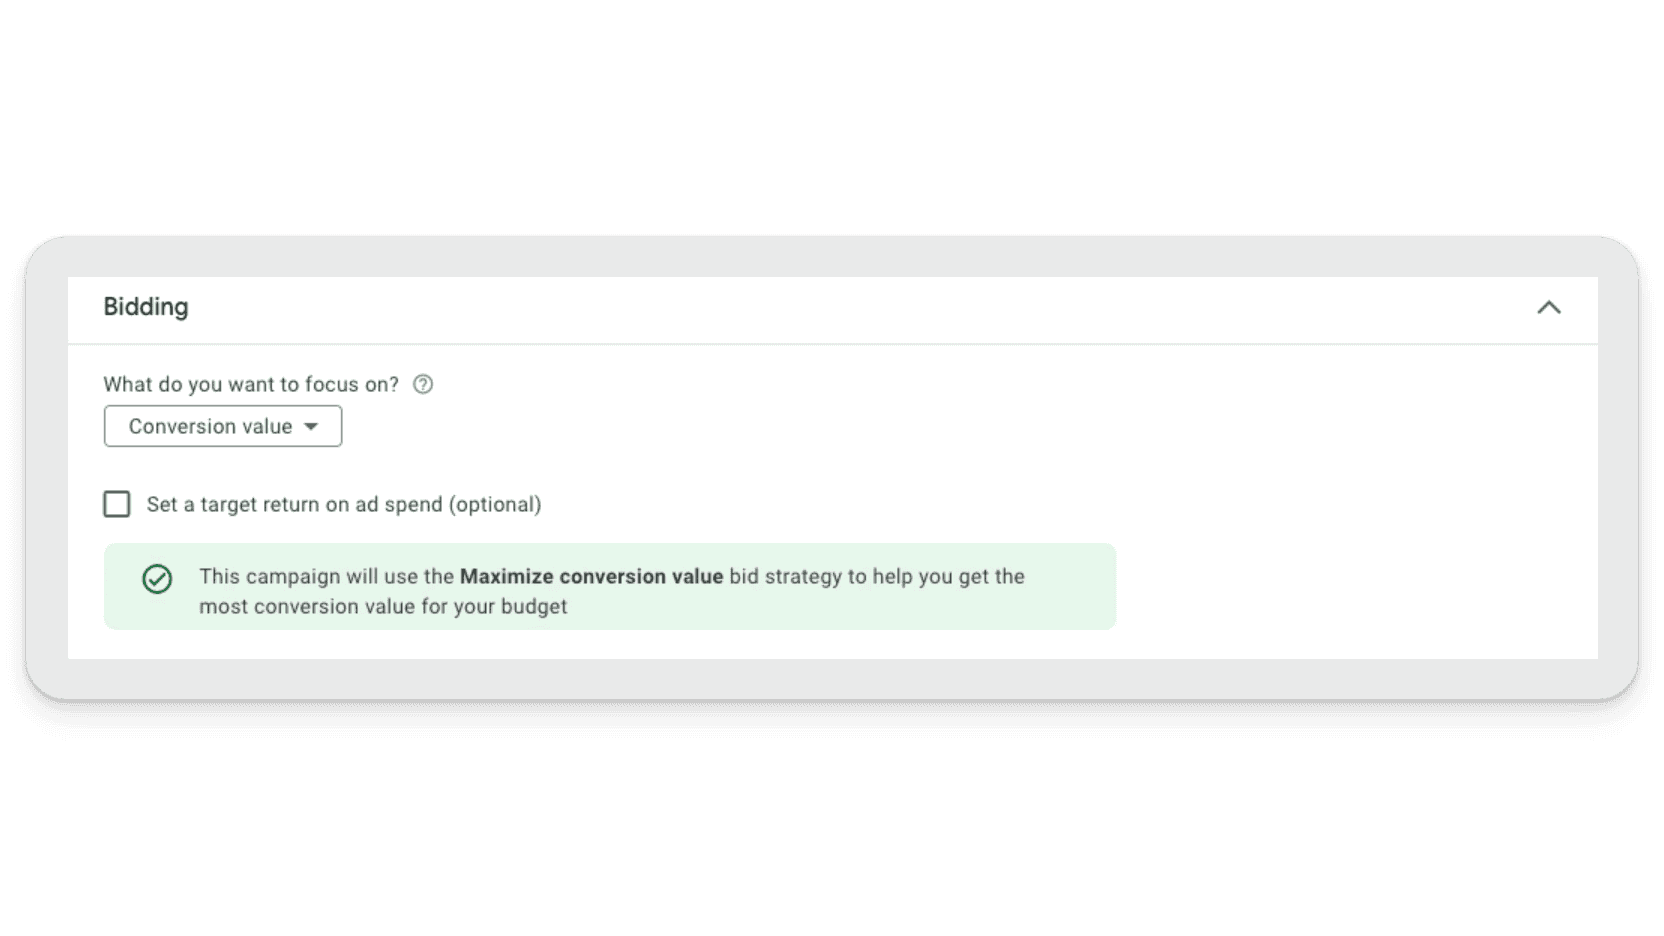
If you’re just starting out, don’t put in a target Return on Ad Spend (tROAS), as you need to get data and conversion volume first.
You can select ‘optimize campaign for acquiring new customers,’ but only if you have a strategy and know what the customer acquisition setting does.
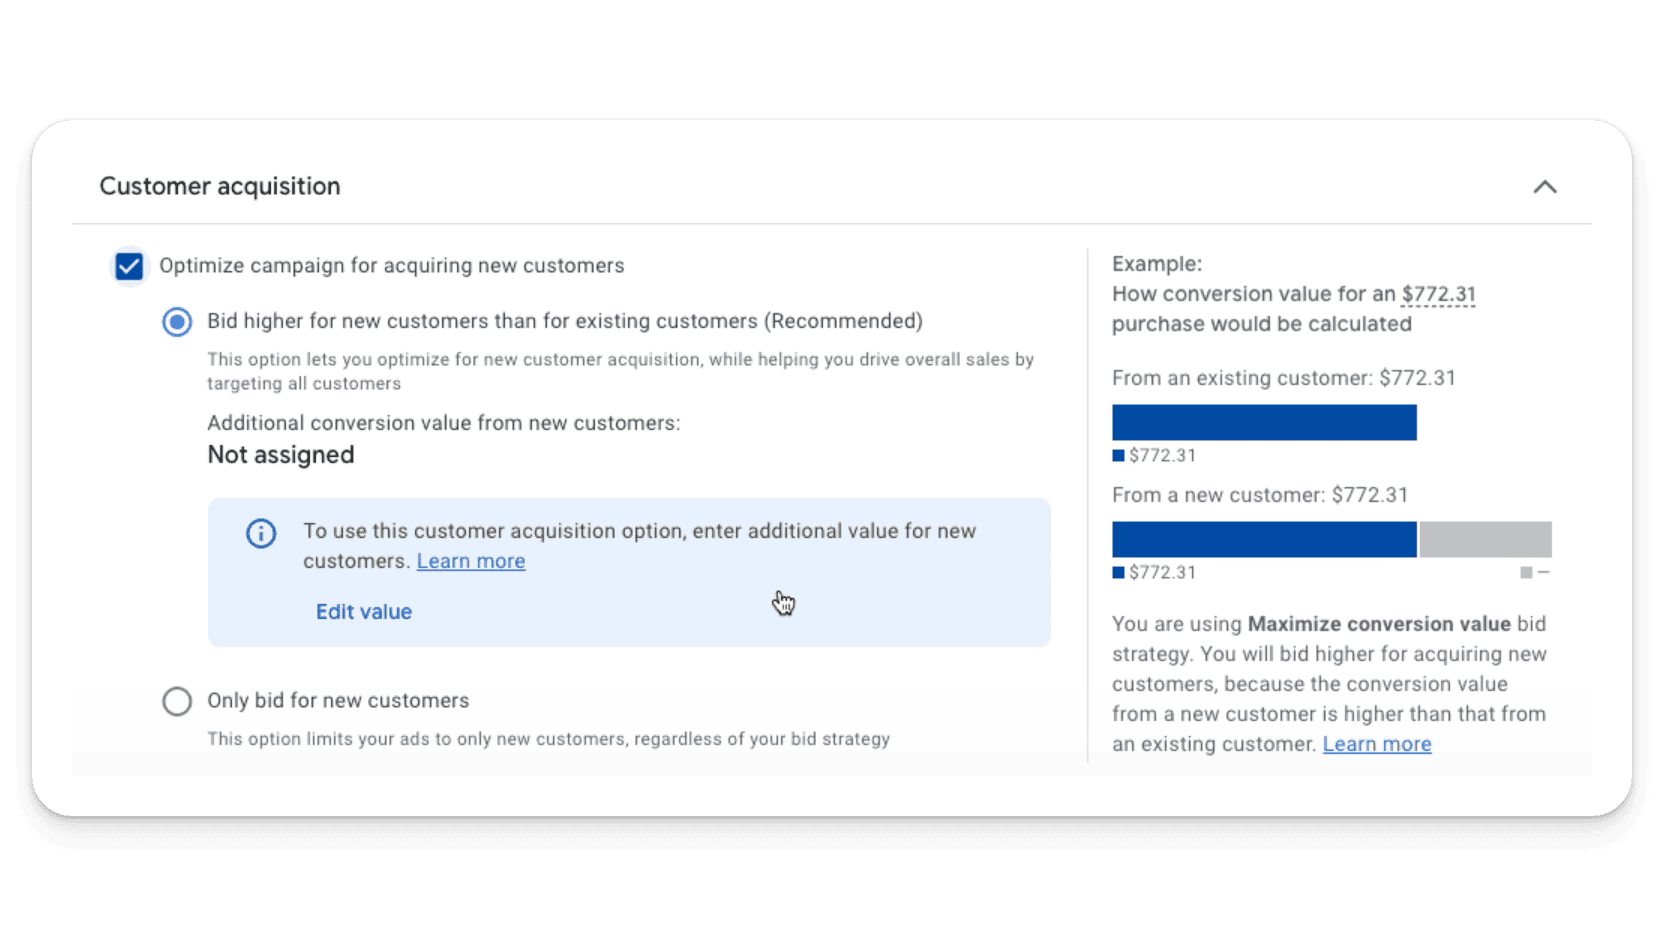
90% of the time, we recommend leaving this unchecked.
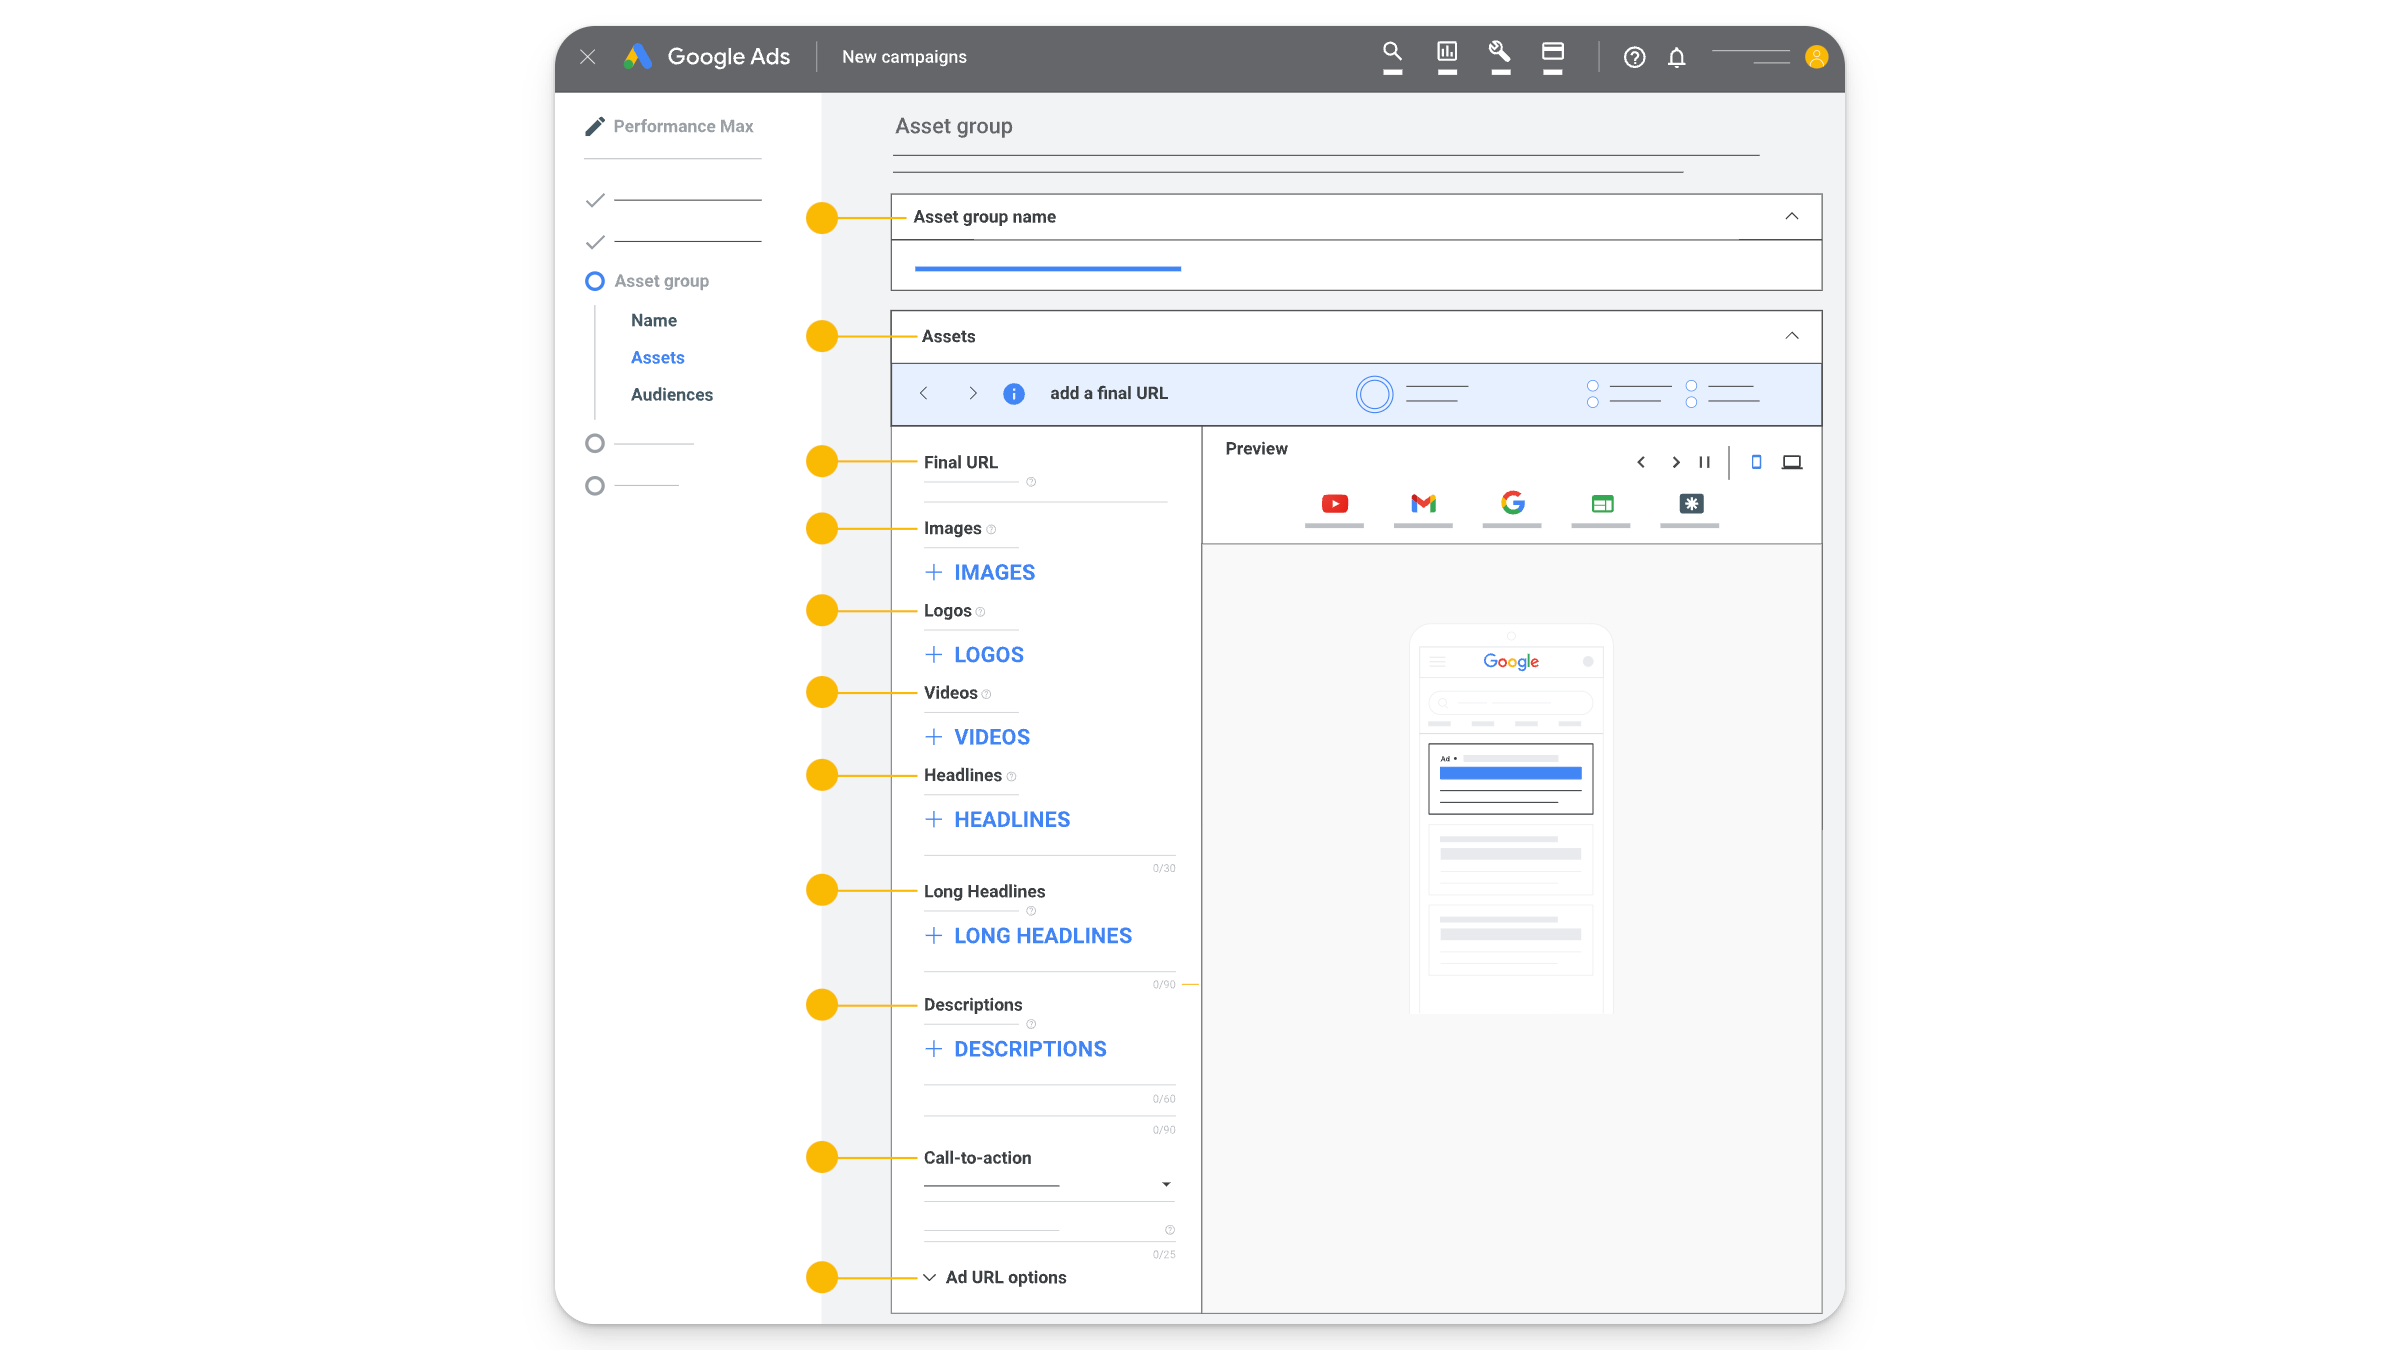
Step 4: Create Your Asset Group
Asset groups are collections of assets (images, videos, logos, headlines, and descriptions) that Google uses to create ads. These groups allow you to tailor your message to different audiences.
Develop a Clear and Compelling Creative: Use high-quality images and videos that reflect your brand and message. Write compelling headlines and descriptions that highlight your value proposition. You can add up to 15 headlines. If you can add 15 unique headlines, do it — but you don’t need to add 15, especially if you’re repeating yourself. 5 is a decent minimum.
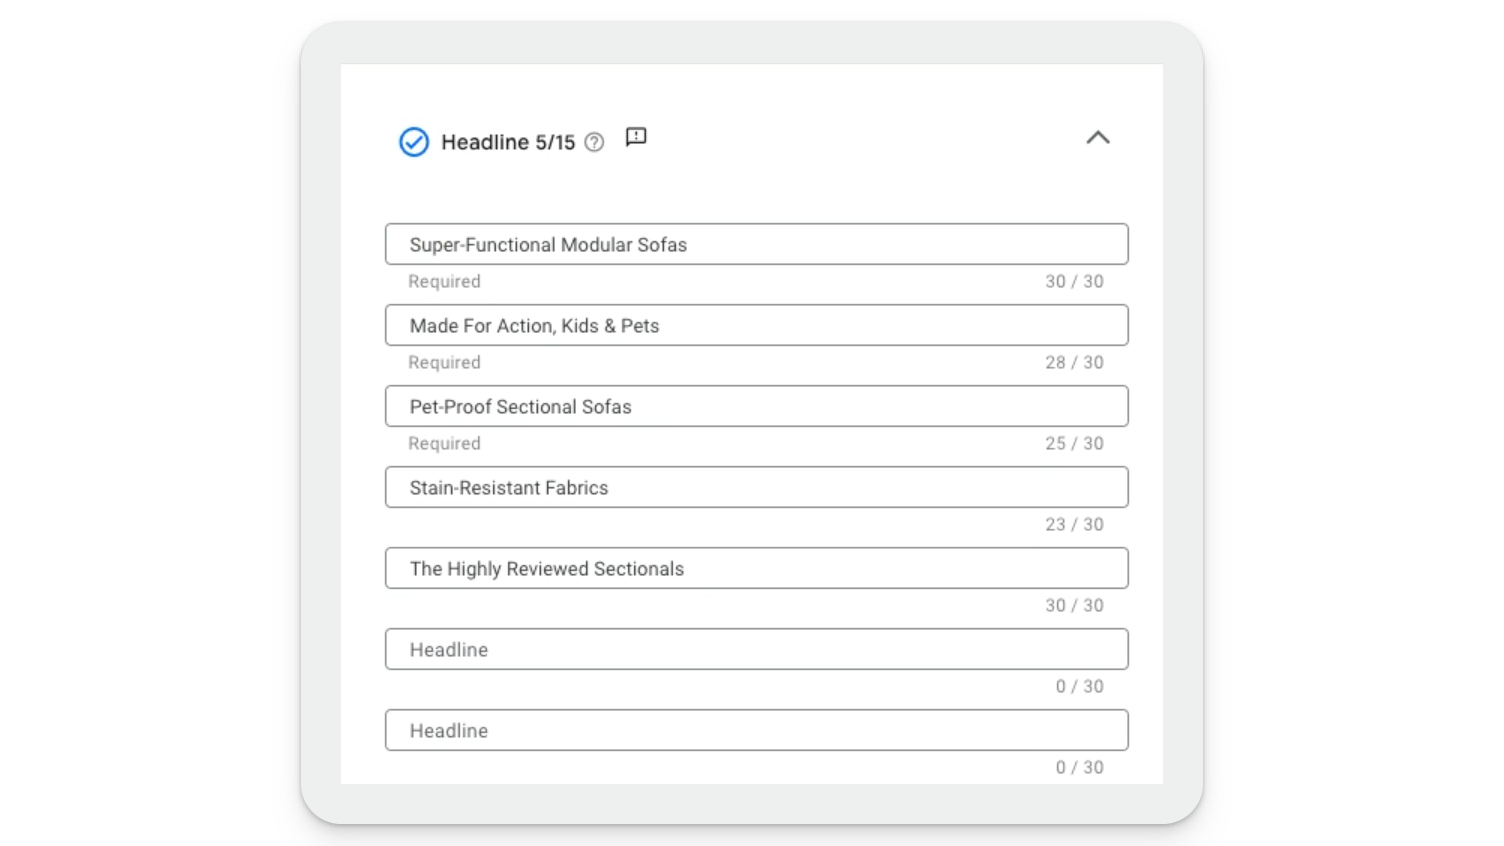
A good rule of thumb when it comes to headlines, is to only add them if they will move the needle. You might consider testing:
Calls to action
Offers
Promos
Product features and benefits
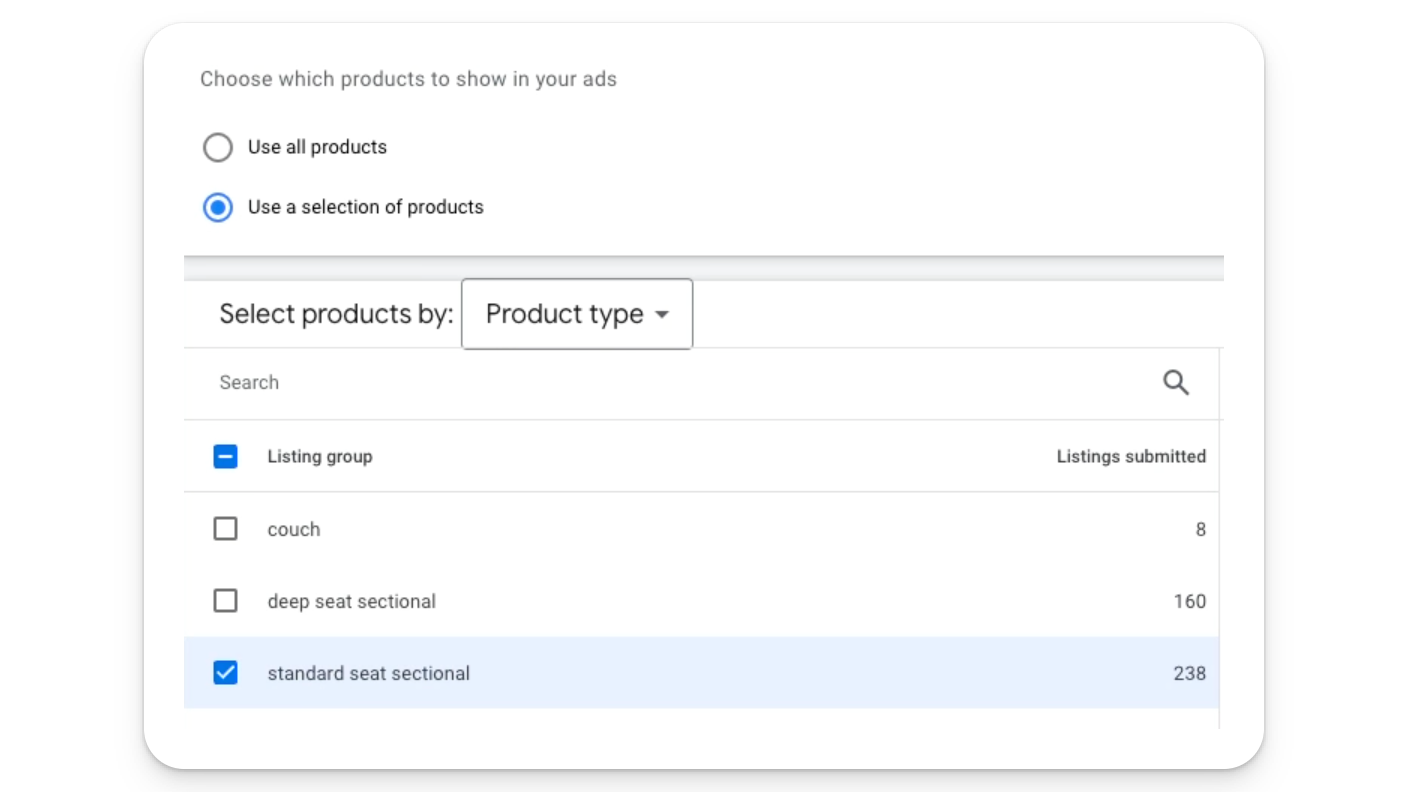
In addition, make sure you’ve selected the right product type under ‘Listing groups.’
When it comes to images, the more the better. If you have 20 images, add them. If you don’t, use what you can.
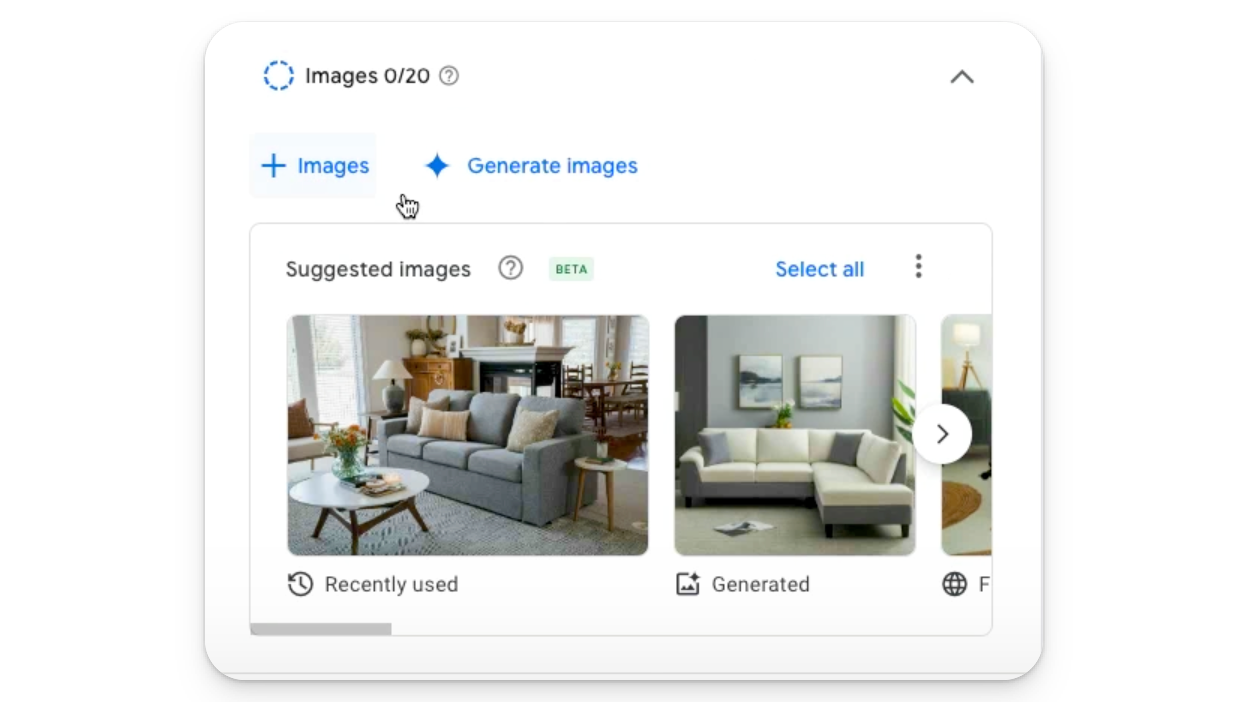
Google can also crawl your website for images, which can be a great alternative.
For the rest of the settings, make sure to go through and select what makes sense based on your business and advertising goals.
Segment Your Audiences: Though Performance Max automatically targets your ads, you can guide Google by defining audience segments based on interests, demographics, or customer lists.
There’s a lot here so if you would like a more granular, step-by-step breakdown of exactly which settings are recommended and why (including sneaky location settings), you can get access to our free Performance Max course here, then check out the video “How to Set Up Full Performance Max Campaigns.”
Step 5: Implement Conversion Tracking
To measure the success of your Performance Max campaign accurately, set up conversion tracking. This involves creating conversion actions in Google Ads for various objectives, such as purchases or sign-ups, and installing the necessary tracking codes on your website.
Step 6: Launch and Monitor Your Campaign
Once everything is set up, review your campaign settings and launch. Monitoring your campaign’s performance is crucial. Use Google Ads’ reporting tools to analyze metrics like conversion rate, cost per action (CPA), and return on ad spend (ROAS). Adjust your asset groups, budget, and bidding strategy based on performance data to optimize results.
Conclusion
Setting up a Performance Max campaign may seem daunting at first, but by following these steps, you can harness Google’s machine learning to achieve your advertising goals. Remember, the key to success with Performance Max is continuous optimization based on performance data. Stay engaged, be willing to experiment with different asset combinations, and adjust your strategy as needed to maximize your campaign’s effectiveness.
Performance Max Optimization: Tips and Tricks
In addition to establishing the right campaign structure, there are a few key metrics you’ll want to pay attention to in order to make your PMax campaigns the best they can be.
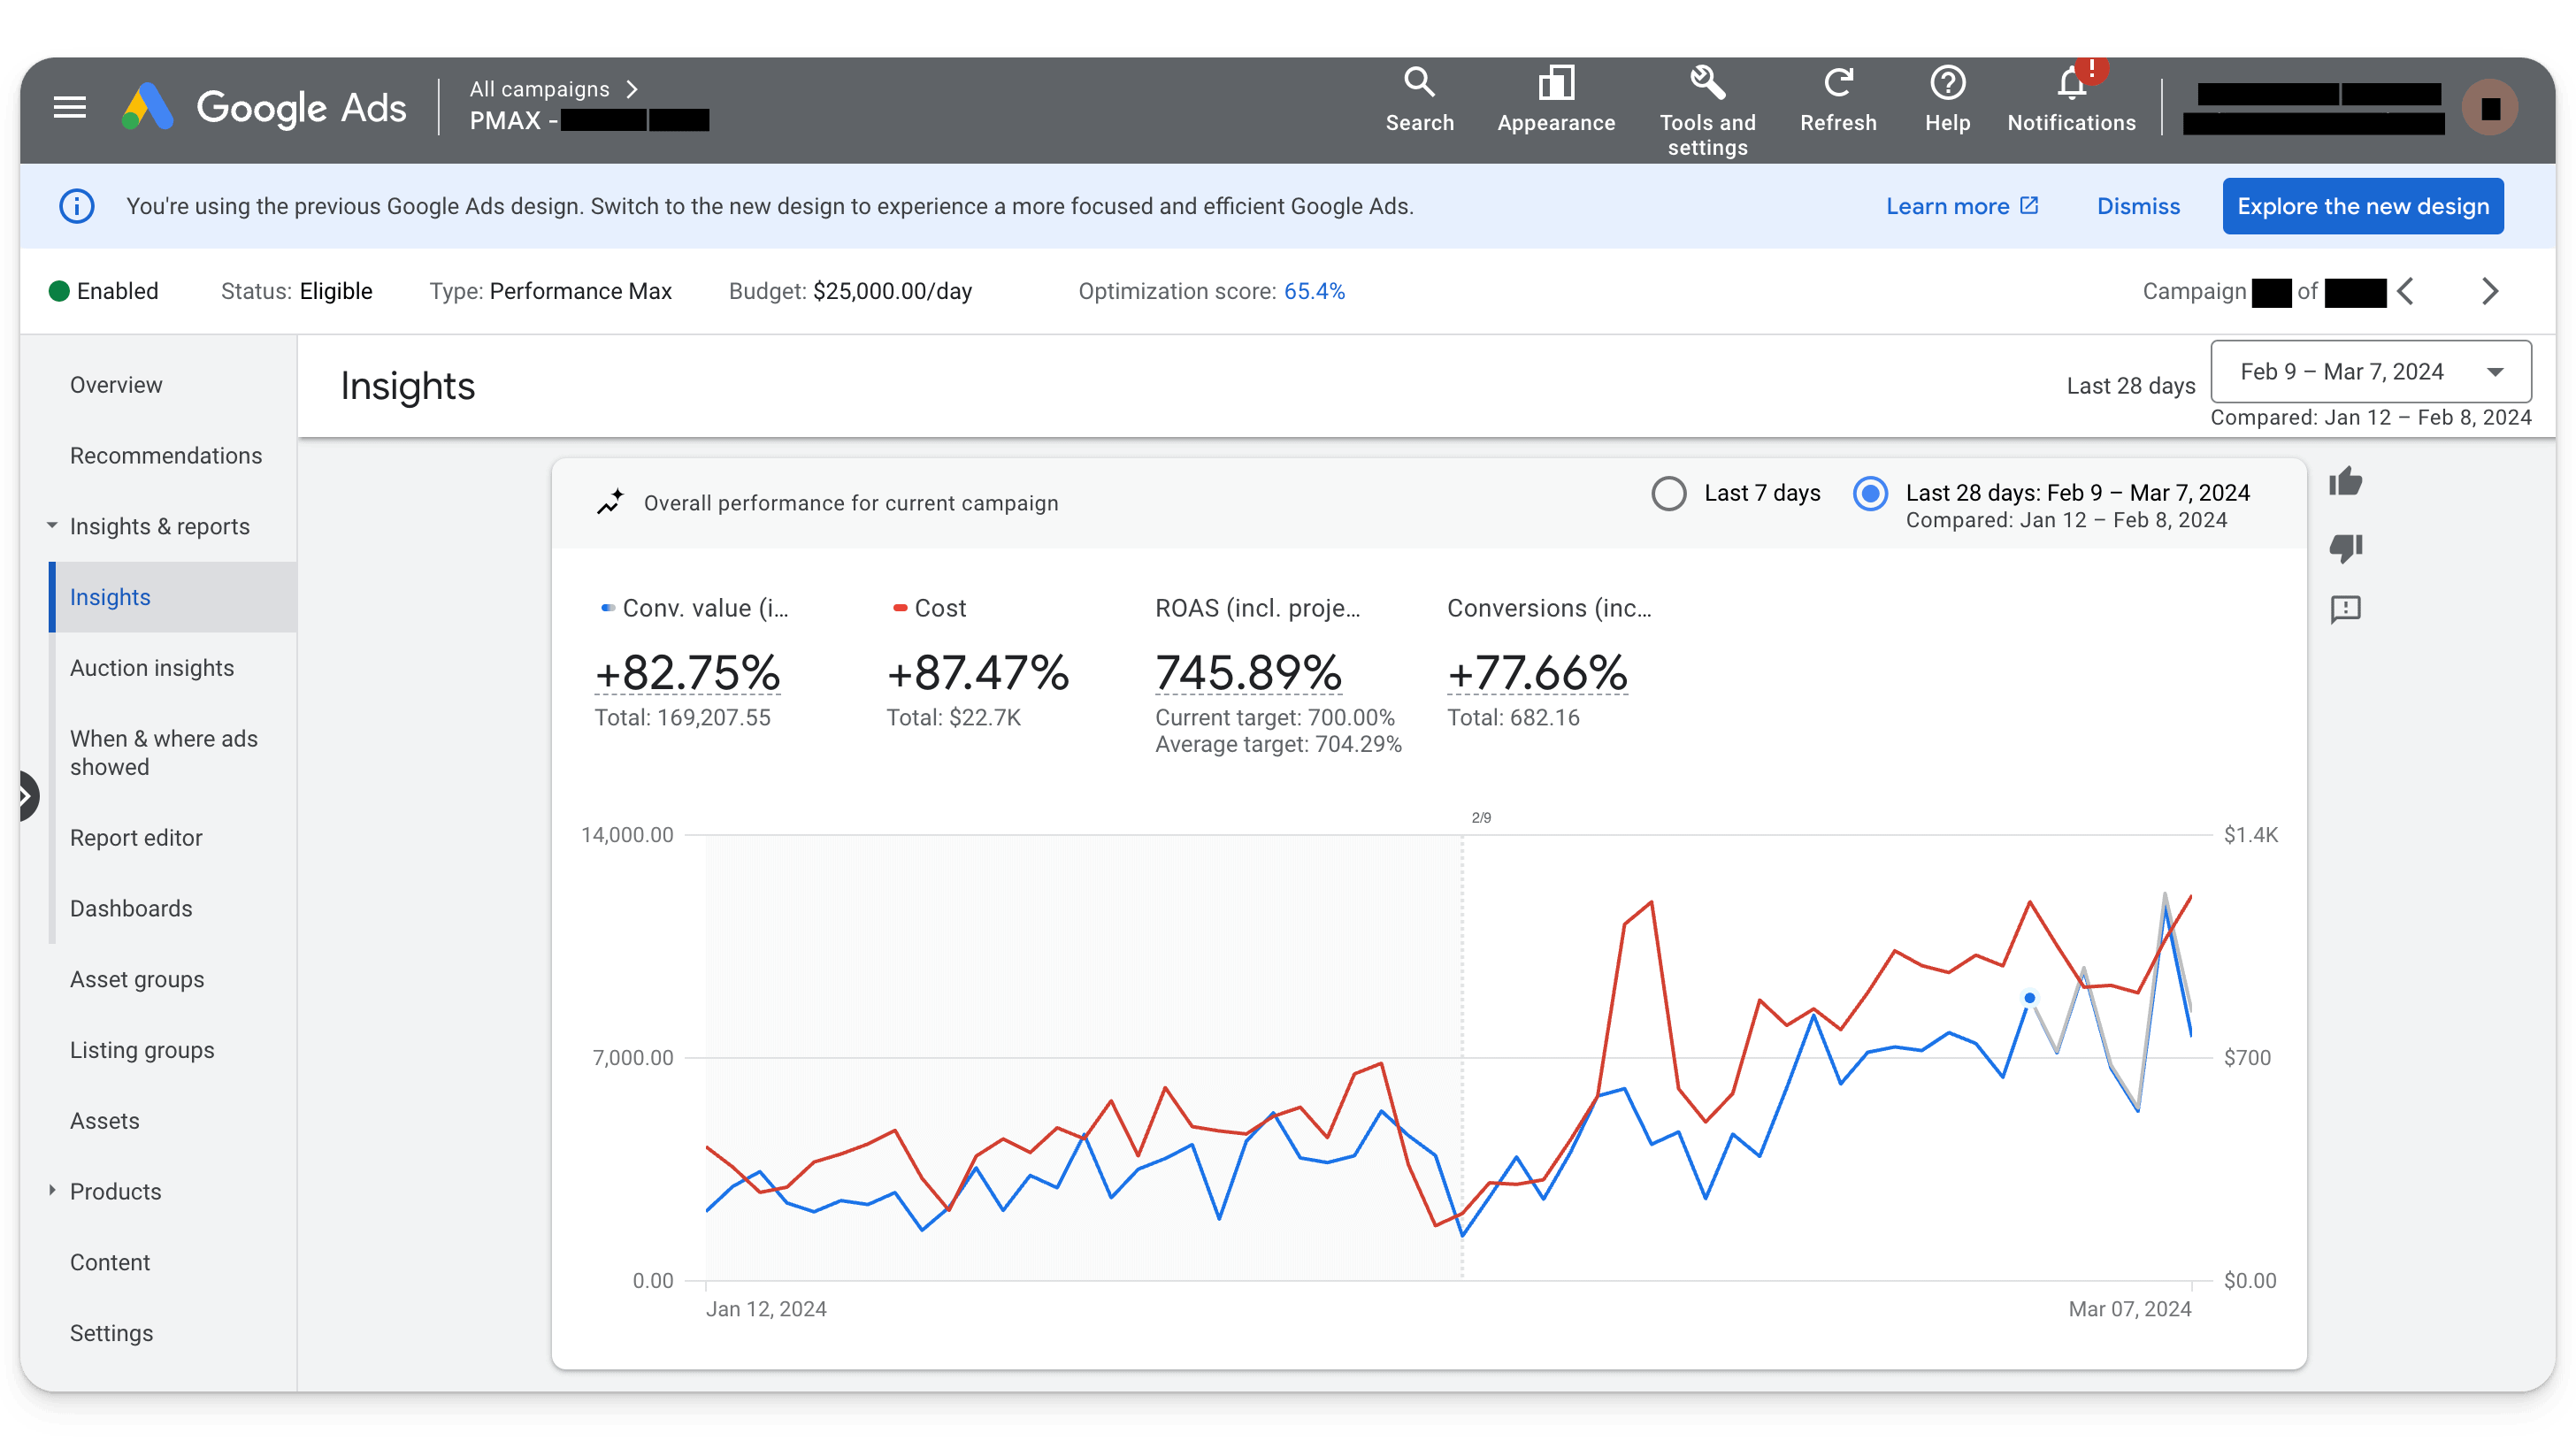
Insights
The Insights tab in your Performance Max campaign is where the Google Ads gold is. Here, you’ll find information on your campaign’s overall performance:
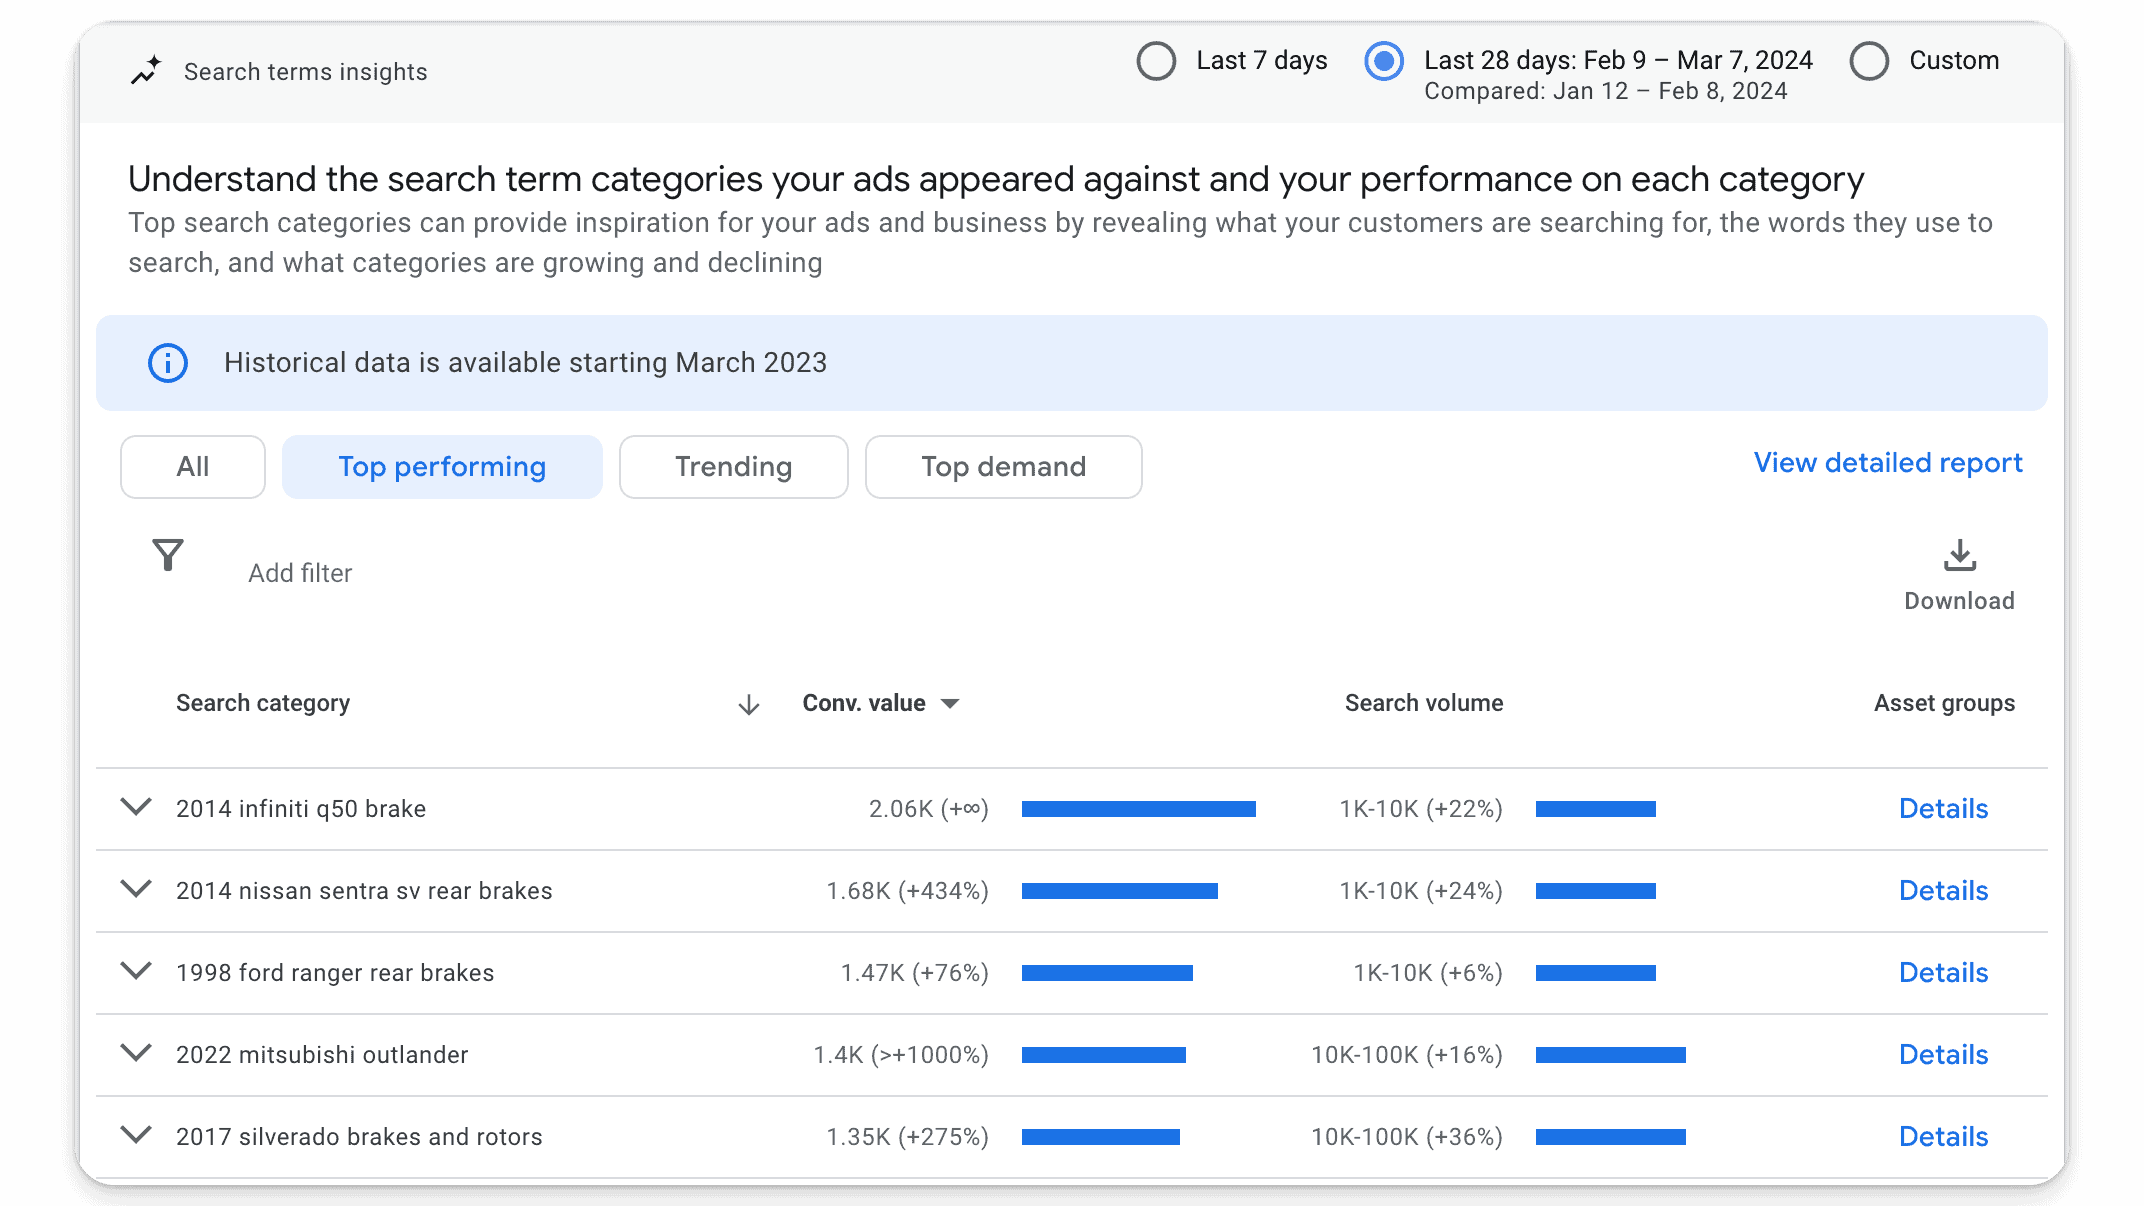
Search terms:
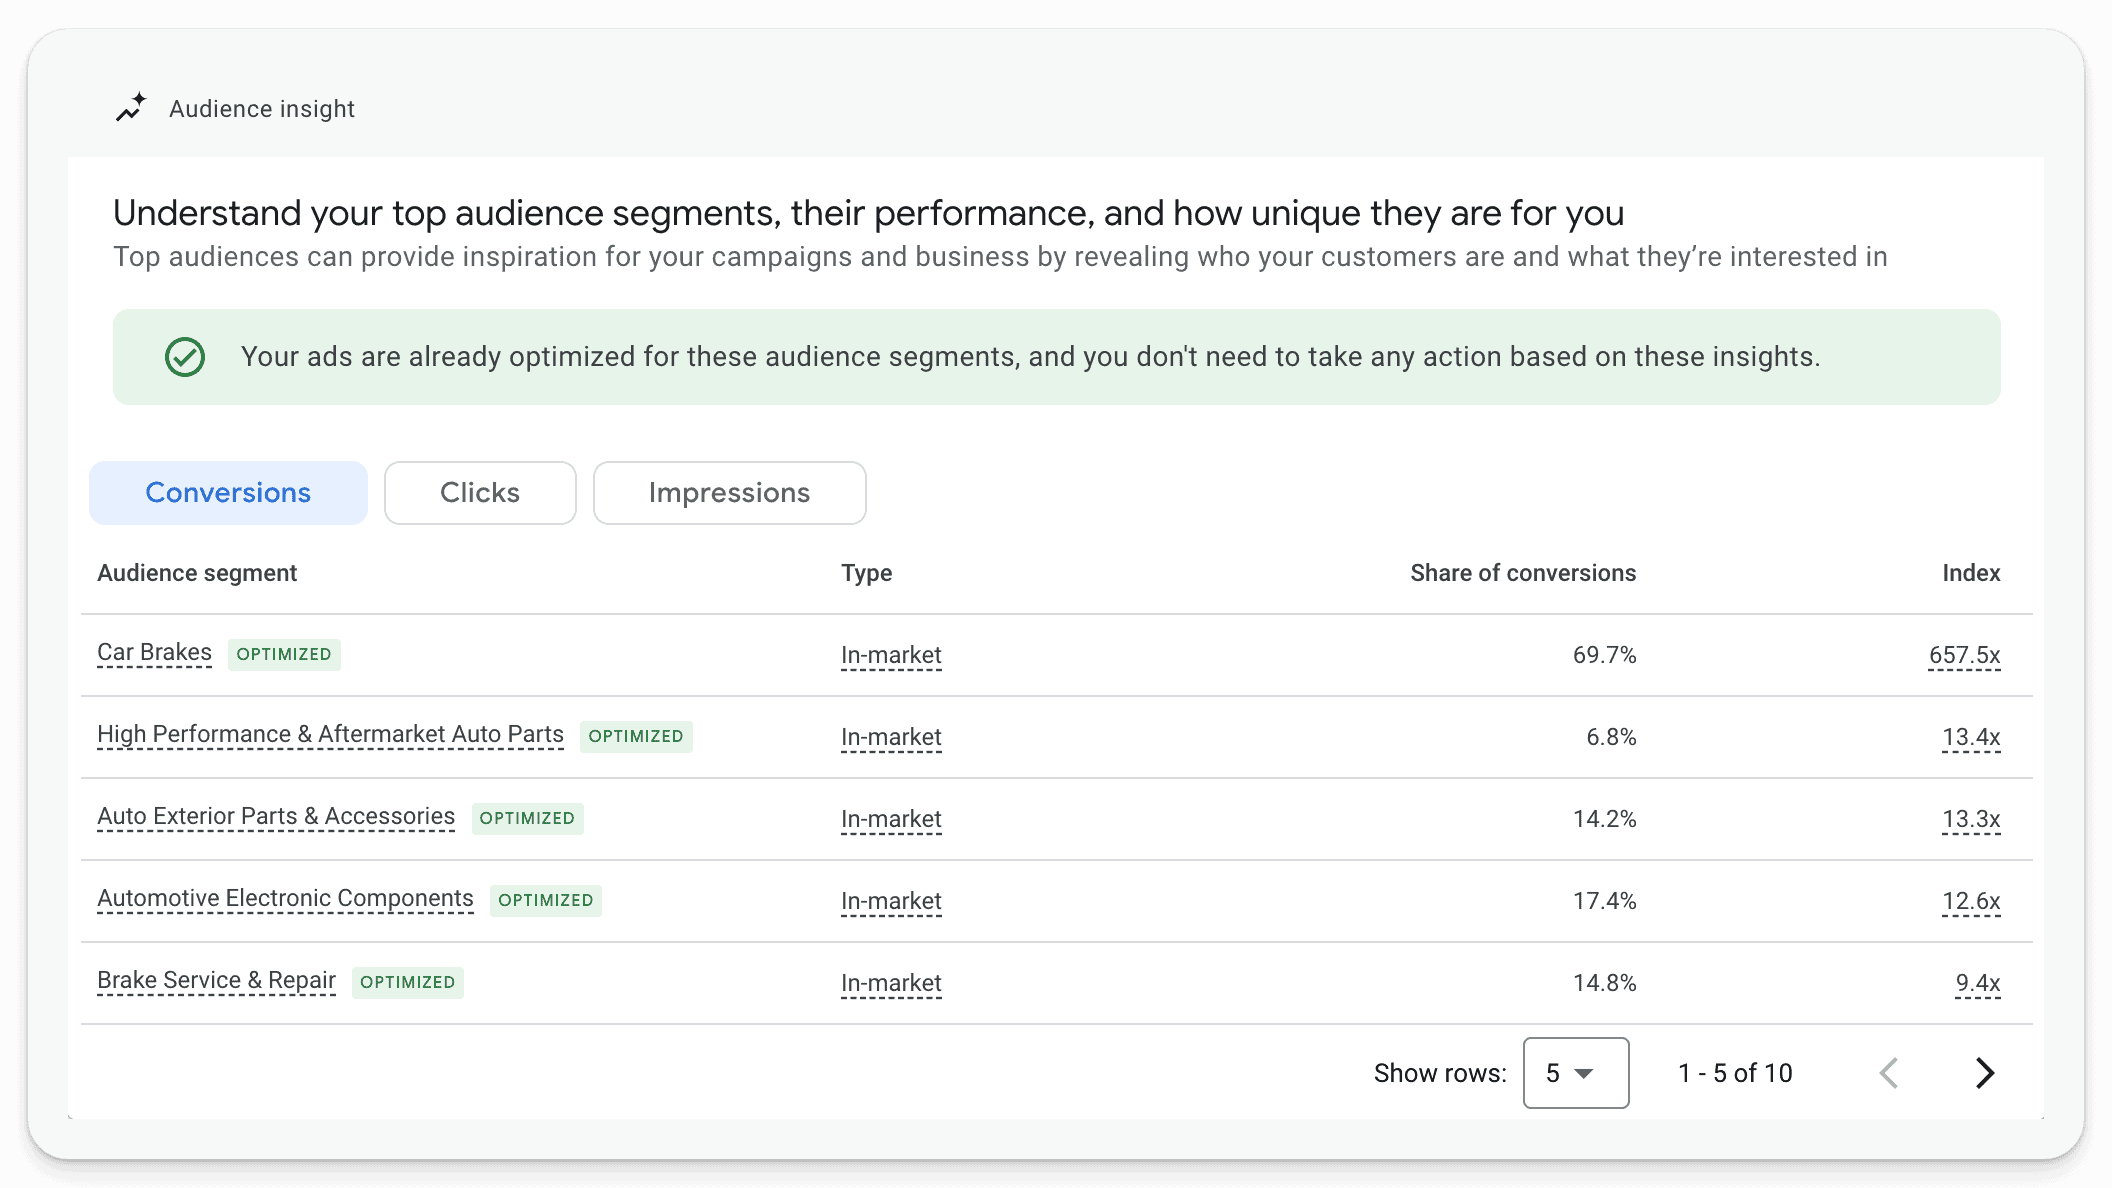
Audience insights:
And more.
This is all extremely valuable information, which you can utilize in future campaigns.
Assets
When it comes to asset optimization, it’s better to keep it simple. Test changing out poor performing assets for new assets.
Monitor (and improve when necessary) your:
Ad copy
Images
Videos
As far as creative goes, focus on the most important elements — including:
Call to action (CTA)
Offer (prices/promos)
Benefits and features
Google Shopping Feed Optimization (Made Simple)
Within your Merchant Center account lies your shopping feed, a crucial element for your online presence. The Google Shopping Feed can be intimidating.

Fortunately, it doesn’t have to be.
In general, we recommend using a tool to manage your shopping feed. For most ecommerce businesses, feeds need to be fetched automatically due to frequent changes in inventory, pricing, and other details.
A quick glance at the product attributes required for your feed might alarm you at first. From GTIN numbers to product titles, images, and categories — the list is extensive. As it happens, only some of these attributes are actually necessary, and focusing on them can make a significant difference to your feed. Let’s dive in.
Attributes Most Likely to Move the Needle
Certain attributes influence your feed’s performance more than others. These are the major attributes to pay attention to when building out your shopping feed:
Price: This is a huge determinant, though not always within your control. If you sell the same product as a competitor, the lowest price will win regardless of how terrible a feed is. That said, do not try sneaky price baiting tricks, as Google will catch this eventually.
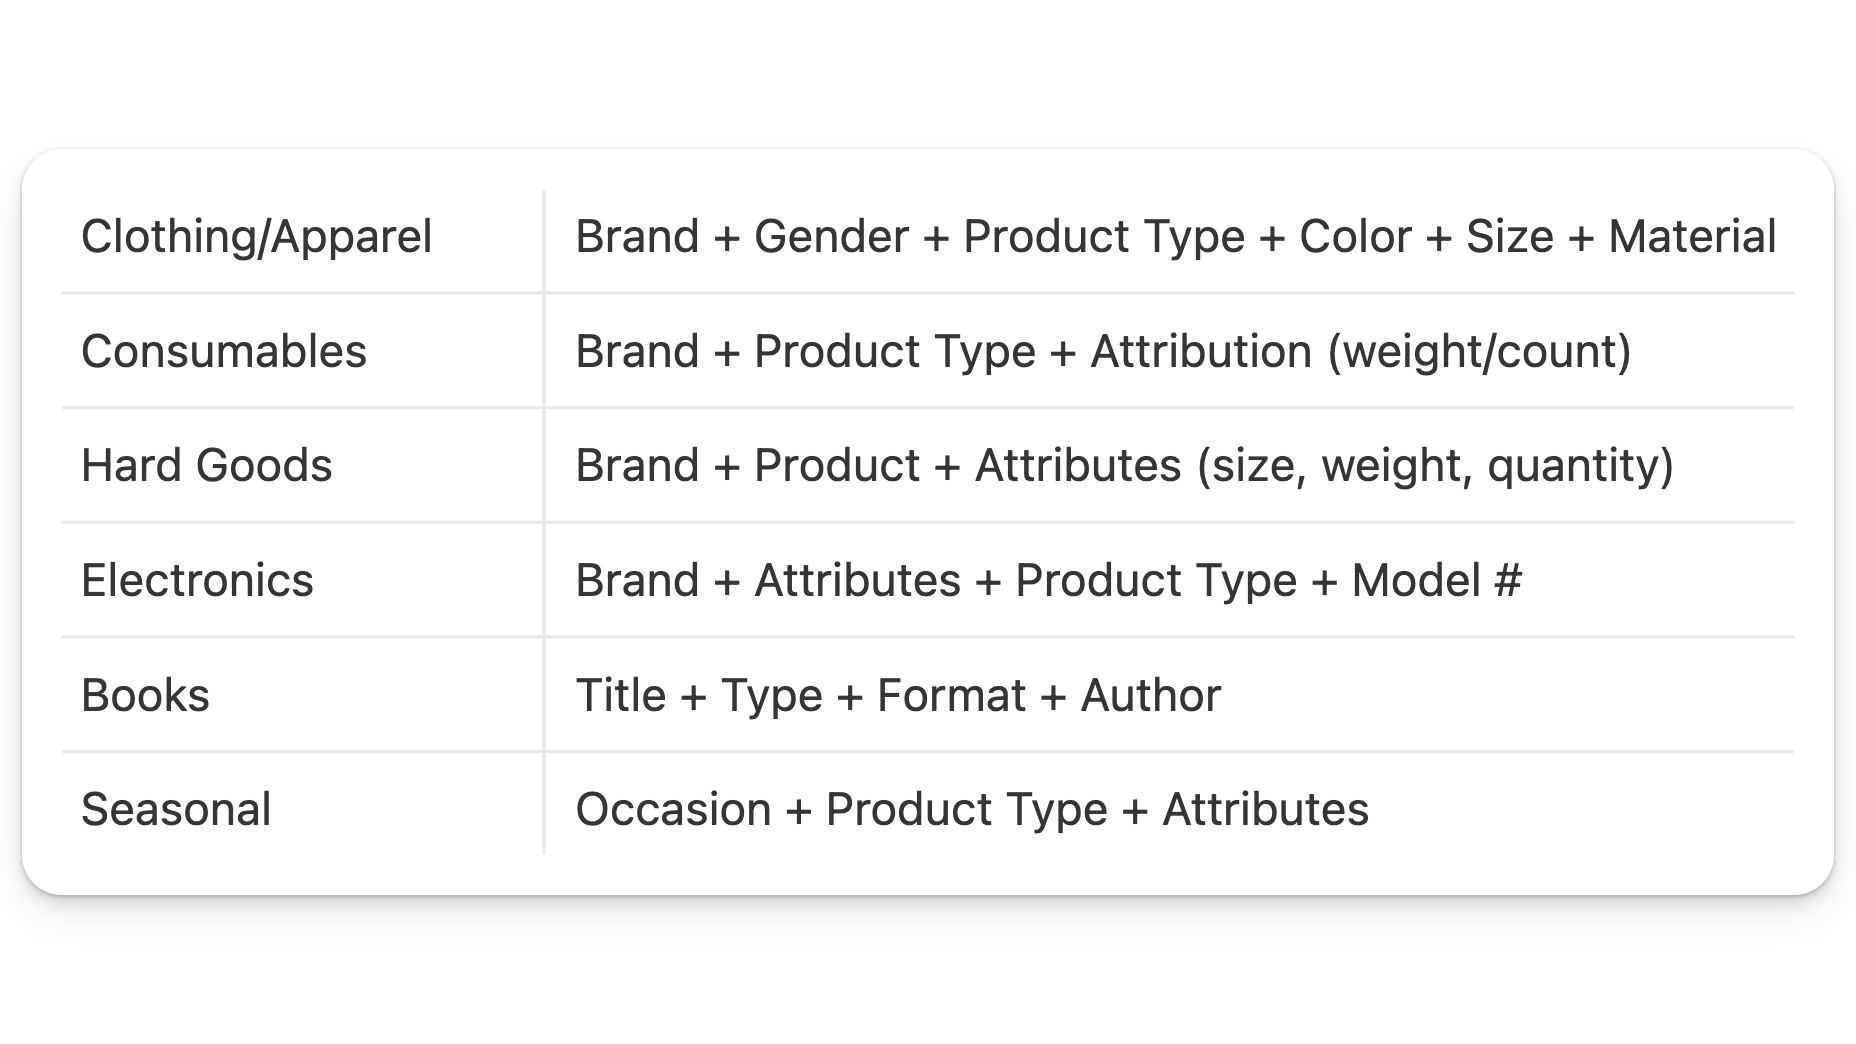
Title: This is the most important attribute of your feed that is 100% in your control. Proper keyword placement and understanding how your audience searches for products like yours are key. Also, word order matters: keep the most important keywords toward the beginning of your title. Google only reads 150 characters and titles shown in the SERP can cut off at 30 characters. Here are a few title structure ideas:
GTIN Numbers: These have become increasingly important for Google, so ensure they’re in your feed if applicable. You can find your GTINs from your supplier, manufacturer, or barcode lookup.
Images and Descriptions: High-quality, relevant images on a white or transparent background and descriptive, keyword-rich product descriptions can enhance your product’s appeal.
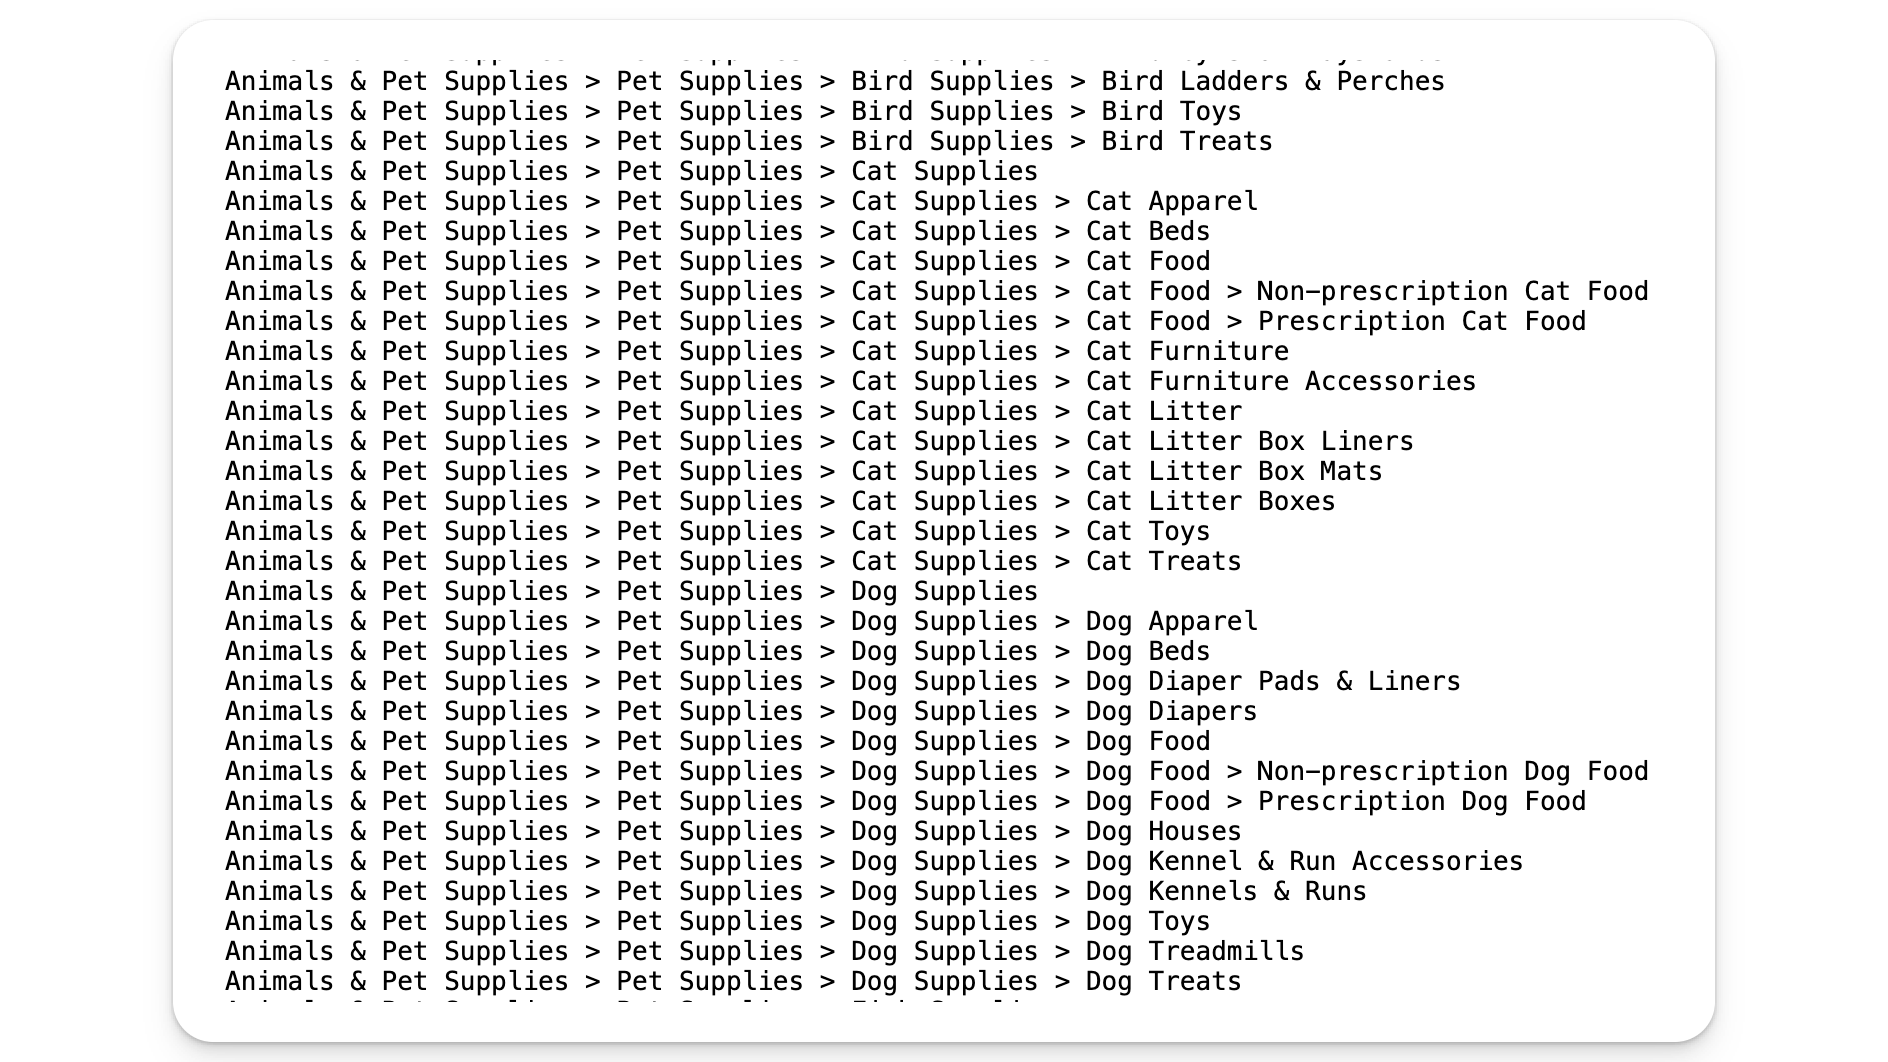
Category: Having the correct Google Product Categories will increase your chances of showing for the correct search terms. Review Google’s product taxonomy, and remember: if you don’t include a product category, Google will choose one for you.
Required Feed Attributes
Out of all of the possible attributes you might add, Google only requires a few. Although it’s usually a good idea to fill out as many attributes as you can, sometimes it isn’t possible. In that case, you’ll want to make sure you have at least completed all of the required attributes (or else risk disapproval). These are:
ID (Unique identifier for each product)
Title (Product title)
Product description
Price
Availability
Link (Product URL)
Image link (Product image URL)
Brand
GTIN (Global Trade Item Number)
Optional Feed Attributes
Some feed attributes are not required by Google to show your ads. Here’s a list of optional feed attributes:
product_type (Product type)
mpn (Manufacturer Part Number) [Recommended]
google_product_category (Google product category) [Recommended]
availability (Product availability)
color (Product color)
size (Product size)
weight (Product weight)
shipping (Product shipping)
condition (Product condition)
age_group (Product age group)
gender (Product gender)
material (Product material)
pattern (Product pattern)
occasion (Product occasion)
scent (Product scent)
features (Product features)
custom_label (0-4) (Custom attributes) [Recommended]
Recommended Tools
For managing and optimizing your feed, tools like Feedonomics (for enterprise-level needs) and Data Feed Watch (a more budget-friendly option) can be invaluable. They streamline the process, making it easier to maintain an optimized feed that performs well.
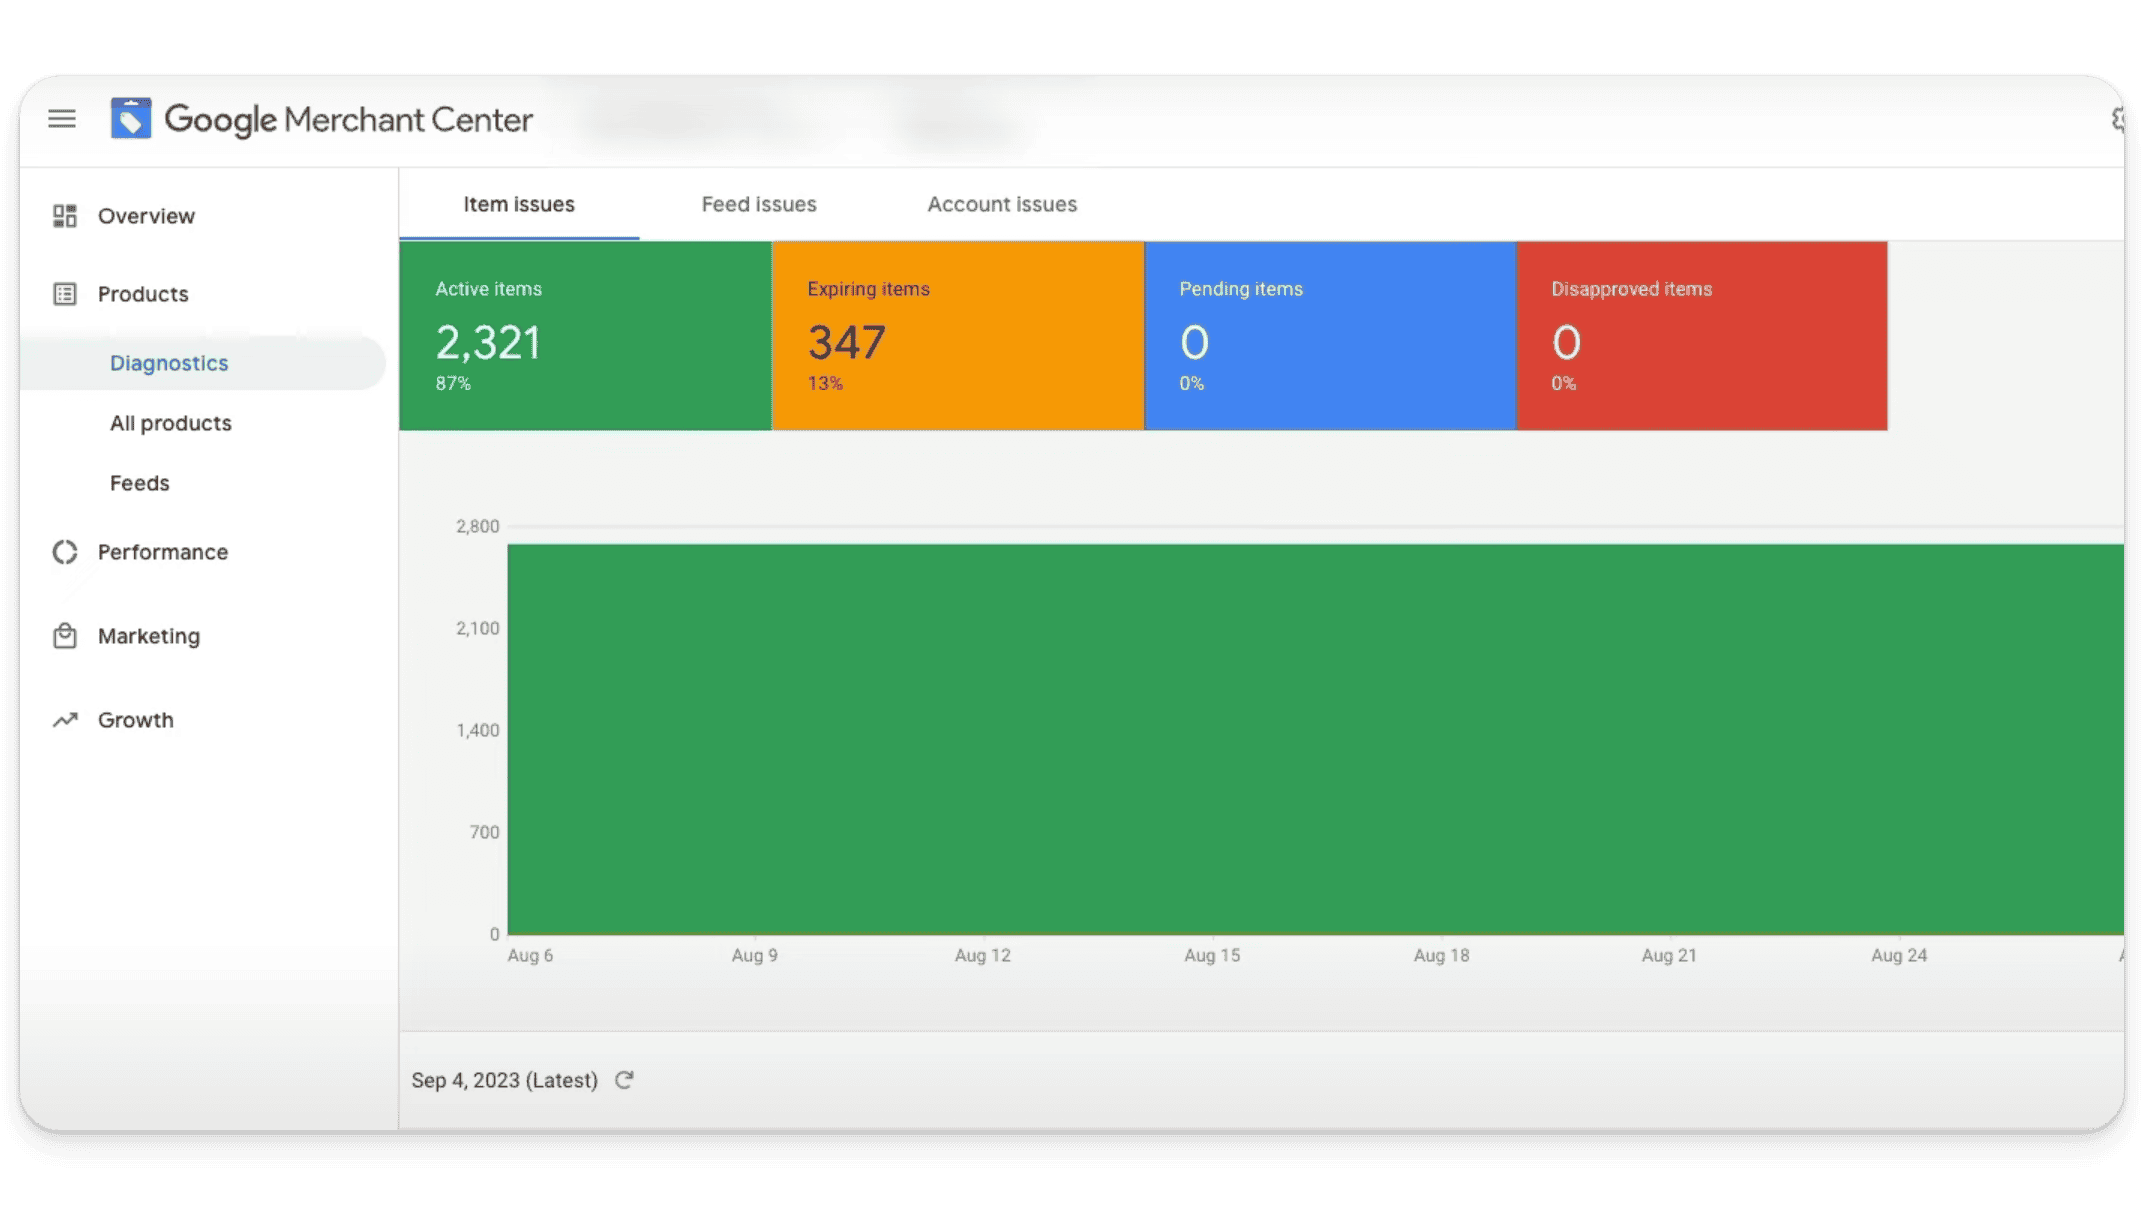
Remember to check Merchant Center often and review your Diagnostics tab for any feed or product issues.
Wrapping Up
Optimizing your Google Shopping feed doesn’t have to be a daunting task. With the right focus and a bit of simplification (while utilizing effective tools), you can enhance your feed’s performance, leading to increased visibility, clicks, and — ultimately — conversions. The more data you give Google, the better your results.
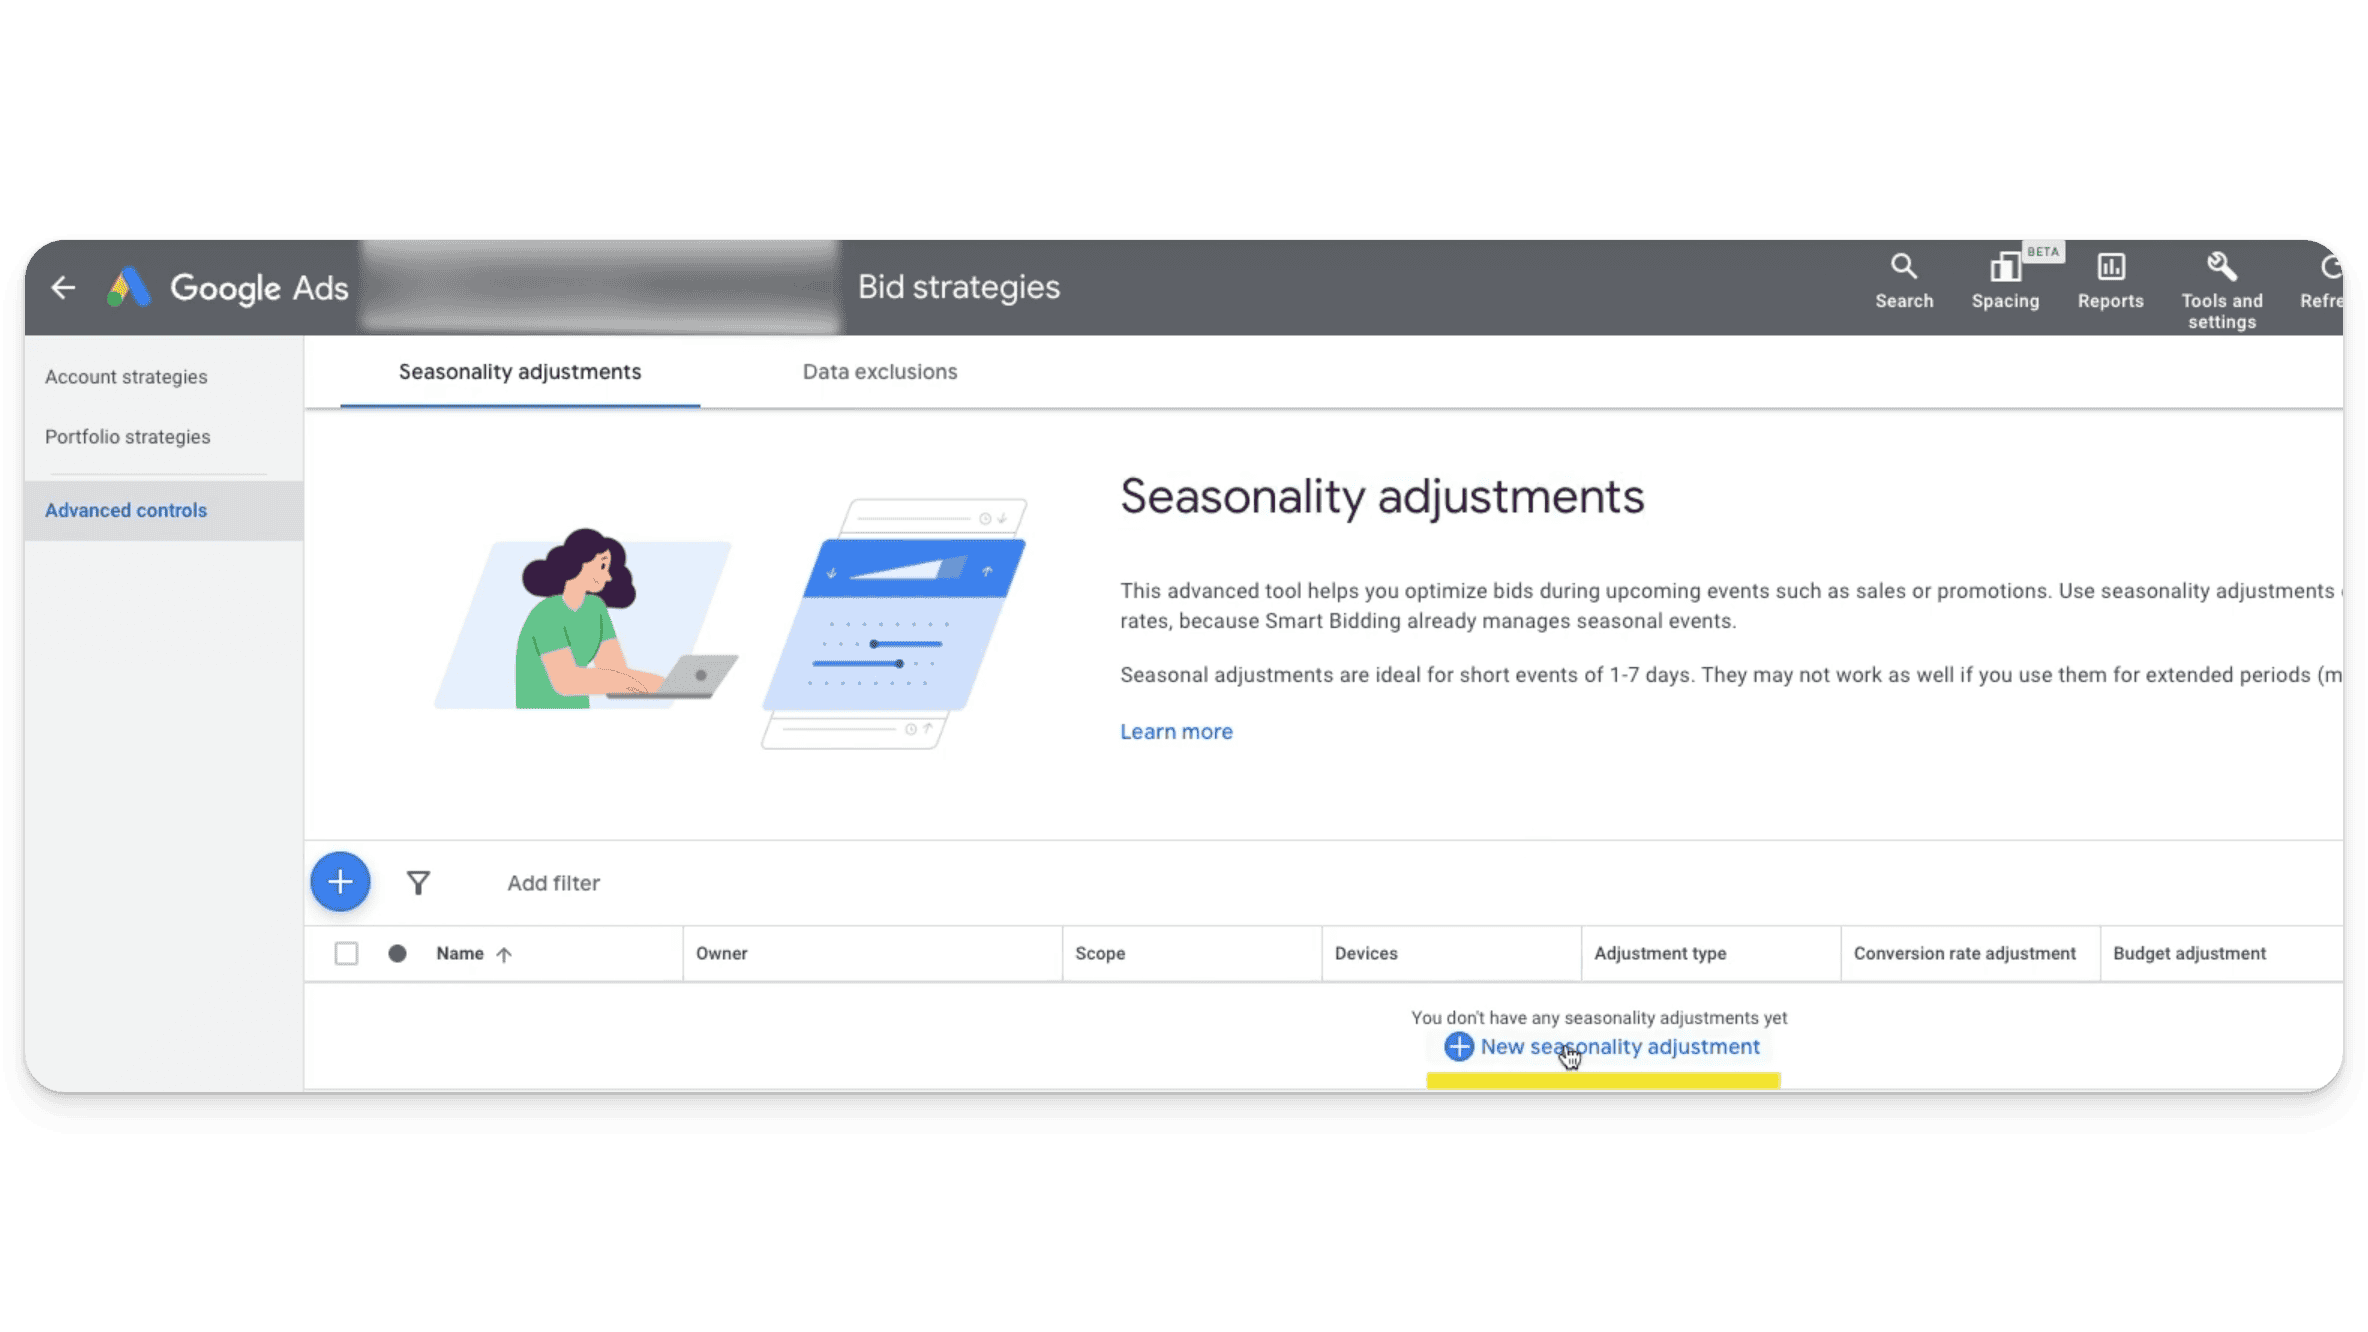
Maximize Sales with Seasonality Adjustments
By definition, seasonality adjustments allow you to inform Google’s smart bidding algorithm of expected conversion rate changes during specific events, typically lasting from 1 to 7 days. Seasonality adjustments can significantly enhance your sales strategy during peak times like Black Friday and Cyber Monday.
However, setting these adjustments correctly is crucial to avoid depleting your budget too early and missing out on potential sales.
Seasonality Adjustments: Set Up
To set up a seasonality bid adjustment effectively, it’s important to avoid a one-size-fits-all approach. Instead, analyze historical data to make informed decisions. For instance, if you experienced a 50% increase in conversion rates during last year’s Black Friday sale, it doesn’t necessarily mean you should set your adjustment to 50%. You’ll also want to consider other factors such as the change in average cost-per-click (CPC) and your impression share during the event.
A practical approach involves examining the performance of specific campaigns from previous years, focusing on conversion rates, CPC, and top impression share. This will help determine a more accurate and potentially conservative percentage for your seasonality bid adjustment. It’s essential to align this percentage with your historical data to avoid unnecessarily inflating your CPC or depleting your budget too early in the day.
Some key takeaways for setting up seasonality bid adjustments:
Use Historical Data: Base your adjustments on detailed analysis of past performance during similar sales events.
Adjust Conservatively: Set a percentage that reflects your historical conversion rate increase without overly inflating your CPC.
Monitor Impression Share: Ensure your adjustment doesn’t negatively impact your visibility or competitiveness during the event.
Focus on Specific Campaigns: Apply adjustments at the campaign level to account for variations in performance across different product categories.
For a more thorough treatment of seasonality adjustments, check out this blog post or watch our video.
The bottom line? By adopting a data-driven approach to seasonality bid adjustments, you can optimize your bids more effectively, ensuring that your campaigns are competitive during crucial sales periods without overshooting your budget. This strategy not only prevents wasteful spending but also maximizes your sales potential during high-traffic events.
Location Settings
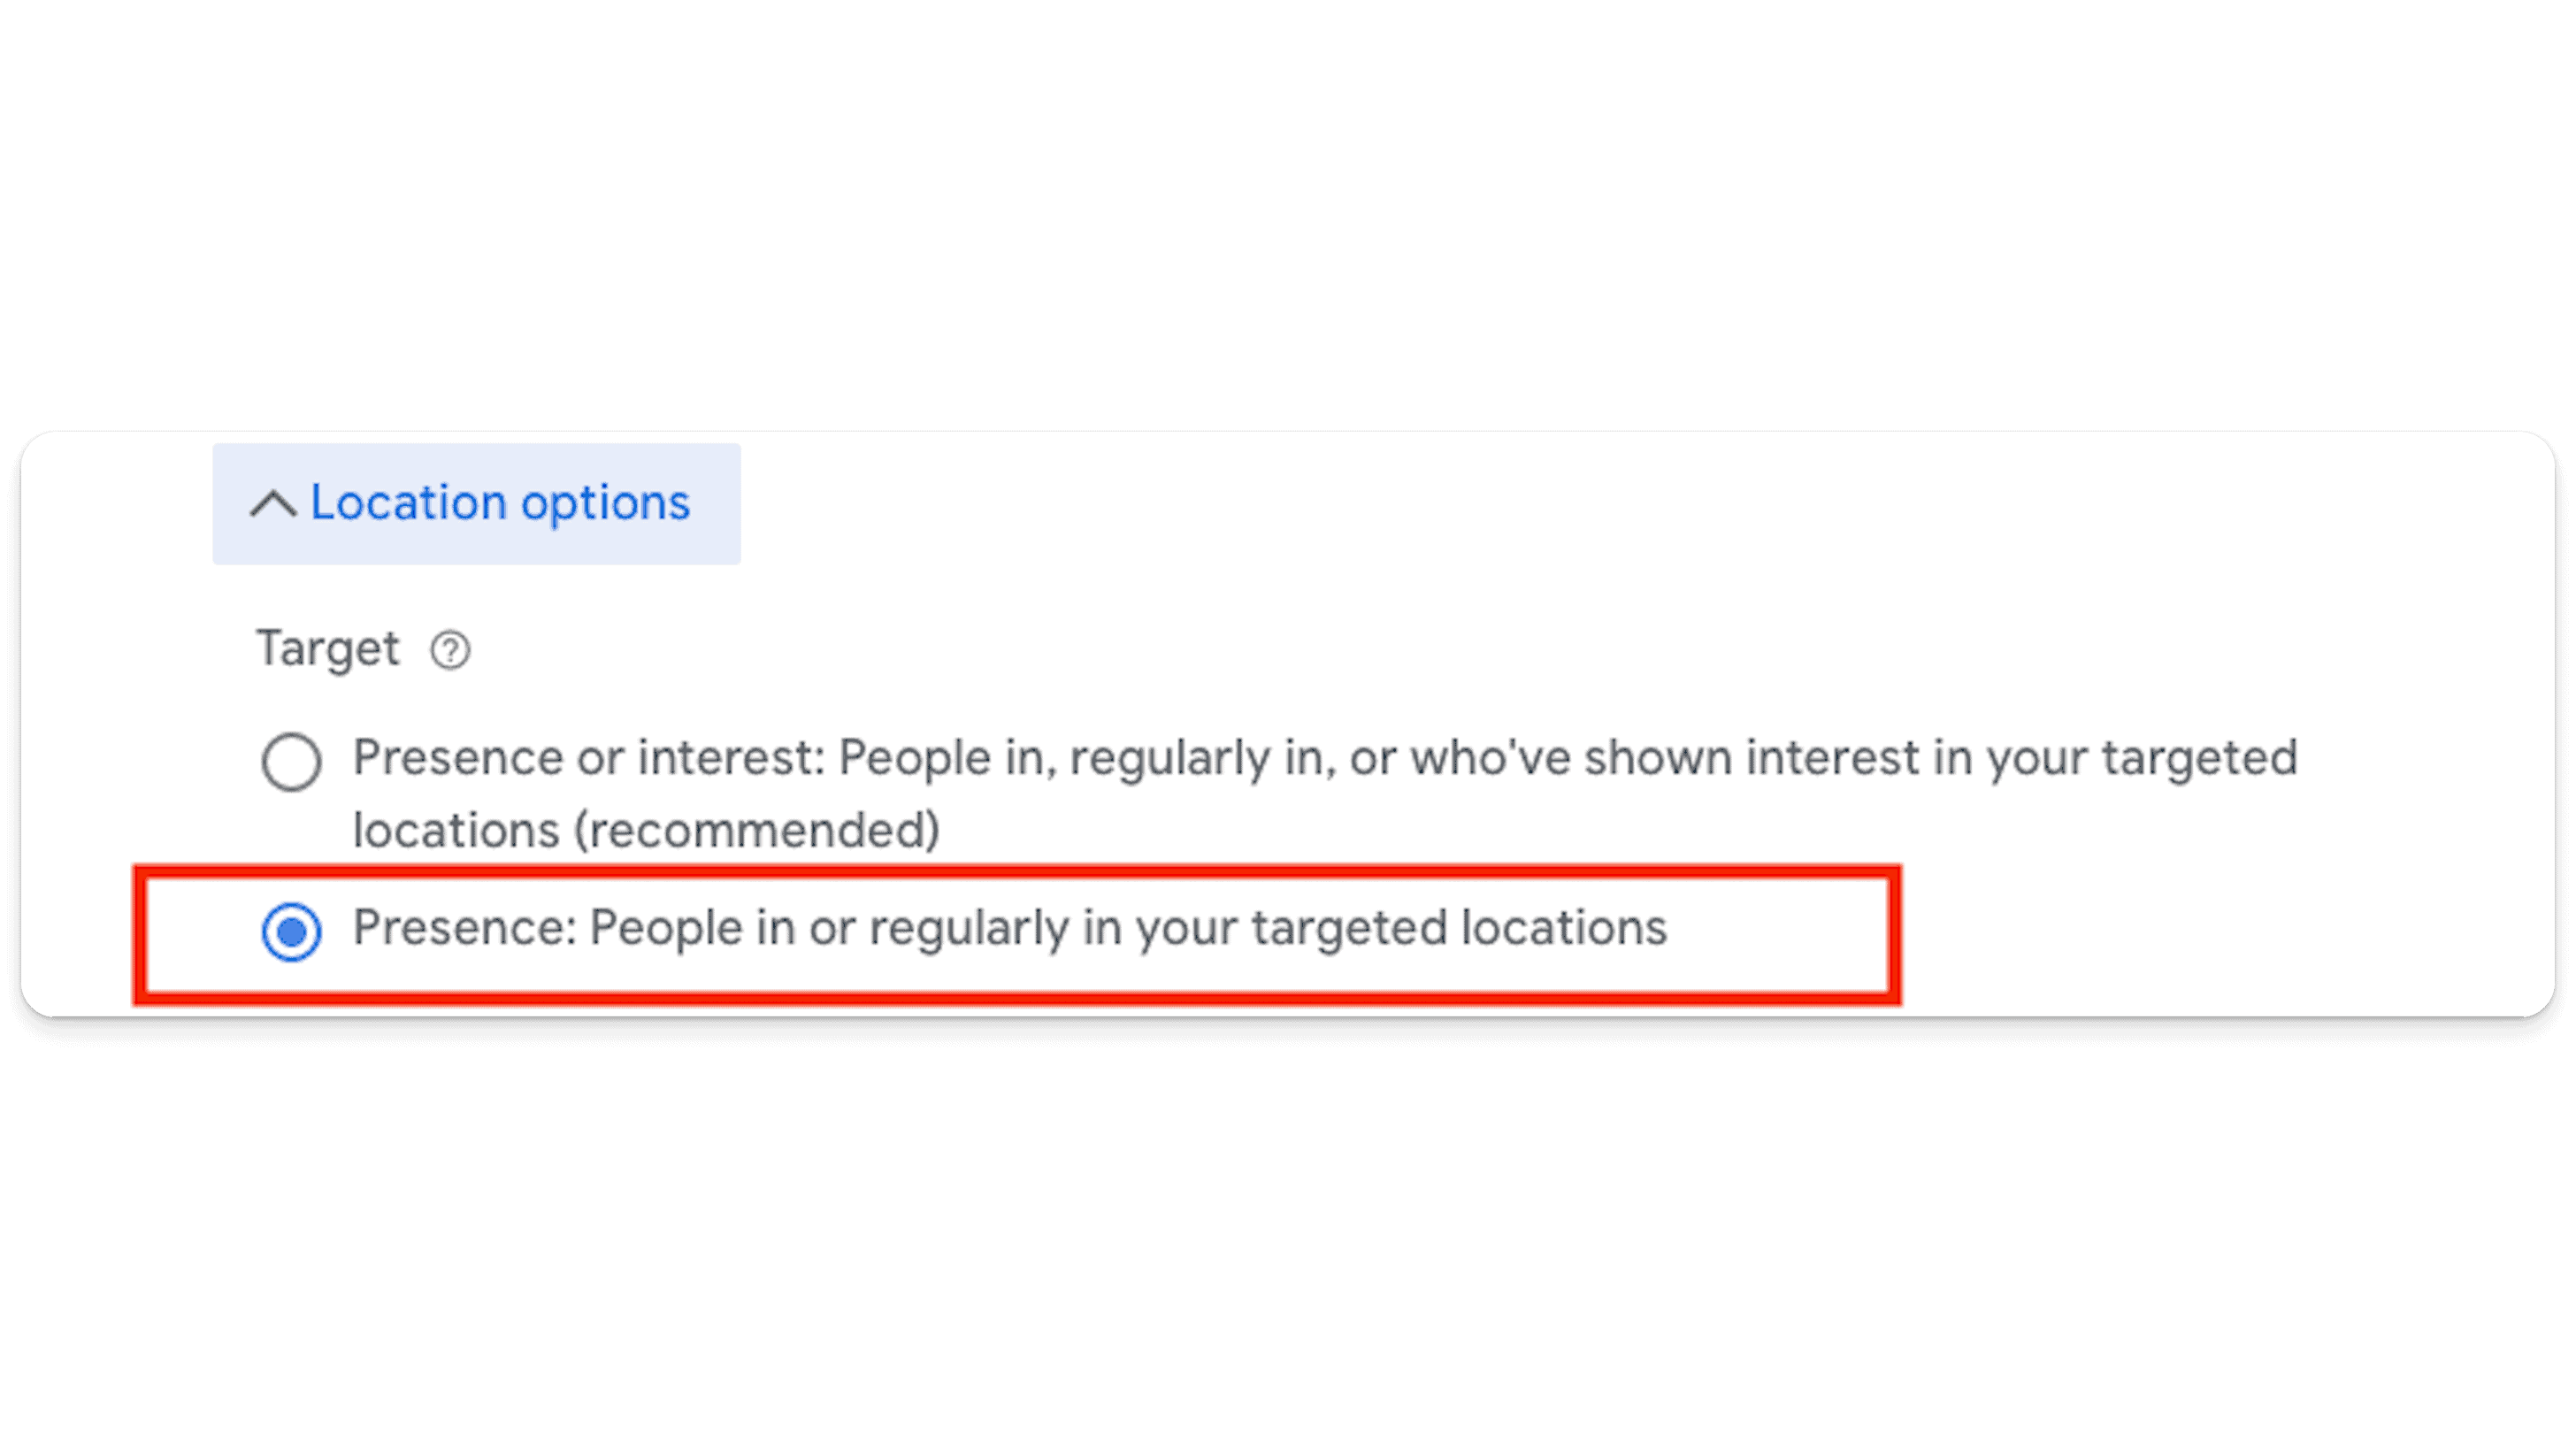
The Location Settings function in Google Ads is pivotal for targeting your advertisements accurately, especially in Performance Max campaigns. To ensure your ads are seen by your intended audience within specific geographical areas, you should adjust the Location targeting to ‘Presence’ only. This adjustment is crucial because PMax campaigns are known for their expansive reach, often displaying ads outside of the targeted locations, leading to unnecessary ad impressions in undesired areas.
To set this up in your Performance Max campaign, follow these steps:
Click on ‘Settings’
Open the ‘Locations’ section
Select ‘Location Options.’
Once you’re in ‘Location Options,’ choose ‘Presence’ to narrow down the targeting.
This will help prevent your ads from appearing to users outside your geo-targeted locations. Implementing this setting helps concentrate your advertising efforts on the regions that matter most to your business — optimizing your ad spend, while increasing the relevance of your ad impressions.
Final URL Expansion
With final URL expansion, Google can optimize your ad performance by potentially directing users to landing pages other than the one specified in your ad’s final URL.
This is particularly beneficial for Search Ads, as it helps match user queries with the most relevant pages on your site, enhancing user experience and potentially improving conversion rates.
To make the most out of final URL expansion, it’s advisable to actively manage and exclude specific URLs where you do not want ad traffic directed. This could include pages not optimized for conversions, such as contact forms or privacy policies, similar to how you would curate destinations for Dynamic Search Ads (DSAs). By carefully selecting and excluding URLs, advertisers can ensure that their ad traffic is more effectively targeted, leading to better campaign outcomes.
To set this up:
Log into your PMax campaign and click ‘Settings’
Click ‘Campaign Settings’
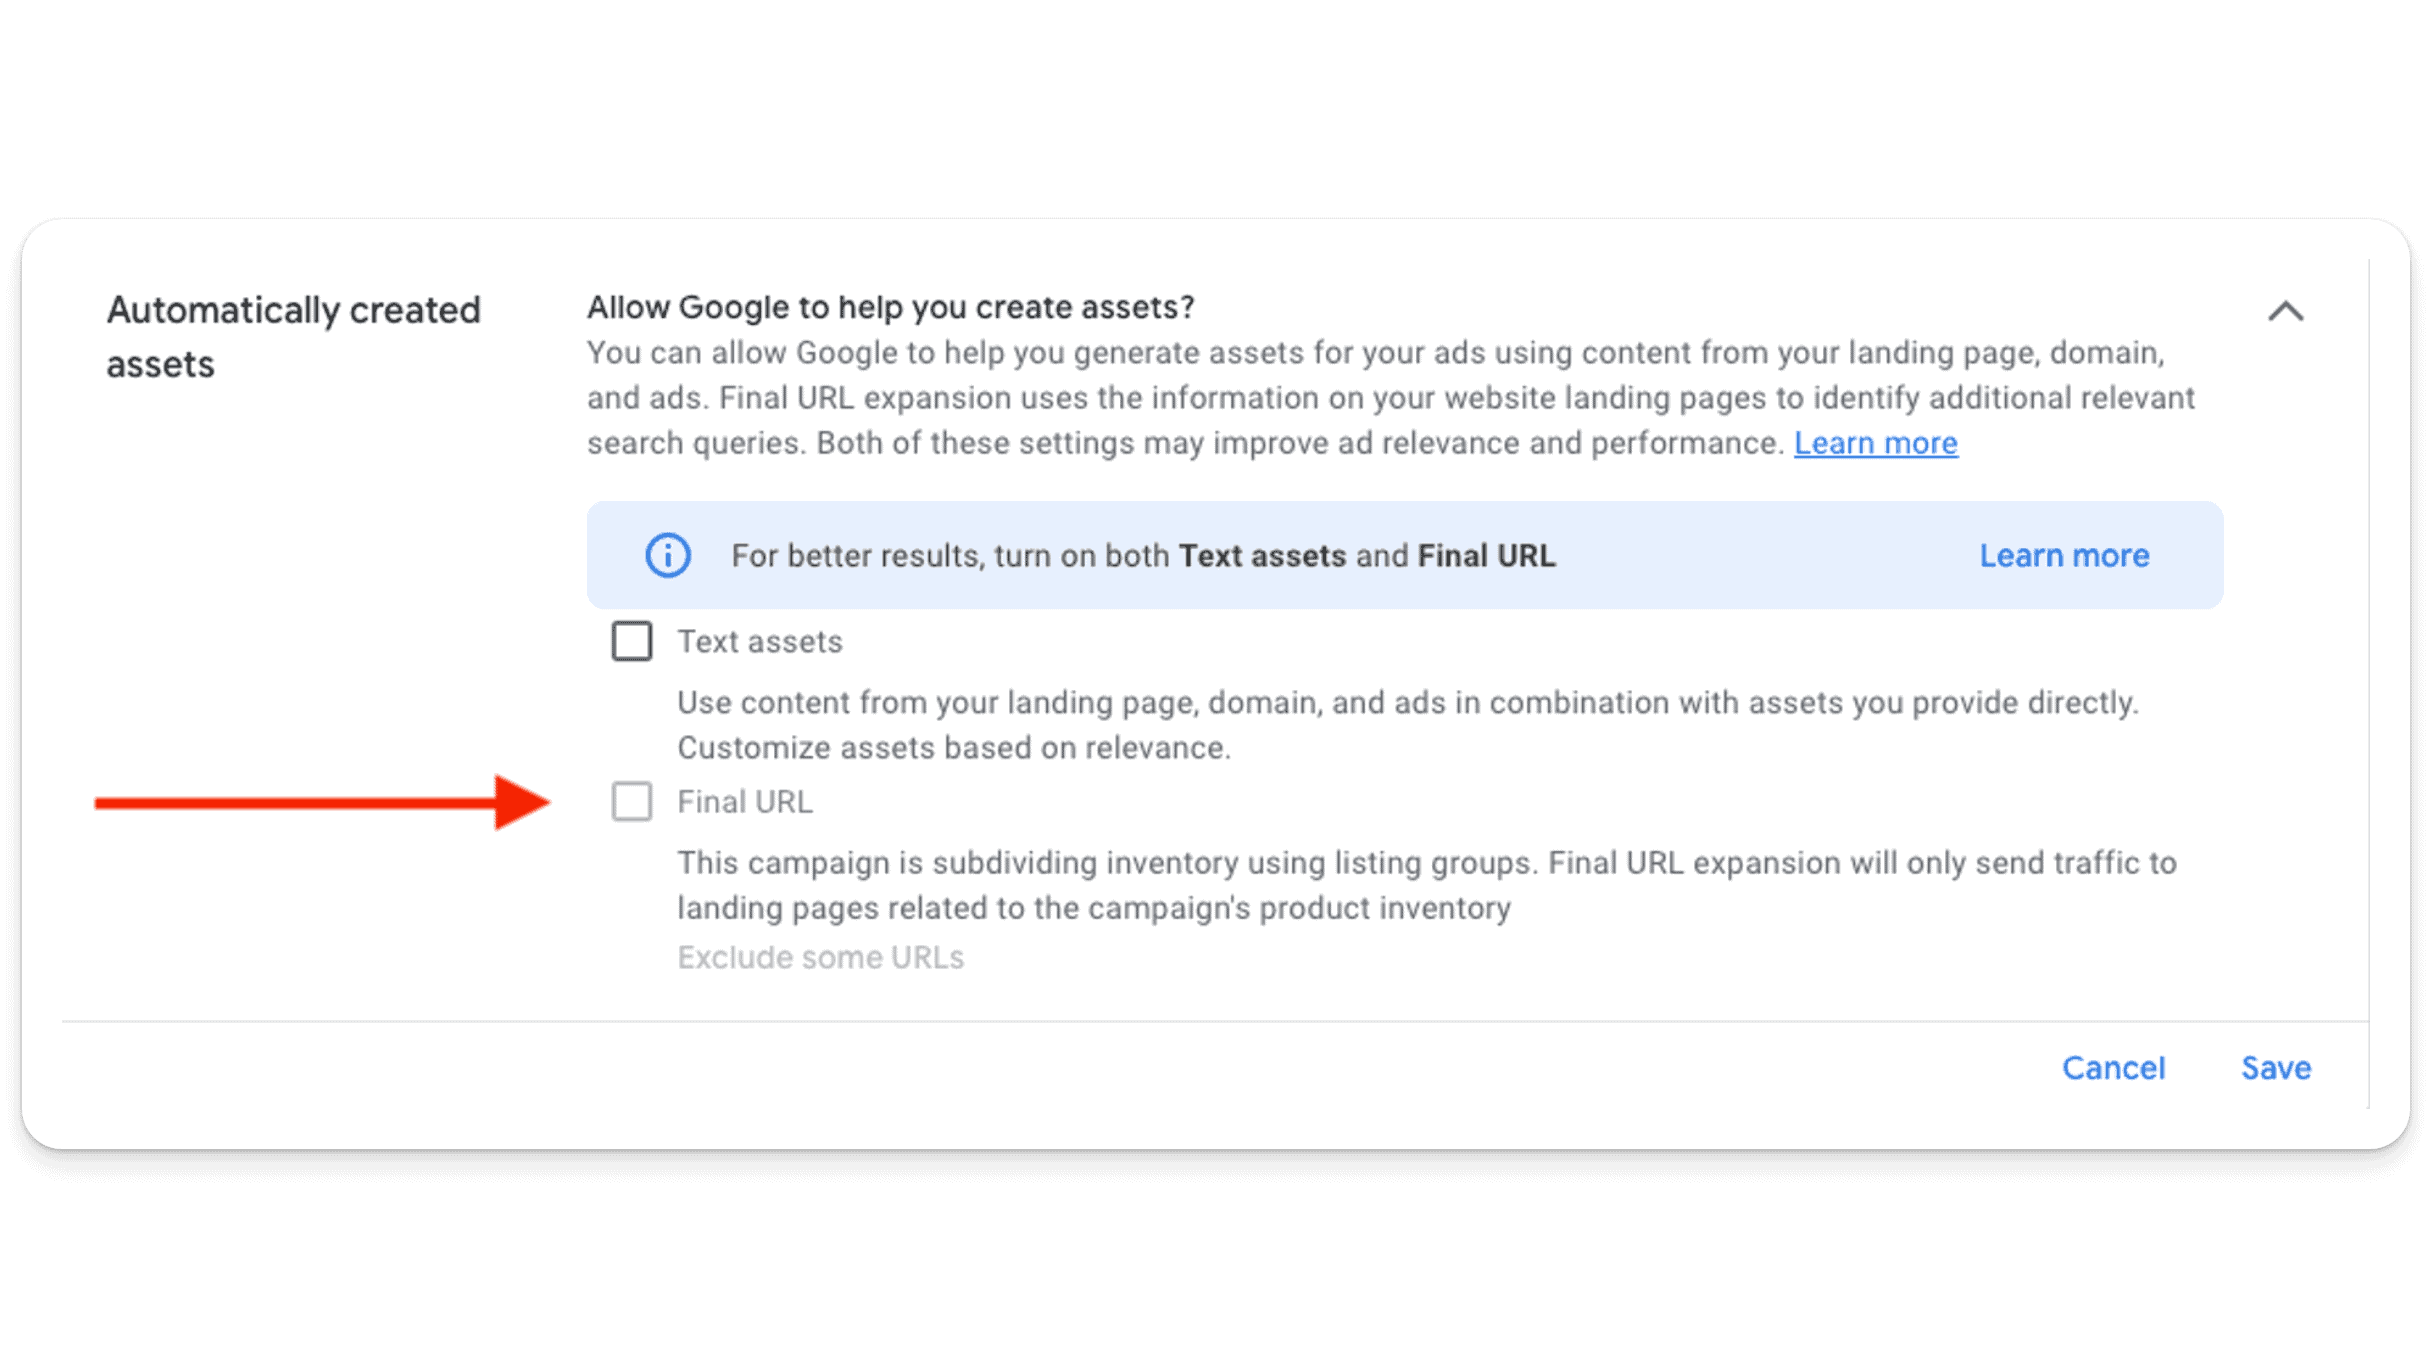
Open ‘Automatically Created Assets’
Check both ‘Text Assets’ and ‘Final URL’. It is important to have both options selected for the setup to work correctly
Exclude some URLs depending on what makes sense for your campaign (for example, blog pages)
Negative Keywords and Placements
Negative keywords are a crucial component in Performance Max campaigns, serving as filters to prevent ads from being triggered by specific words or phrases that are irrelevant to your offering. The trouble is, there is no negative keyword setting inside of Performance Max campaigns.
Fortunately, you can get around this by:
Contacting Google support and asking them to add negative keywords to your Performance Max campaign for you
Filling out this form
Negative Placements
You can view the placements for PMax in the Performance Max Placements report. You can find that here:
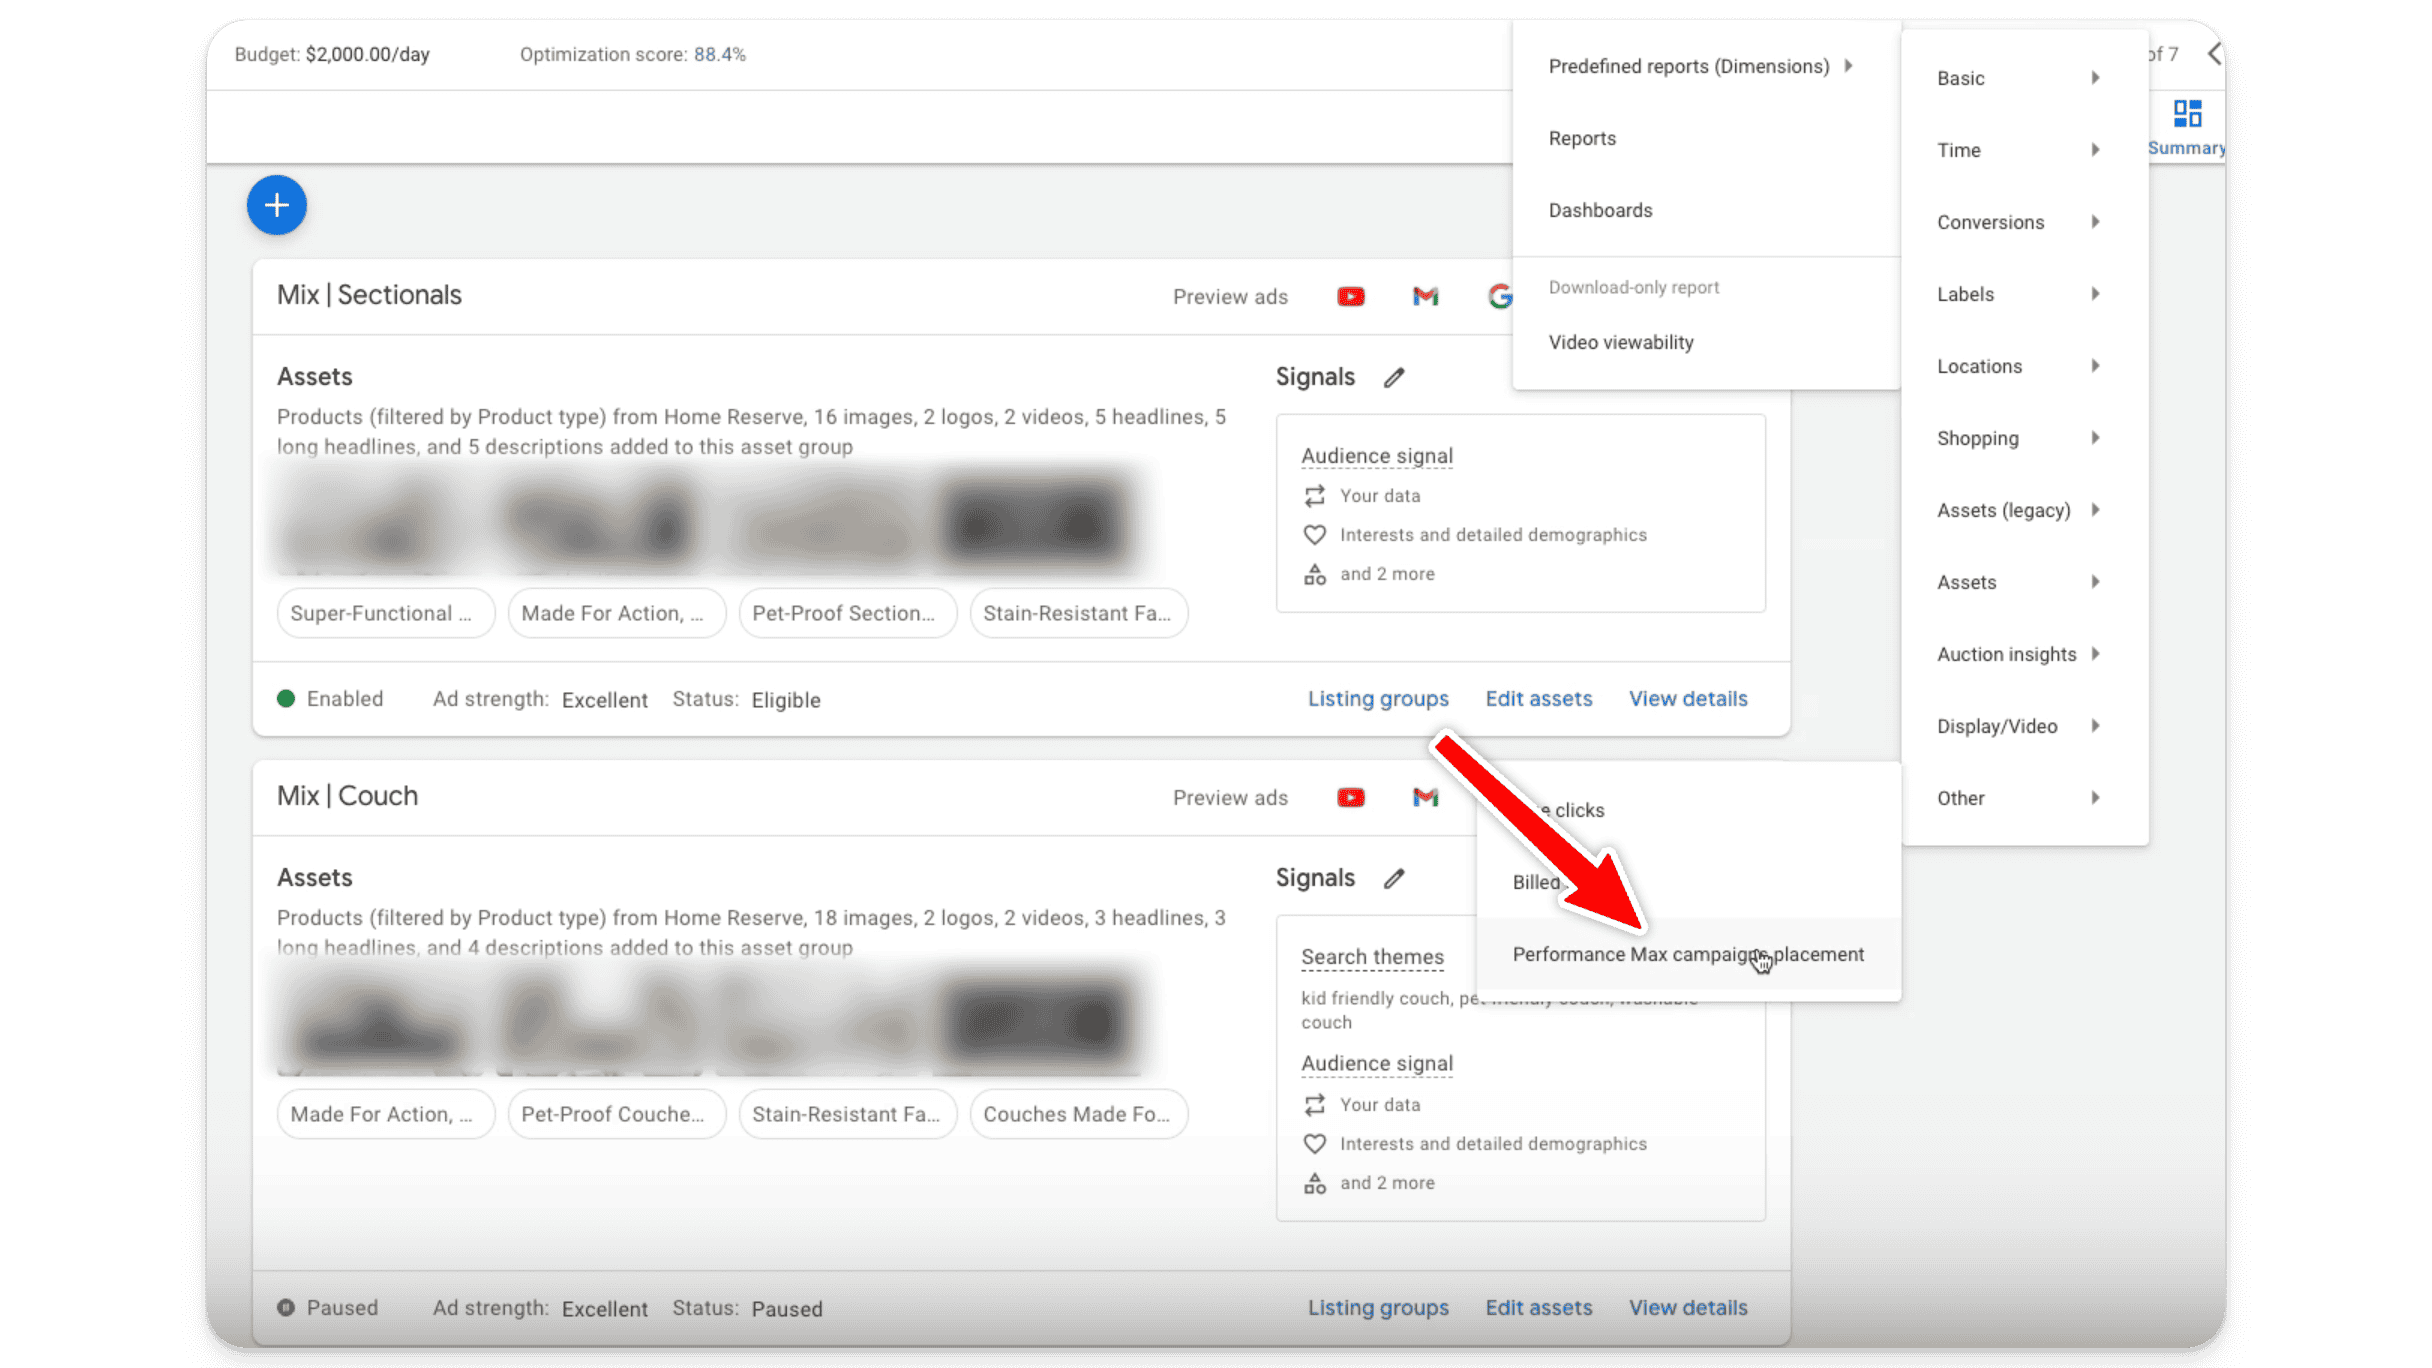
The report itself looks something like this:
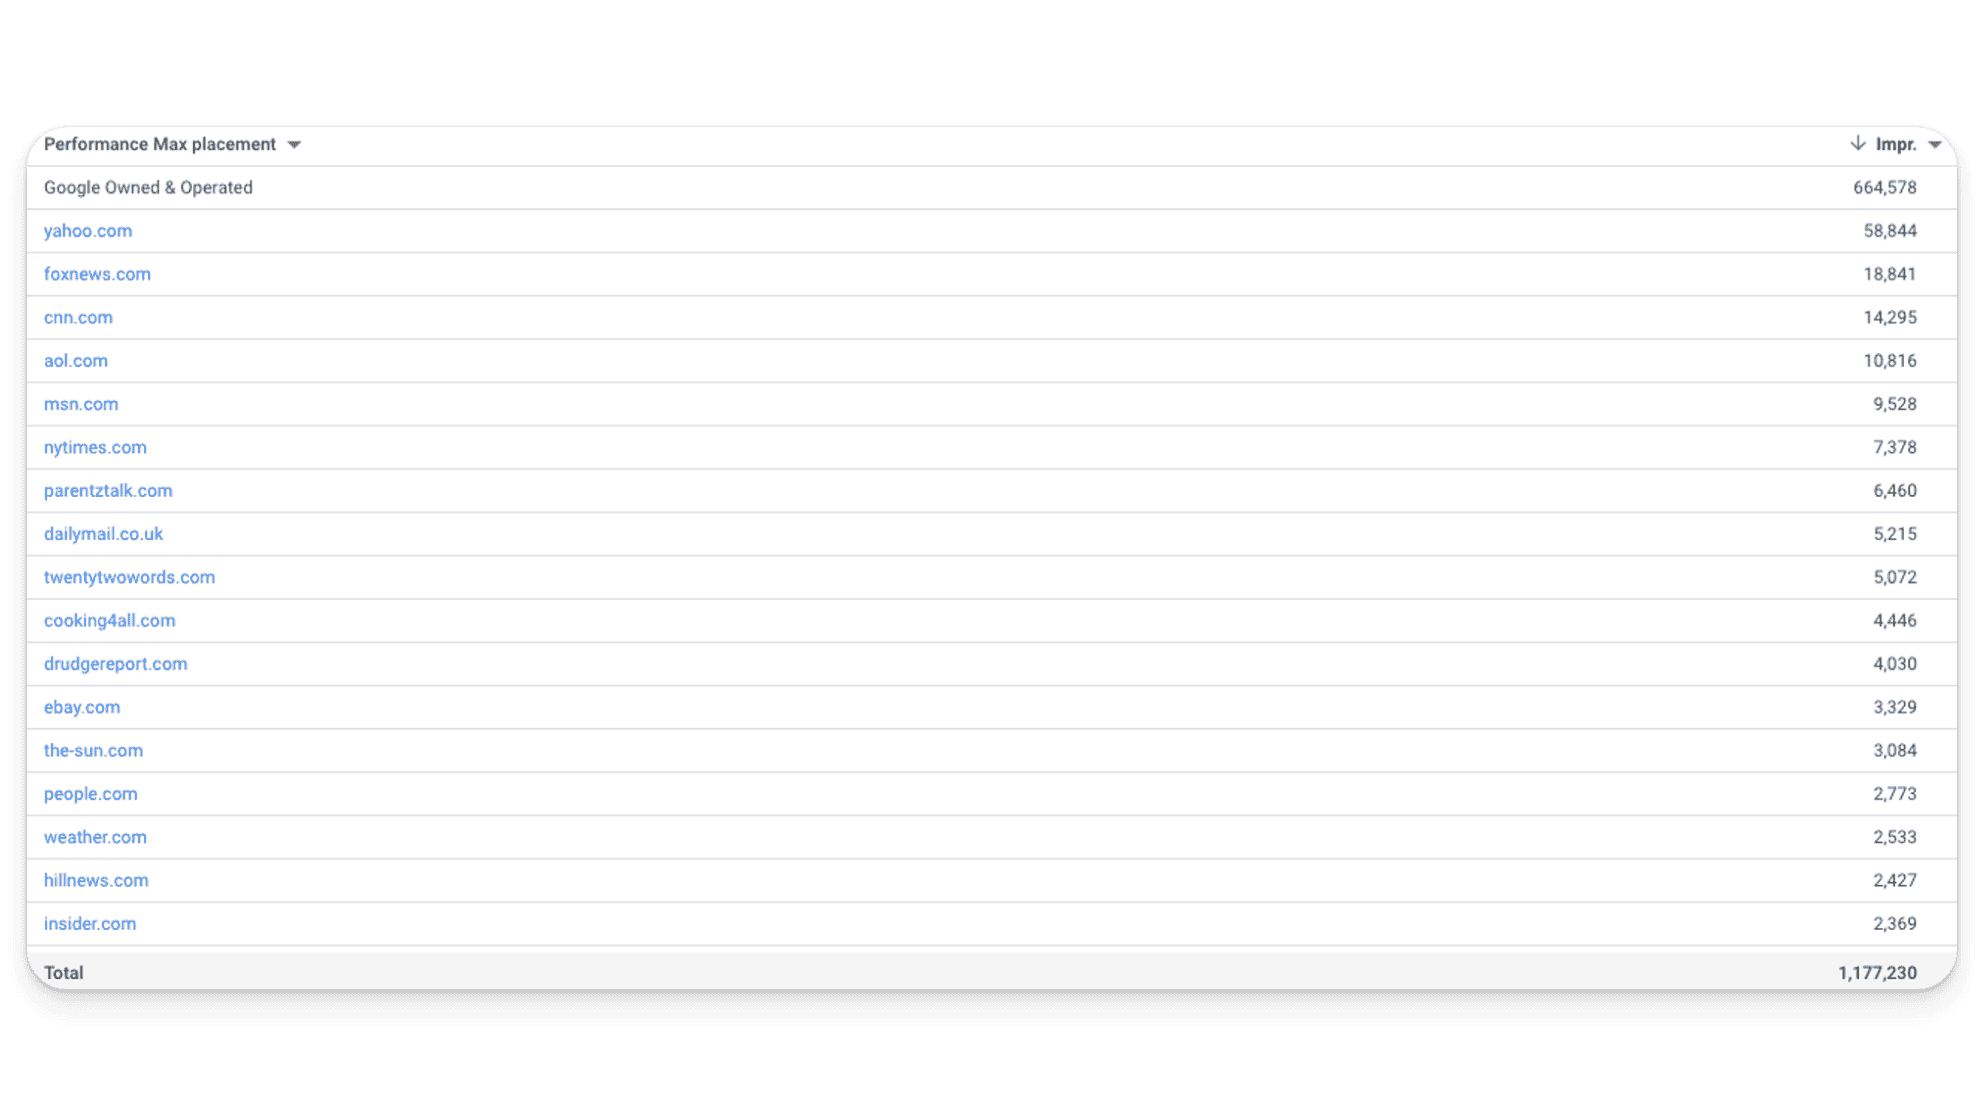
The performance report shows you where your ads were shown. Let’s say you decided you didn’t want to show up on Yahoo — you can exclude this as a placement in the ‘Content’ setting inside of your Performance Max campaign.
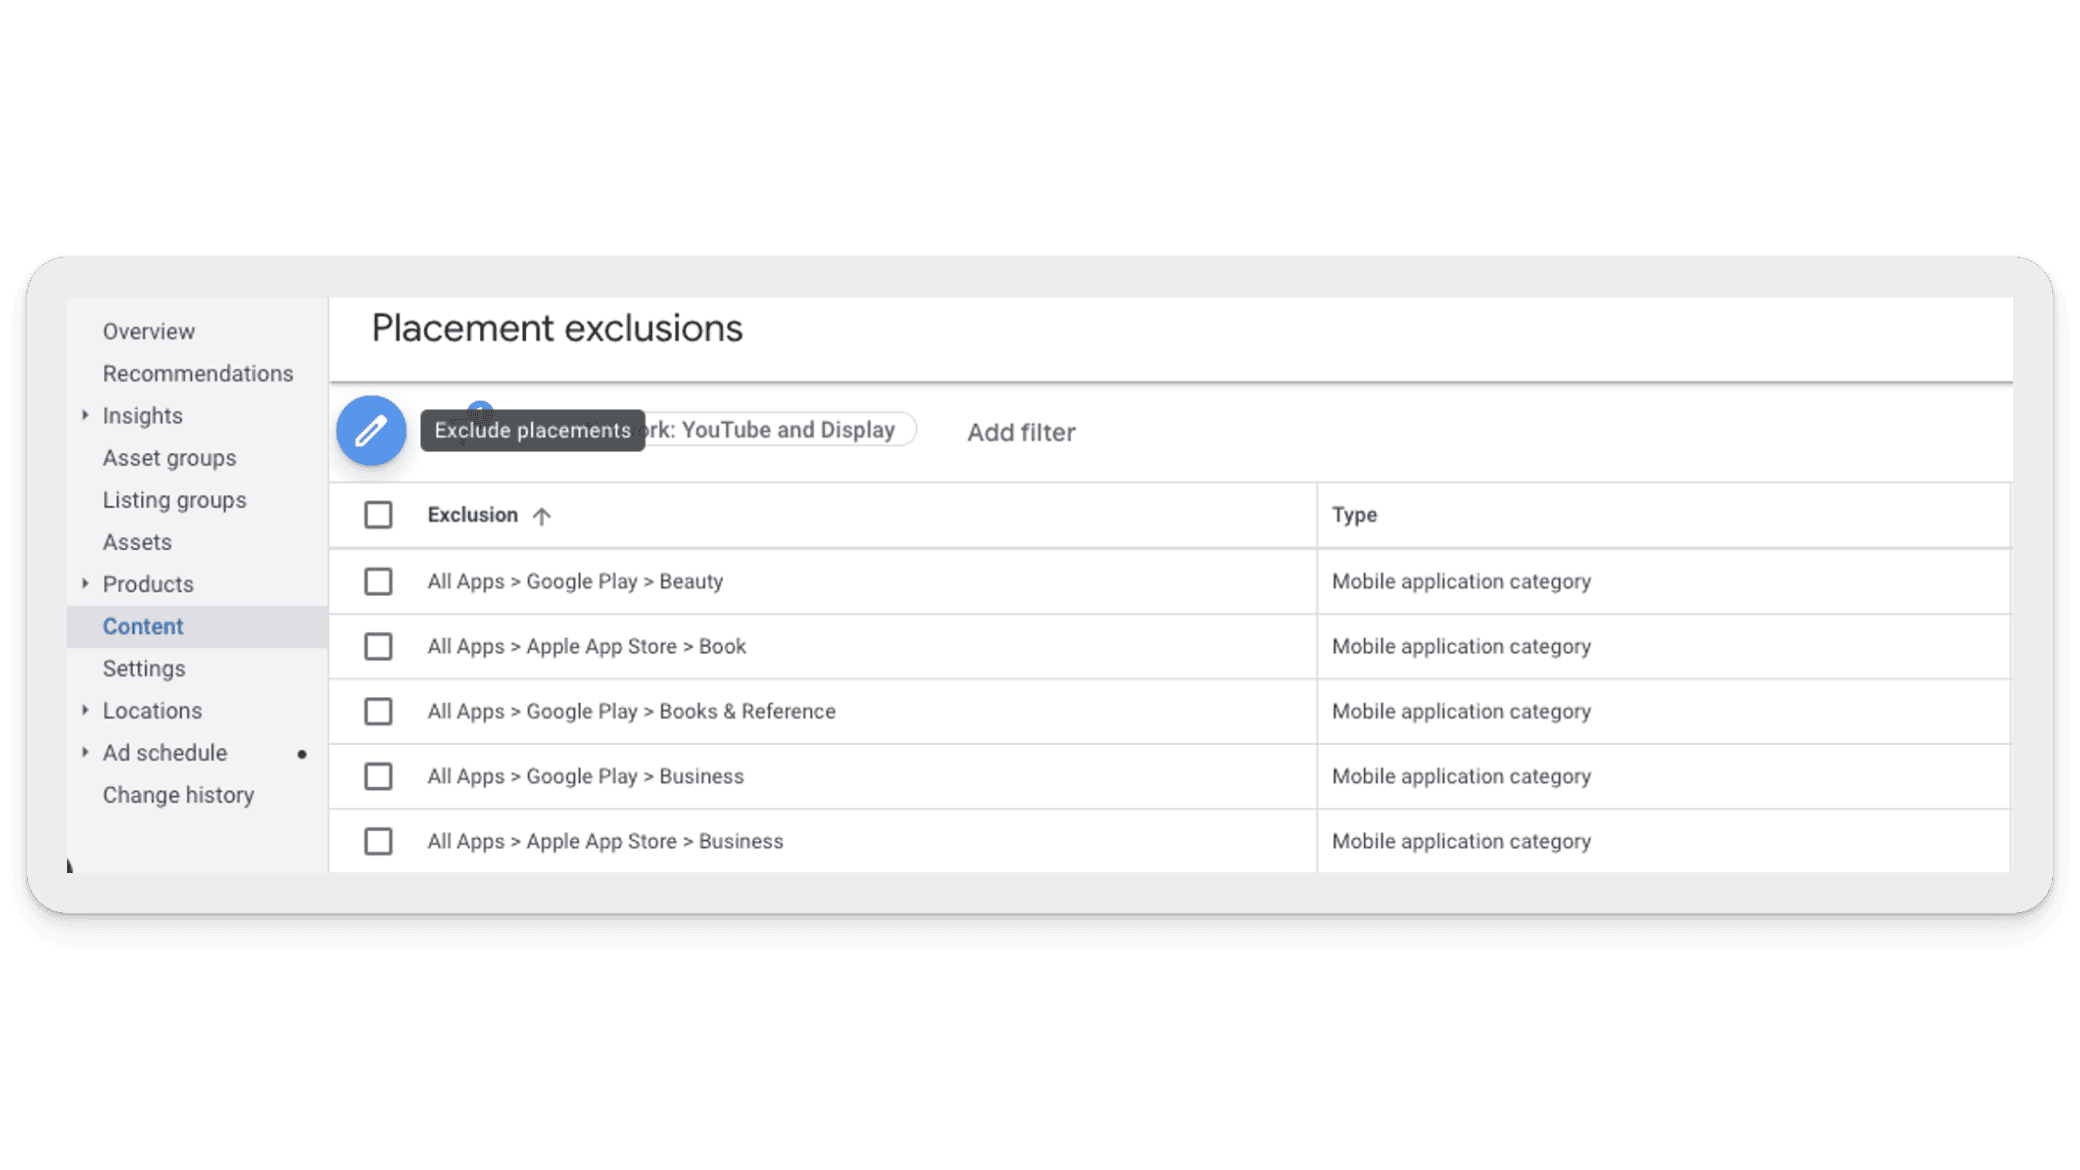
You can also exclude YouTube channels and Display.
Brand Exclusions Setting
You can exclude brand terms without needing to add them as negative keywords using the Brand Exclusion setting inside Performance Max campaign settings.
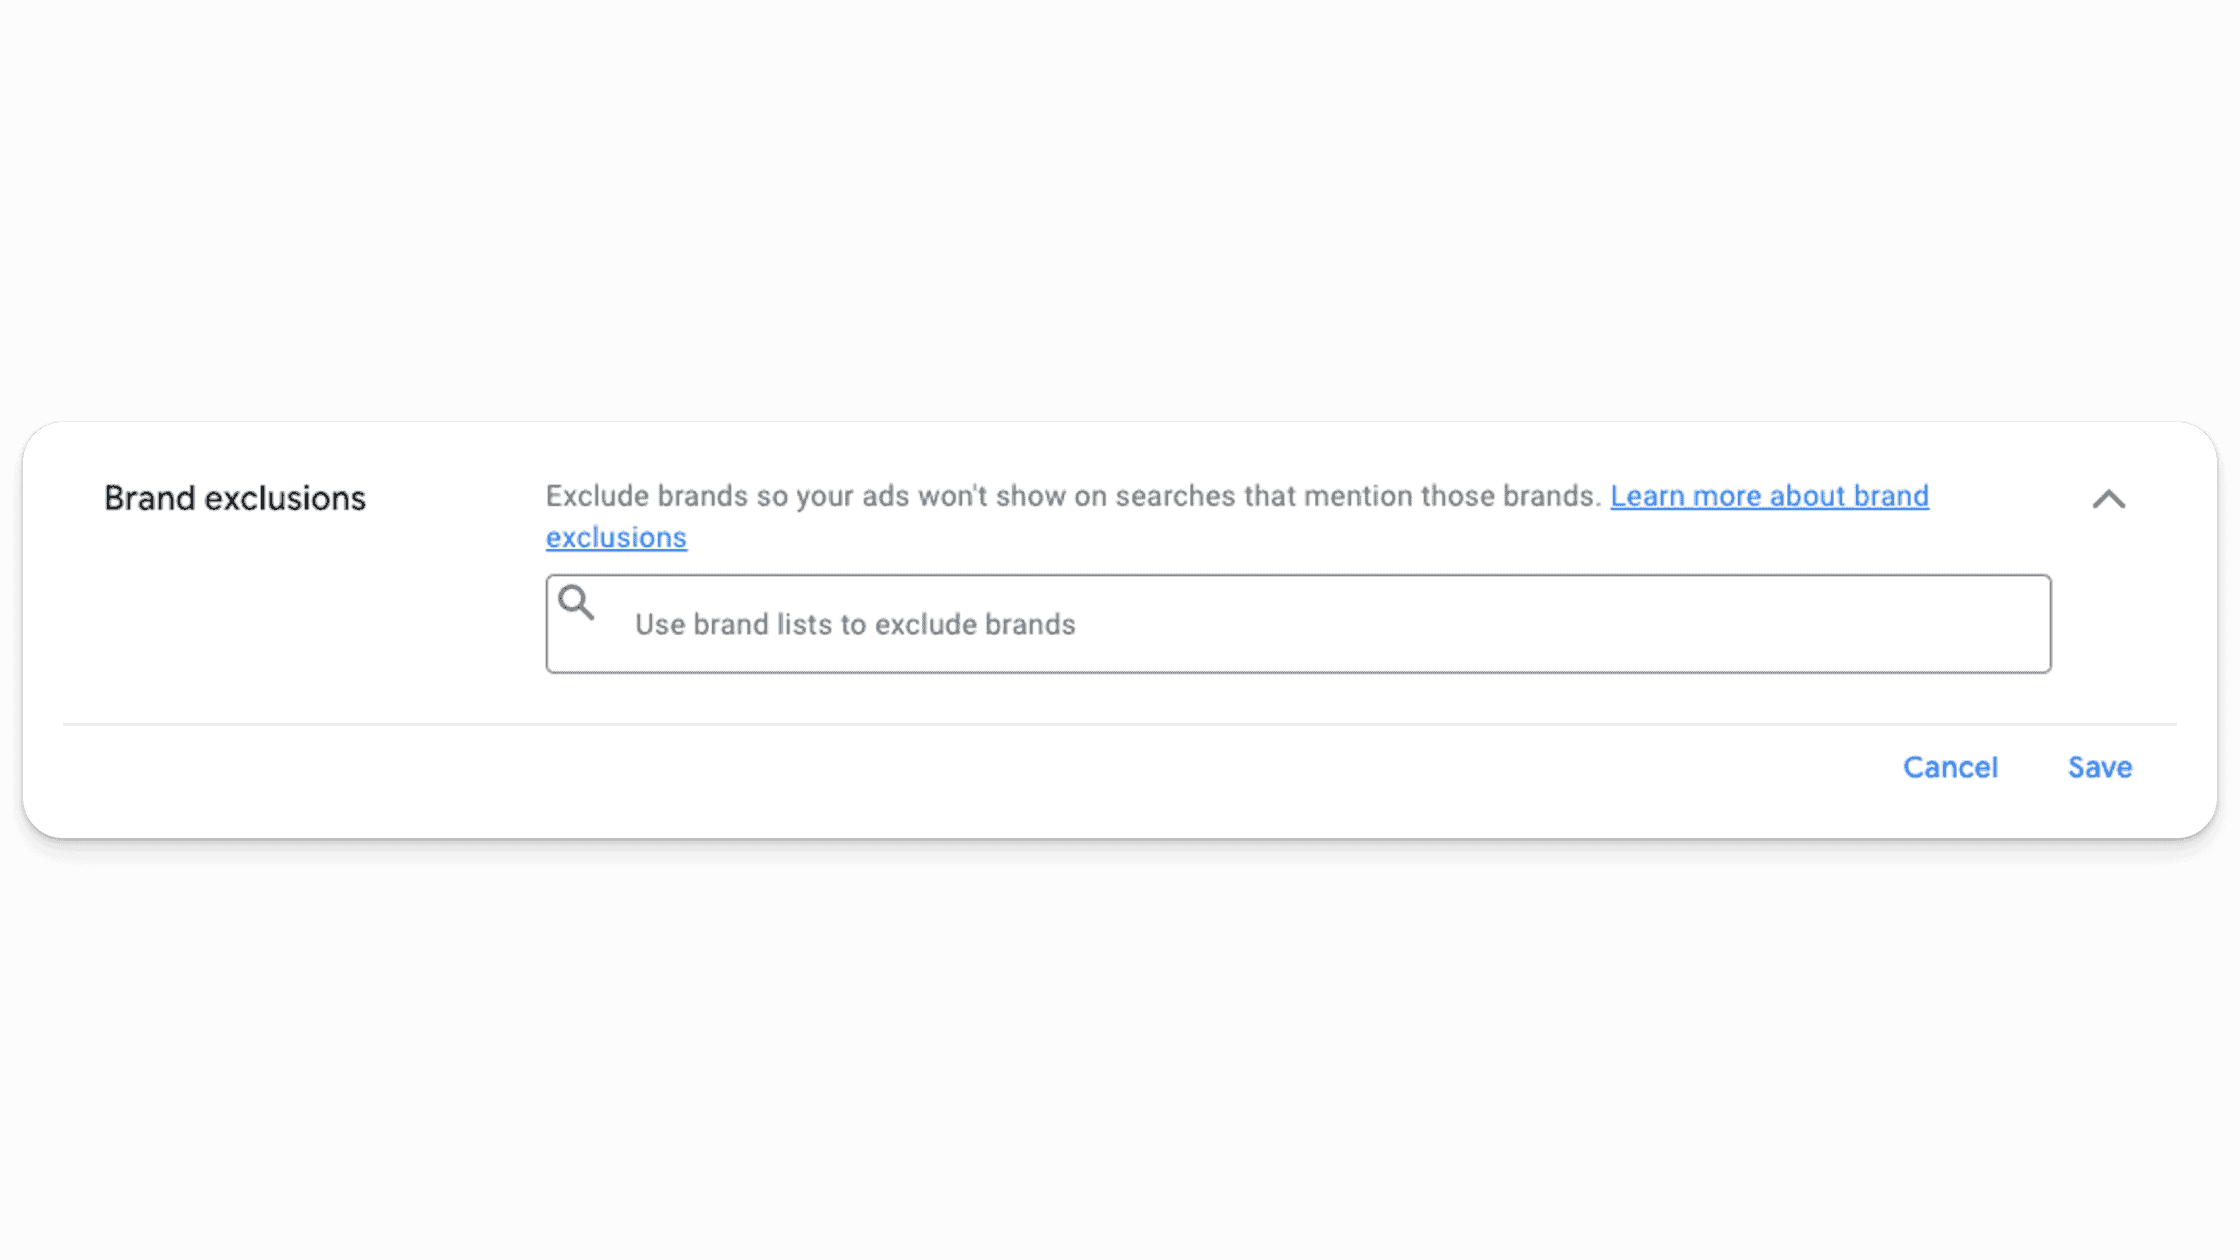
That said, if you exclude Brand terms from your Performance Max campaign make sure to build a Standard Shopping campaign set to low priority so that it shows ads for brand searches.
New Customer Acquisition Setting
If you only want to show your ads to new customers, you can set this up.
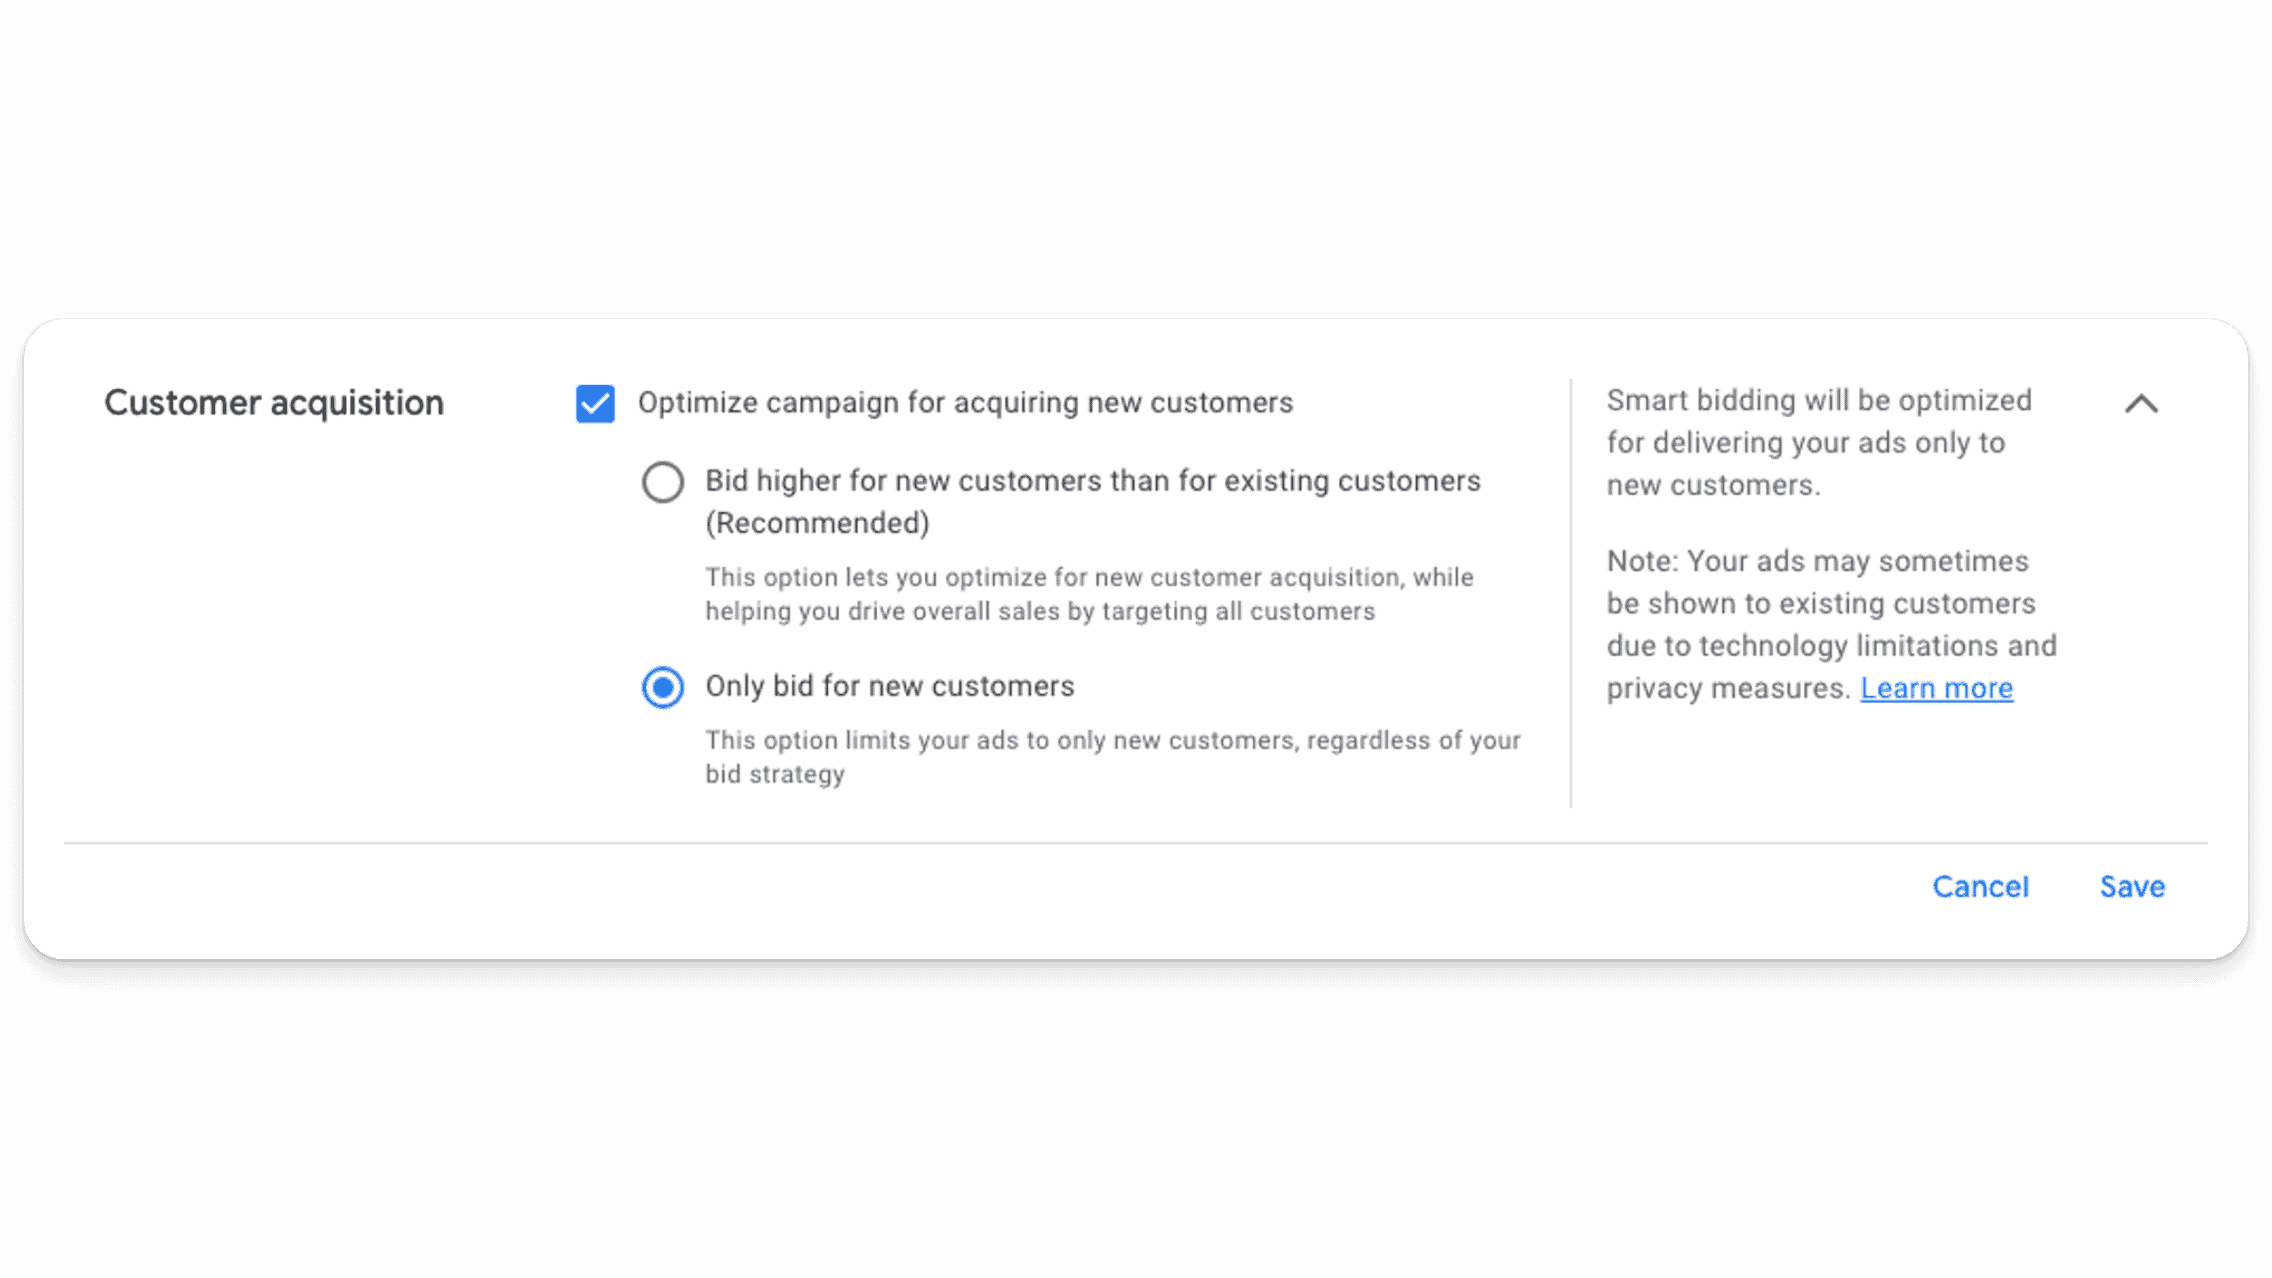
This will prevent most remarketing from taking place. As an aside, you’ll likely be better off checking the bottom option (not the Google “recommended” option).
Conclusion
There you have it: the full explanation of Google Ads’ newest campaign type, Performance Max! Performance Max represents a significant leap forward in digital advertising, offering unprecedented efficiency and effectiveness in reaching your marketing goals. By understanding how to properly set up and optimize your Performance Max campaigns, you can unlock the full potential of this powerful tool and drive meaningful results for your business. Remember, the key to success lies in clear goal setting, providing diverse and high-quality assets, and continuously refining your campaigns based on performance data. This guide is a good start to navigating the complex, new world of Performance Max campaigns, and we’re also here to help if you need us!
Still overwhelmed with setting up or managing Performance Max campaigns? We’re here to help you make sense of Performance Max, with suggestions for optimization based on existing data and the ability to help you create stronger PMax campaigns than ever before. Get in touch with us here.
