Responsive Display Ads: Everything You Need to Know
Creating responsive display ads in Google Ads is a fairly straightforward process, but many people still make mistakes that lead to poor campaign performance (and unattractive ads). That’s why, in this blog post, we’re walking you through exactly how to create responsive display ads that get results, as well as provide some tips and tricks for building the best possible responsive ads for your business.
If you’d rather watch a video, you can check out our YouTube video on responsive display ads here:
Otherwise, let’s dive in:
What are Responsive Display Ads?
Responsive display ads are a versatile and dynamic ad format within Google Ads that automatically adjust the size, appearance, and format to fit various ad spaces across Google’s network.

Responsive display ads use machine learning to determine the best combination of assets (such as images, headlines, logos, and descriptions) to deliver the best performance. This means you provide the assets, and Google does all of the the heavy lifting to create multiple ad variations. These are then tested against each other to see which responsive ads perform (and which don’t).
The real beauty of responsive display ads, however, lies in their adaptability. They can fit into virtually any ad space across the Google Display Network, reaching your audience wherever they are browsing.

Whether your potential customers are reading news articles, checking their emails, watching videos, or exploring blogs, your responsive ads will appear in formats that are visually appealing (and relevant) to the context in which they are seen. It’s a win-win!
How to Create a Responsive Display Ad
There are several steps to creating high-quality, successful responsive display ads. Here’s a quick walkthrough:
Setting Up Your Campaign
Access Your Google Ads Account: Start by logging into your Google Ads account and navigating to the campaign where you want to create a responsive display ad. If you don’t have a display campaign yet, you can create one by selecting “Display” as the campaign type and following the setup prompts.
Select Responsive Display Ad Format: Within your display campaign, choose the responsive display ad format. This allows you to upload a variety of assets that Google will then use to create different ad variations. The responsive display ad format is designed to make the most of your assets by automatically testing different combinations to find the best-performing ones.
Enter Final URL and Business Name: Begin by entering the final URL where you want to direct users who click on your responsive ads. This should be a landing page that is optimized for conversions. It is critical that your landing page is relevant to the ad content.
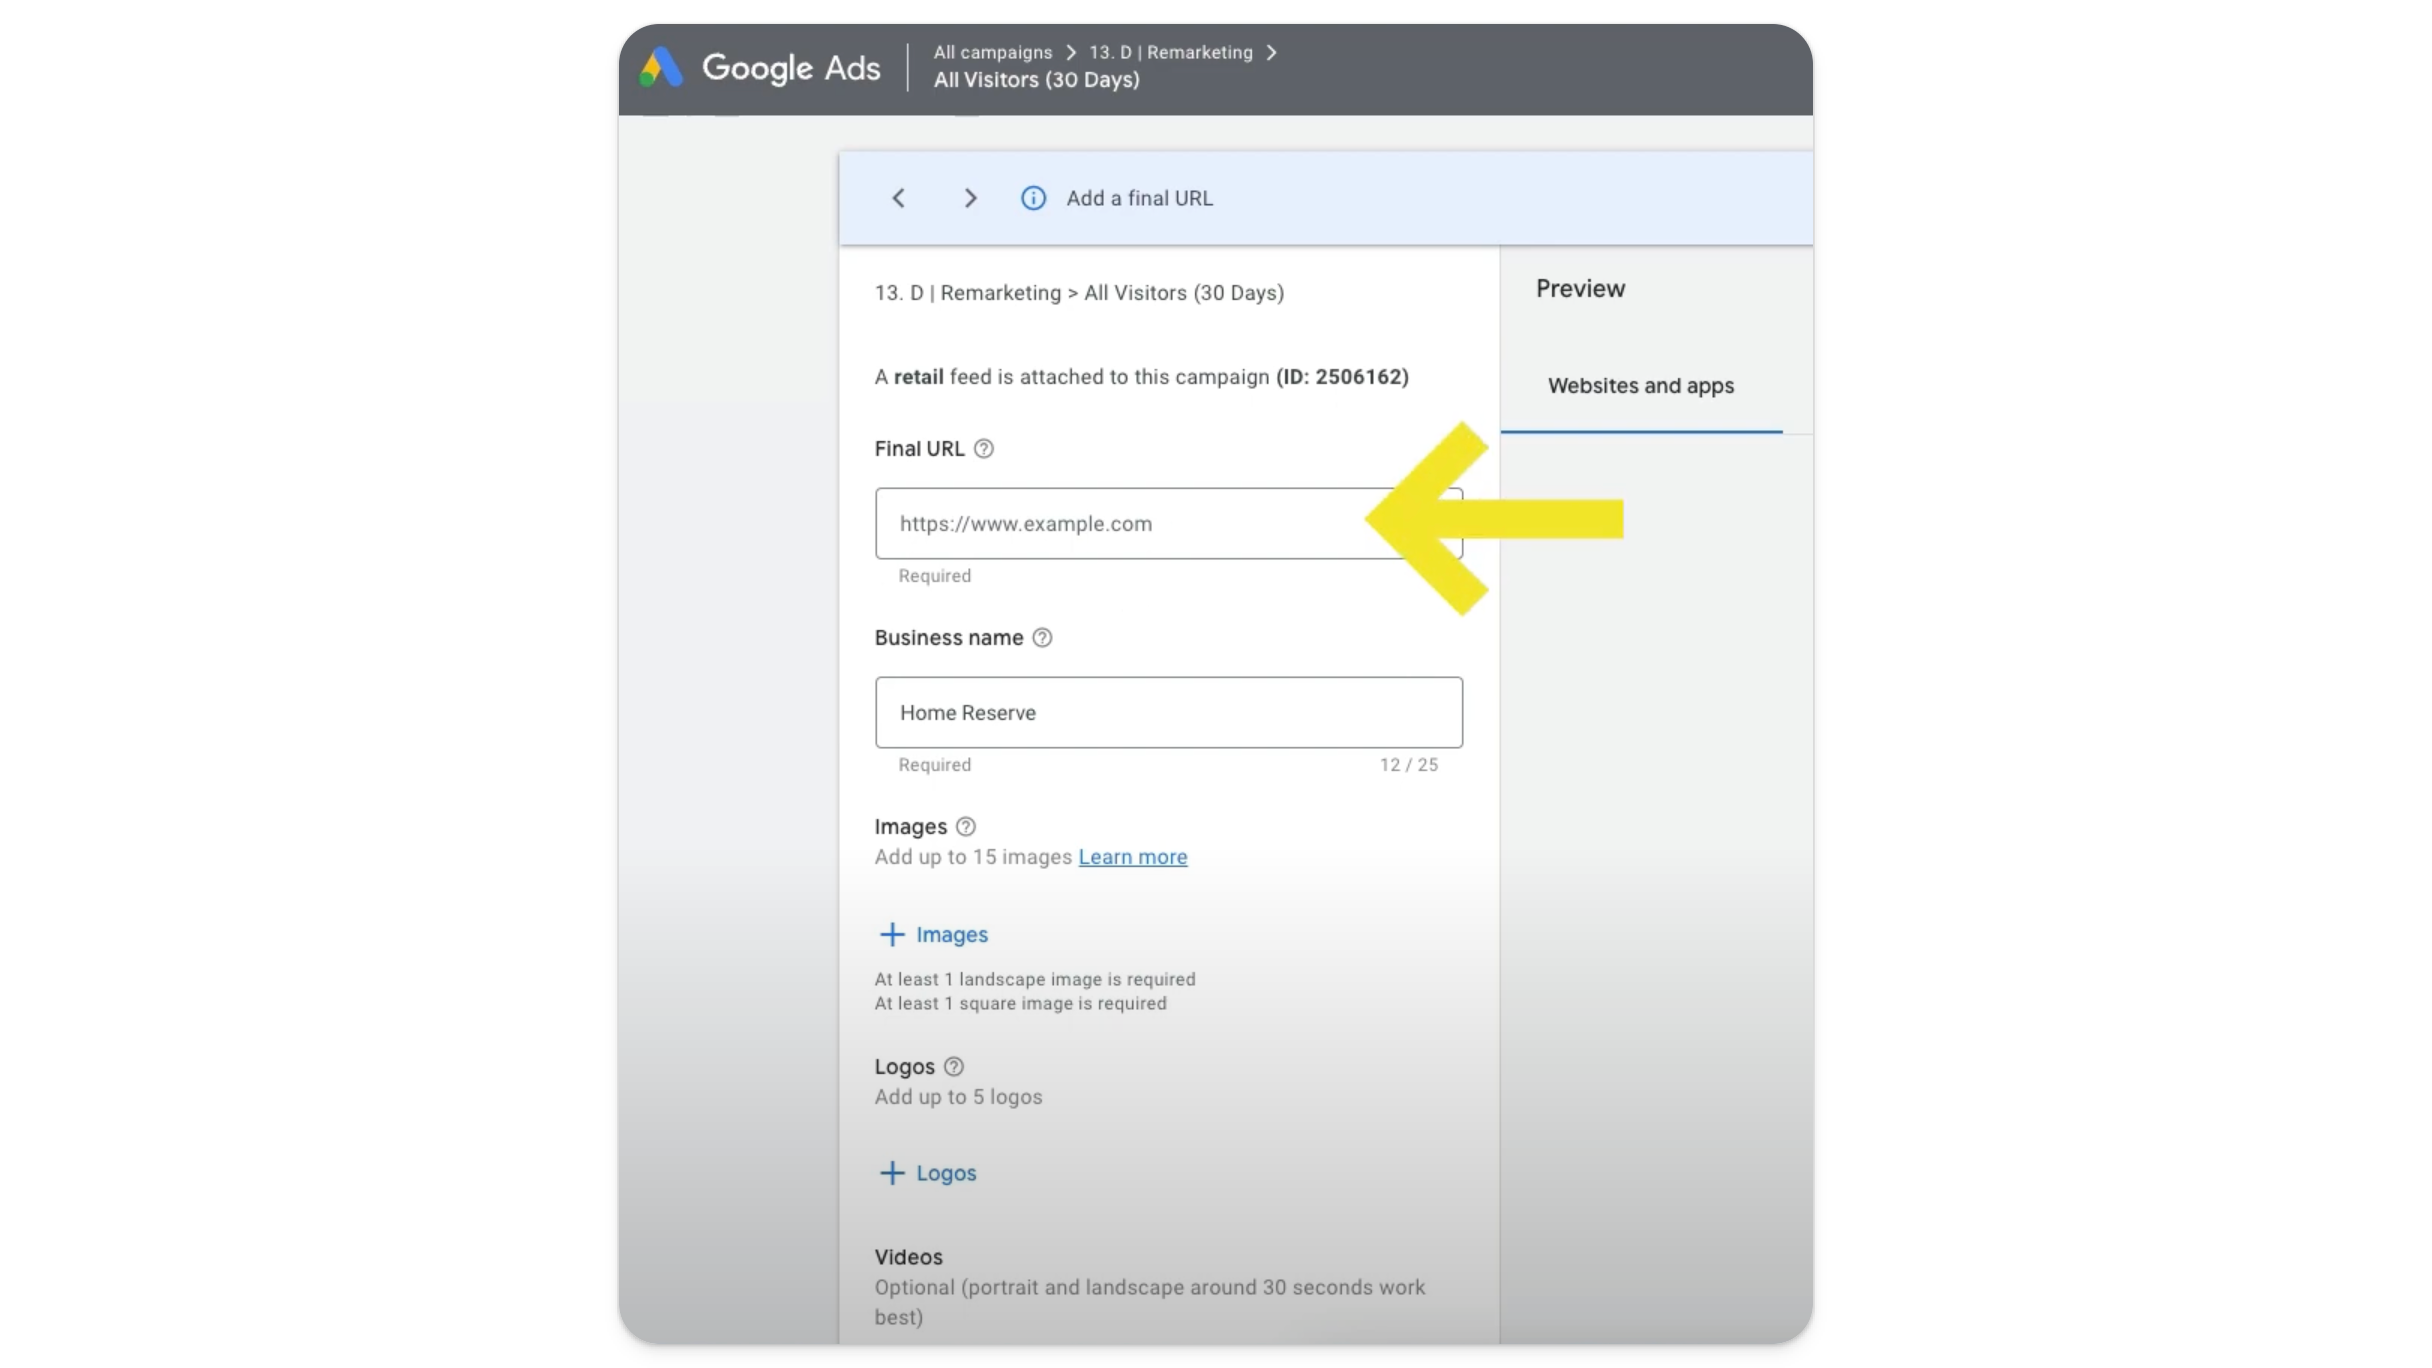
Next, enter your business name. This will be displayed in your responsive display ads.
Adding Images and Logos
Images help catch viewers’ attention. You can add up to 15 images and 5 logos to your responsive display ads. We recommend adding as many images as you can (as long as they are high-quality and fully optimized). The more Google has to work with, the better.
For more information on image optimization (and recommended image specifications for responsive display ads), check out our blog post. Why is this so important? Because if you get it wrong, your ads could look like the one on the left (i.e., pixelated and difficult to read):

High-level, here are the most important steps to take when it comes to images in your responsive display ads:
Upload High-Quality Images: Ensure you only use images that represent your brand well. Poor quality images can make your ads look unprofessional (and reduce their overall effectiveness). Plus, high-resolution images are essential for maintaining clarity and detail, especially on larger screens.
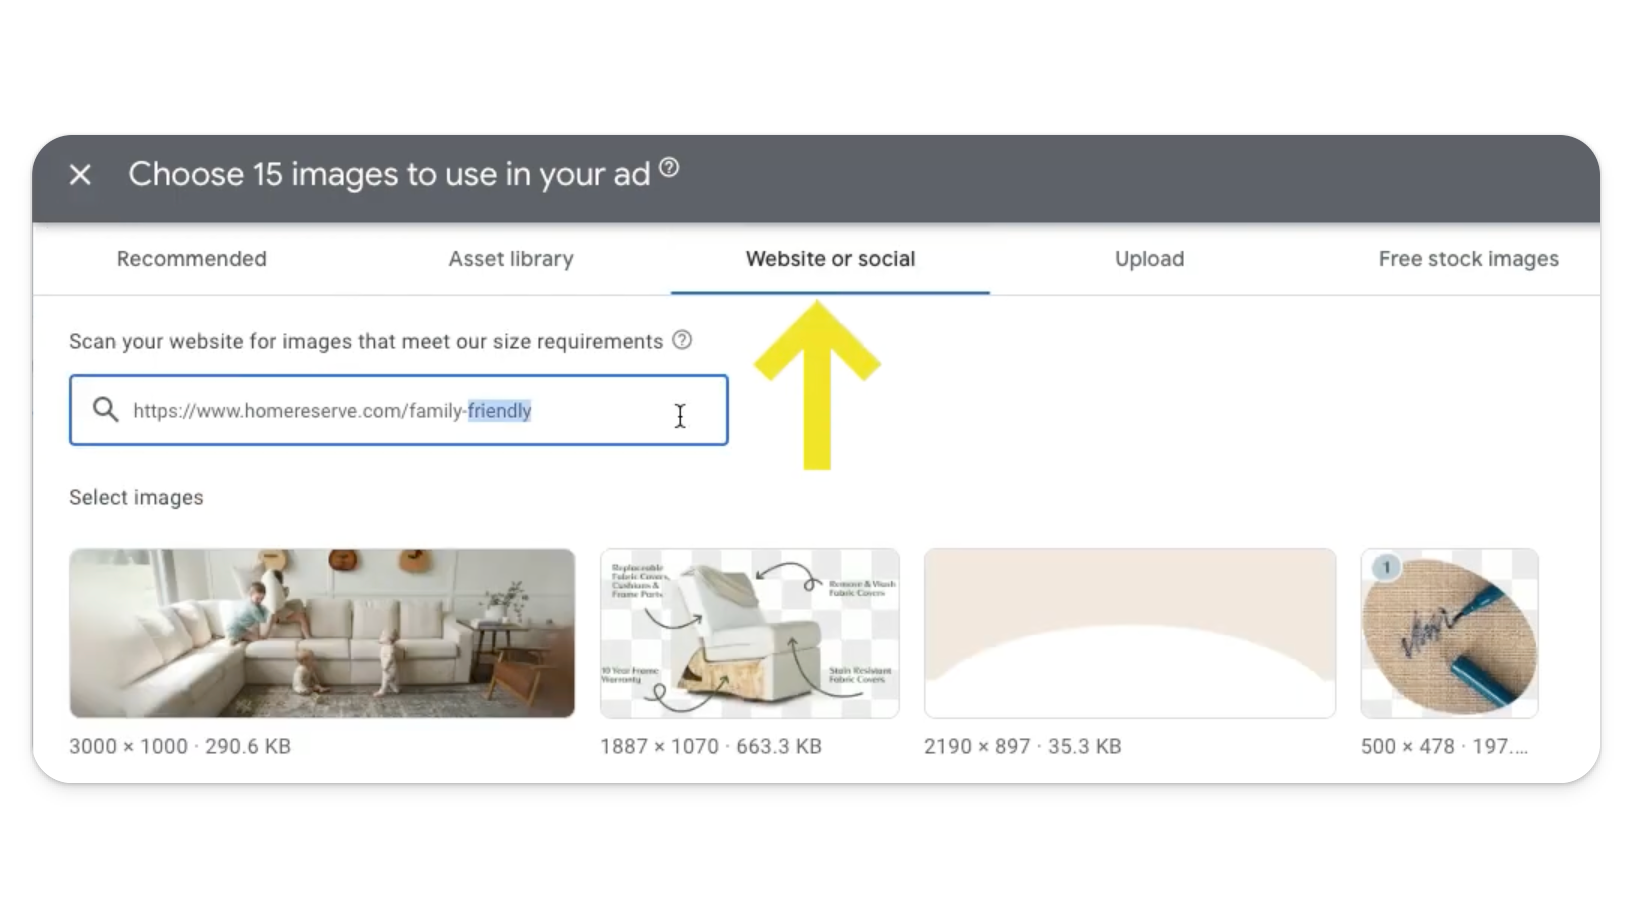
Use Google’s Image Suggestions: If you don’t have enough (or any) images, Google can crawl your website or social media profiles to find images you can use.
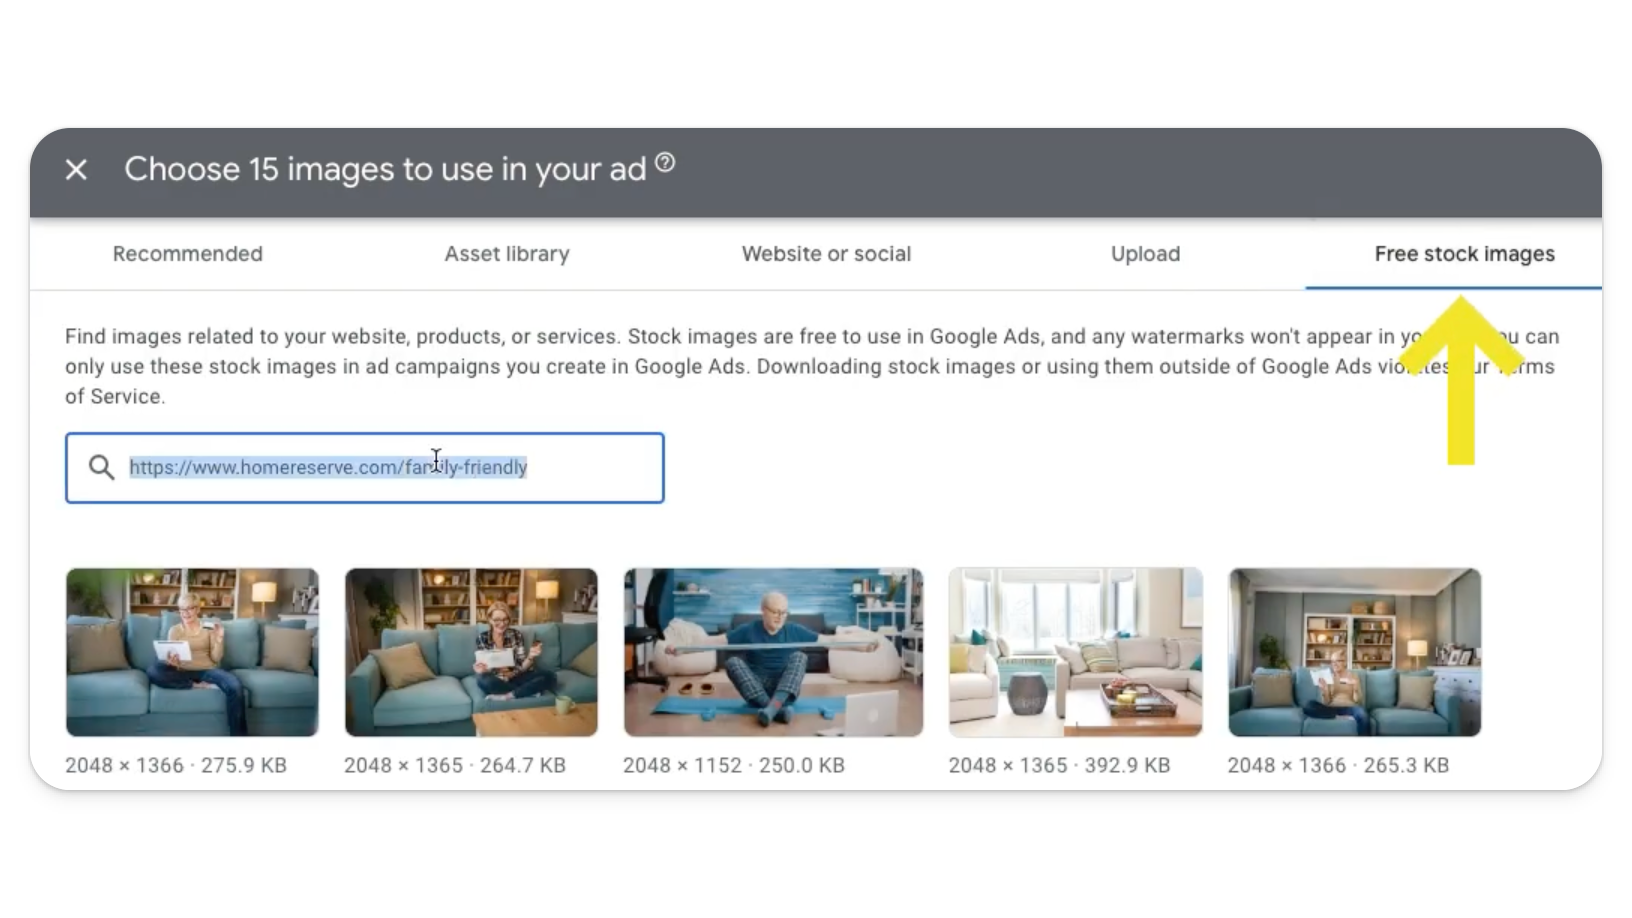
Alternatively, you can use free stock images provided by Google, although it’s best to use custom images that represent your brand accurately. We try to avoid this, but it can be helpful if you don’t have a graphic designer and you still want to run responsive display ads.
Google’s image suggestion feature can save you time and effort, but always review the suggested images to ensure they align with your brand identity.
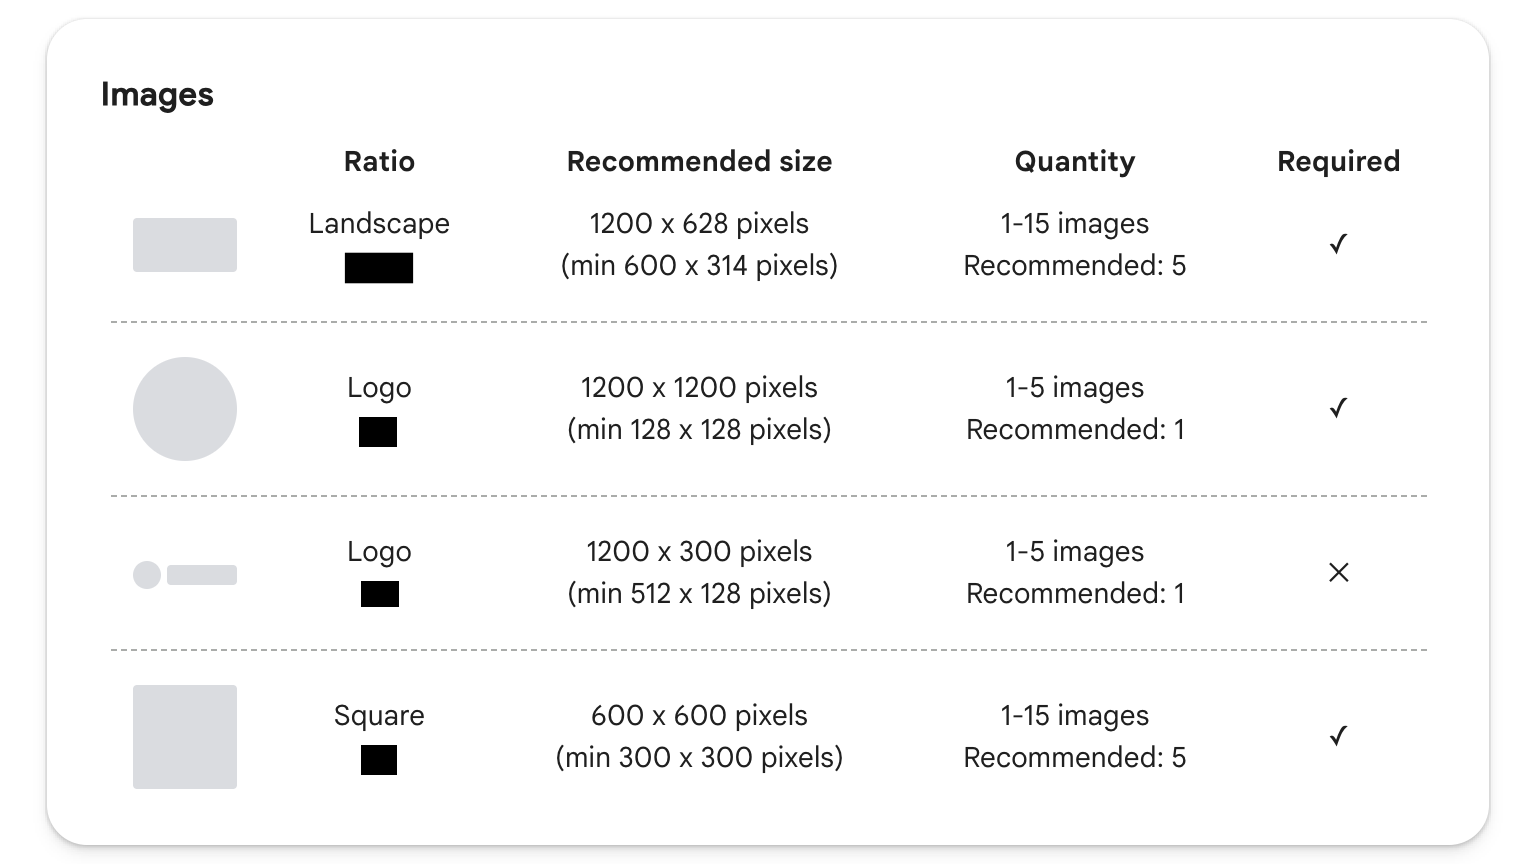
Optimize Image Sizes: The ideal image sizes for responsive display ads are:
Landscape: 1200 x 628 pixels
Square: 1200 x 1200 pixels
Logo: 1200 x 300 pixels (landscape) and 1200 x 1200 pixels (square)
These sizes ensure that your images look crisp and clear across different ad spaces. It’s crucial to use the correct dimensions to avoid pixelation or stretching, which can detract from your ad’s appearance. Again, getting the details right can really pay off in terms of your ad’s overall effectiveness.
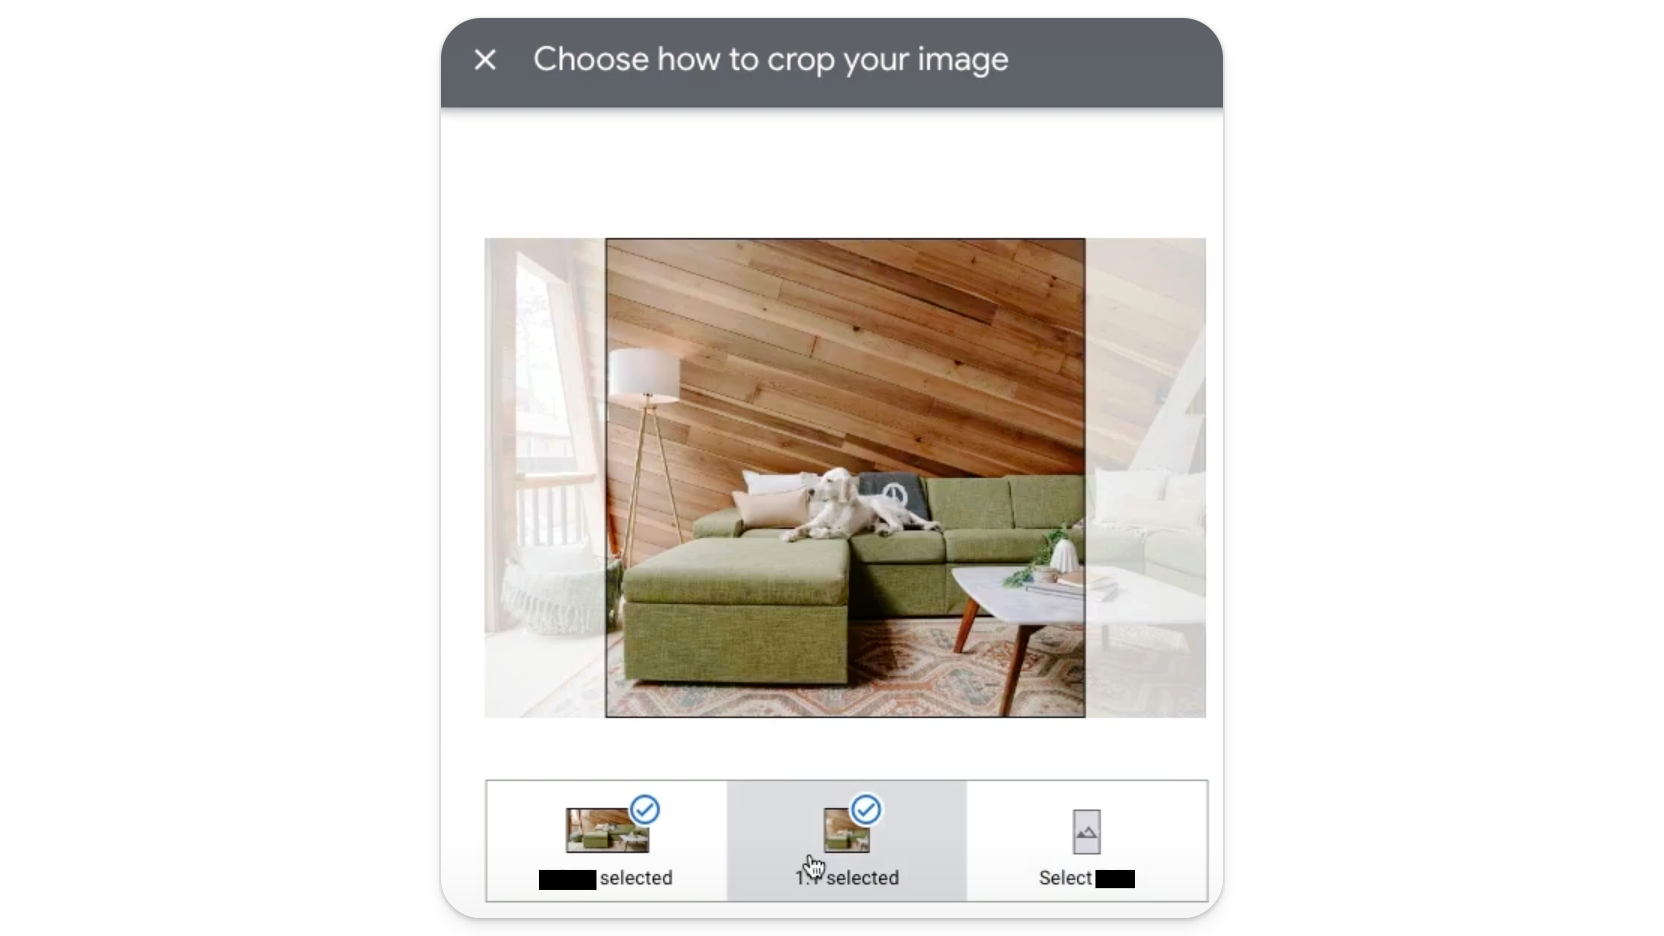
Crop and Adjust: Once uploaded, you can crop and adjust your images within the Google Ads interface to ensure they fit perfectly. Cropping allows you to focus on the most important part of the image and eliminate any unnecessary elements. So, take the time to review each image and make adjustments as needed.
Adding Video
If you have a video, you can absolutely add it in to your responsive ads, but it isn’t necessary (and it isn’t something we usually do, either).
Crafting Headlines and Descriptions
Your headlines and descriptions play a vital role in conveying your message and enticing users to click on your responsive display ads.
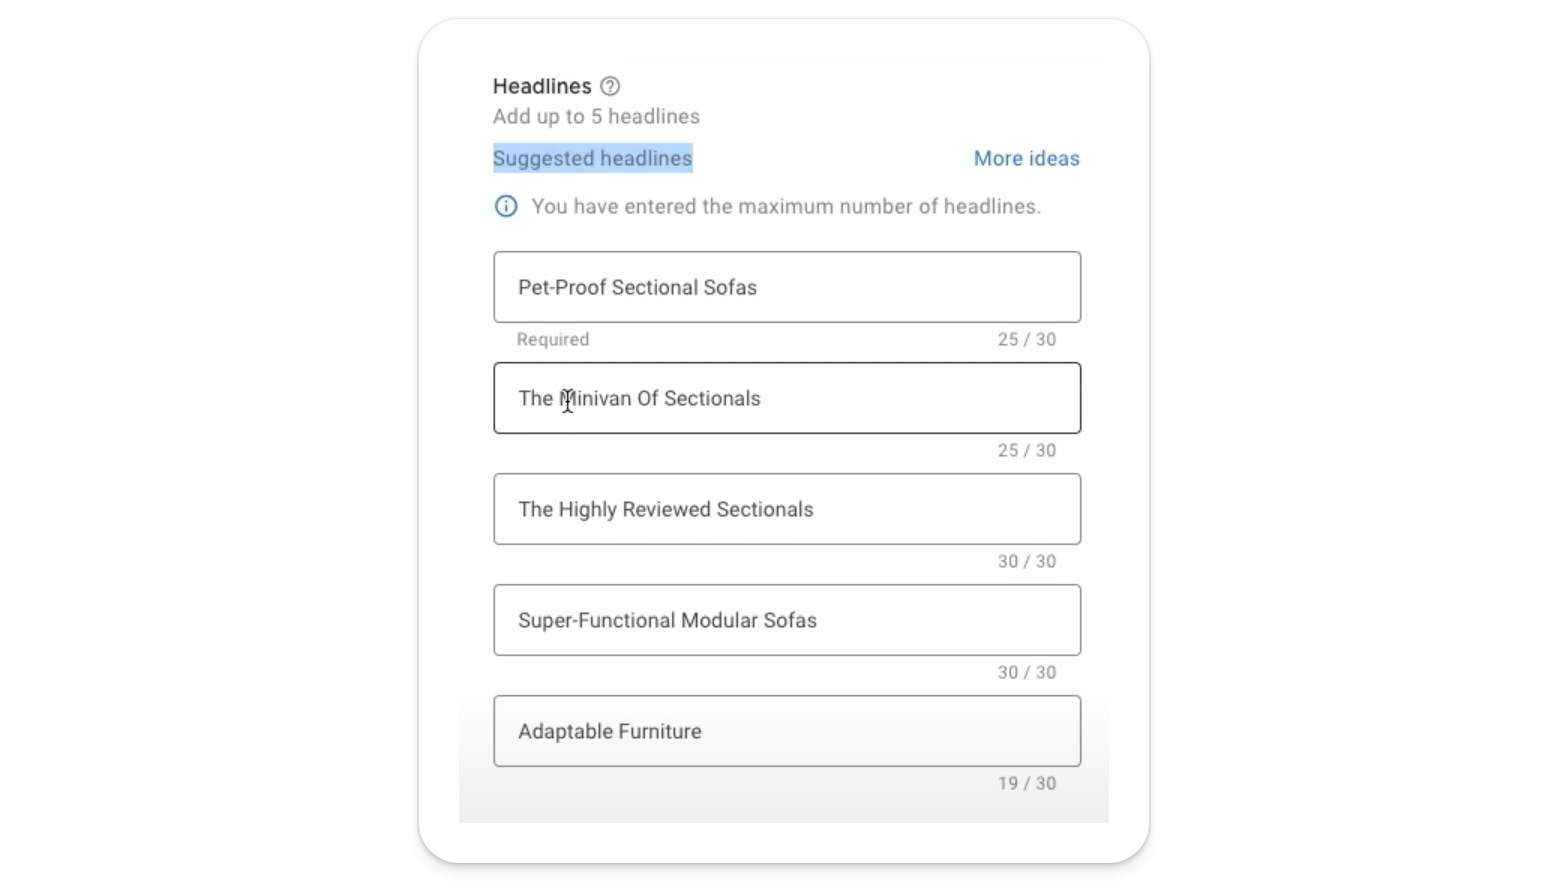
Headlines: You can add multiple headlines (up to 5), each up to 30 characters. Make them compelling and relevant to your audience. Use Google’s suggested headlines if they fit your campaign goals. Effective headlines are concise, clear, and highlight the value proposition of your offer.
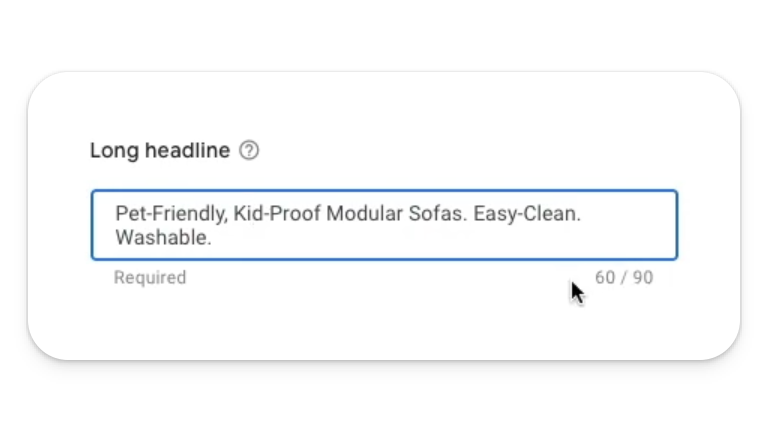
Long Headline: You can add one long headline with up to 90 characters. This headline will appear in larger ad formats. A long headline provides an opportunity to offer more context and detail, making your ad more informative. With responsive display ads, you only get one long headline, so make it count.
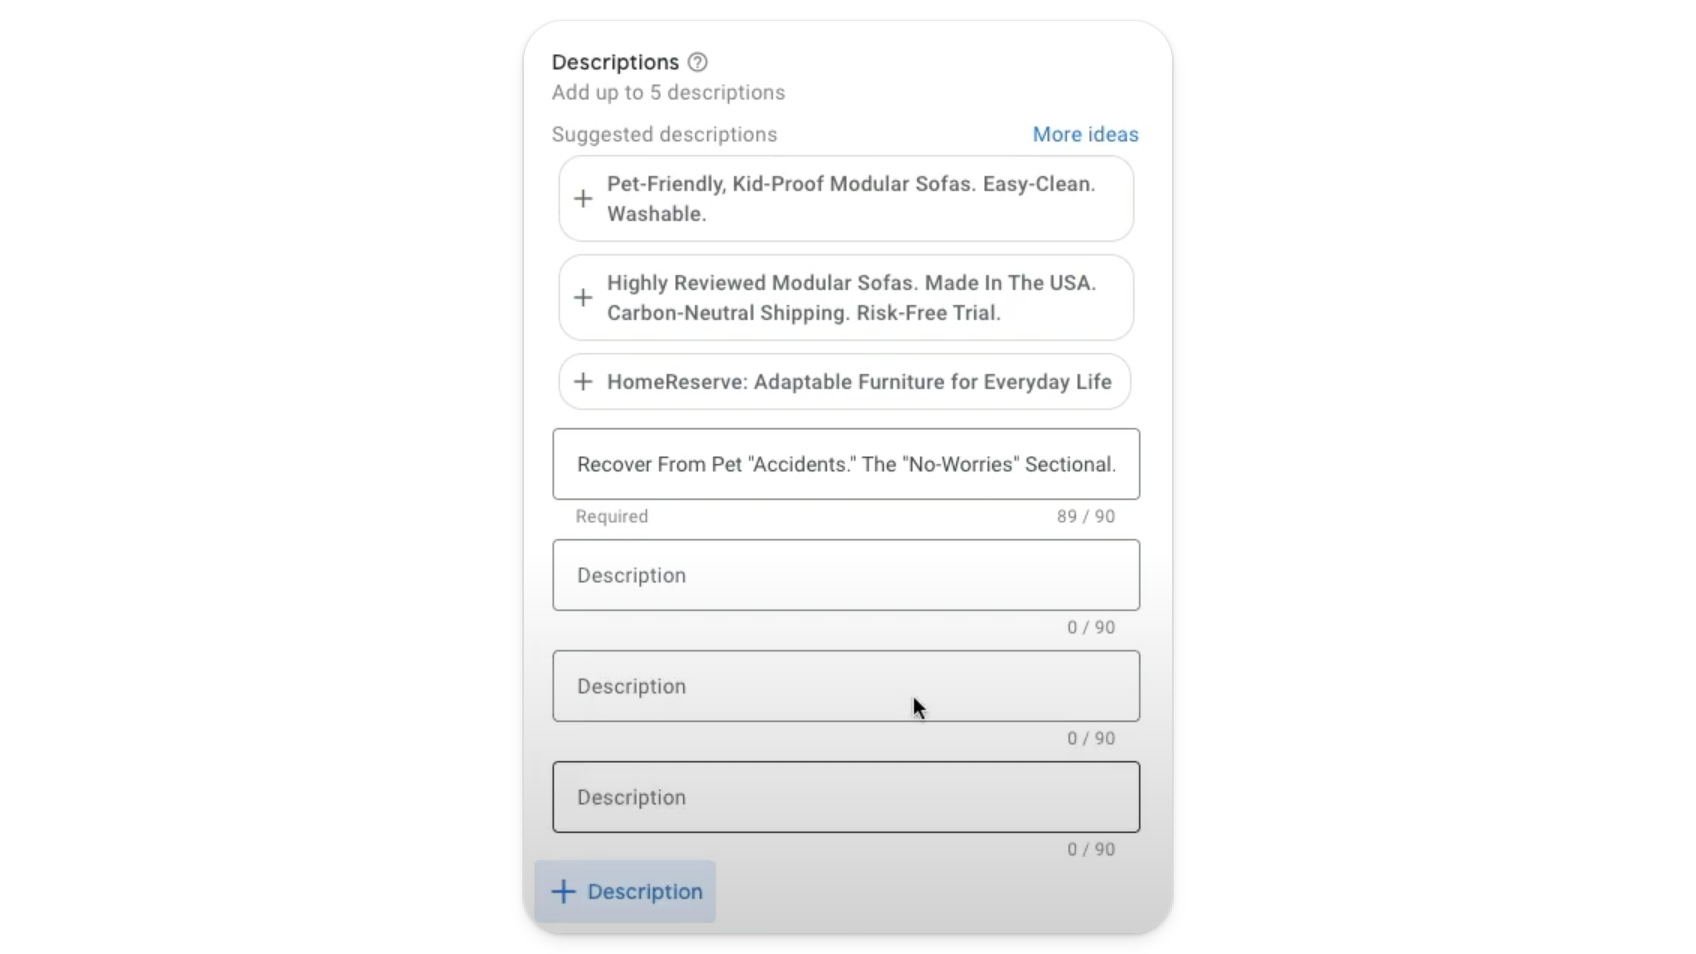
Descriptions: Add up to 5 descriptions, each up to 90 characters. These should complement your headlines and provide more details about your offer. Descriptions should reinforce the key message of your responsive display ads and encourage users to take action. Use descriptive language and highlight any unique selling points or benefits.
Other Settings
Asset Enhancements: This feature allows Google to enhance some of the images and layouts to improve ad performance. If ‘use asset enhancements’ is checked, Google may make minor adjustments to your assets to optimize their appearance and effectiveness. We usually recommend leaving this on.
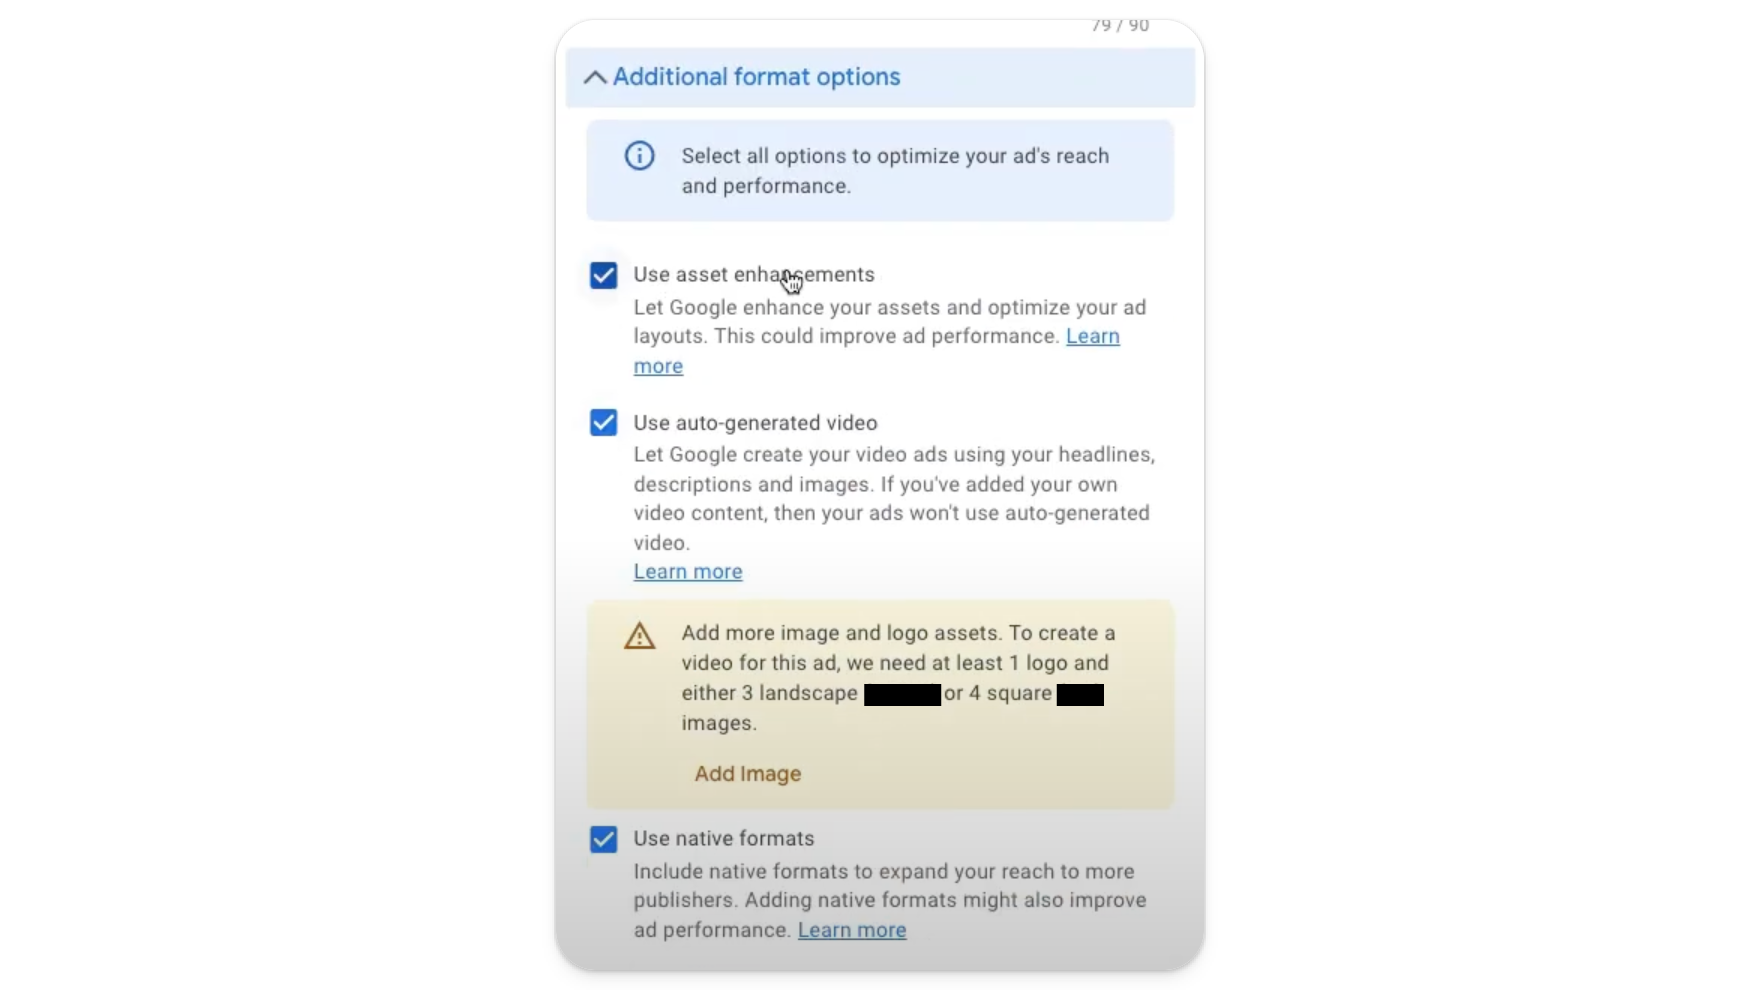
Auto-Generated Video: If you’re going to use video, it is highly advisable that you provide your own video. If you don’t want to use video, do not let Google use auto-generated video. These videos tend to look horrible, and are (very) unlikely to lead to any conversions.
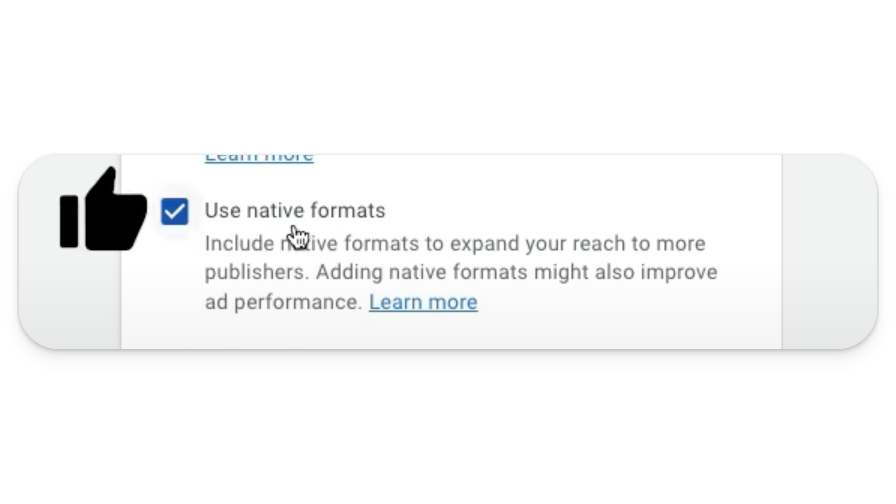
Use Native Formats: This setting expands your reach on Google’s display network. We often recommend leaving this checked.
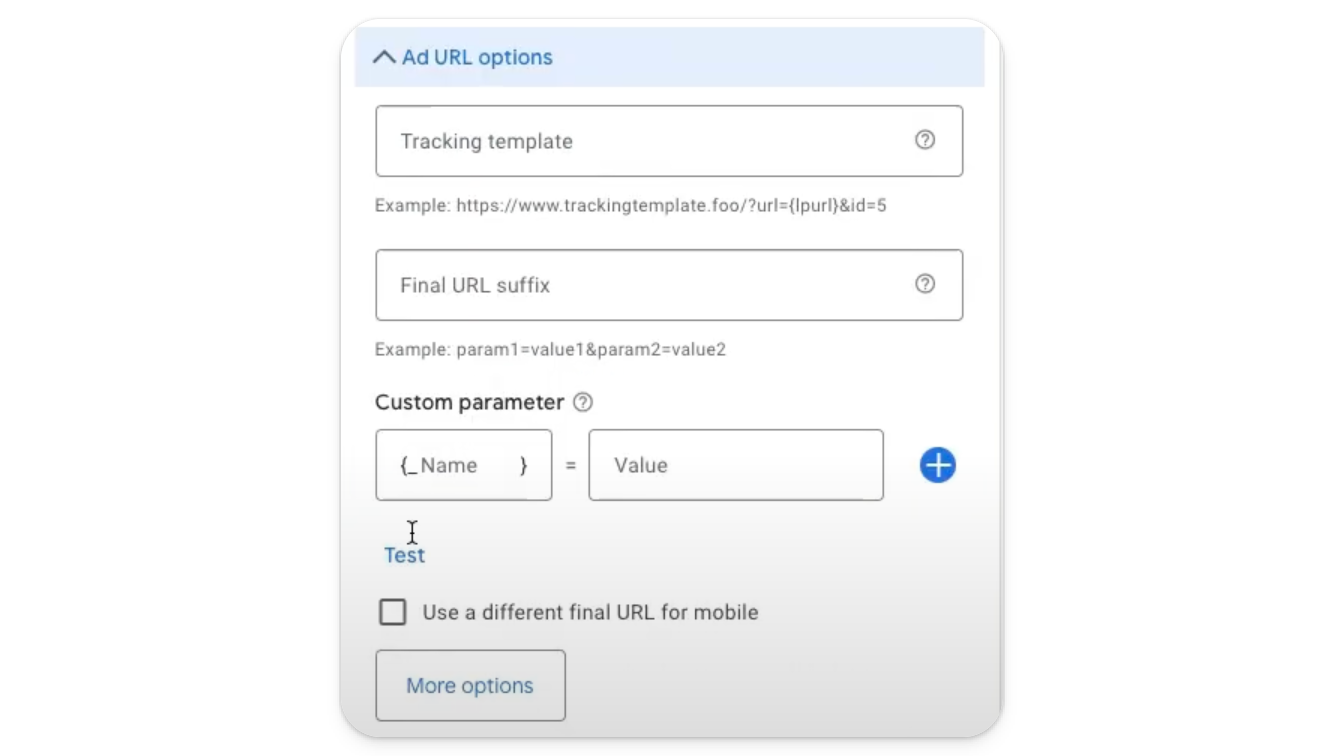
Ad URL Options: We don’t typically use ad URL options, because if we’re doing any UTM tracking on URLs, this is done at the campaign level, not the ad level.
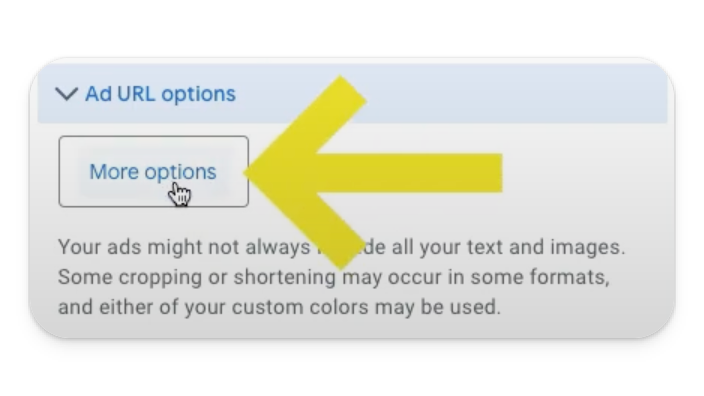
More Options: This button allows you to add dynamic ad options (such as price and promotional copy), call to action text, and custom colors.
Call to Action Text: Choose a call to action (or CTA) that fits your campaign objective. For ecommerce, we recommend using “Shop Now.”
Custom Colors: If you have very strict brand guidelines, you can set the main color and the accent color to ensure consistency with your brand identity. Custom colors help maintain brand recognition and ensure your responsive ads look cohesive across different formats.
Review Your Ad Strength: In this case, ad strength is at ‘excellent,’ which is exactly what we want. That said, if your ad strength goes from ‘excellent’ to ‘good’ after unchecking auto-generated video or other options, don’t worry about it. It’s a decent indicator of ad strength, but can be finicky when it comes to certain campaign settings.
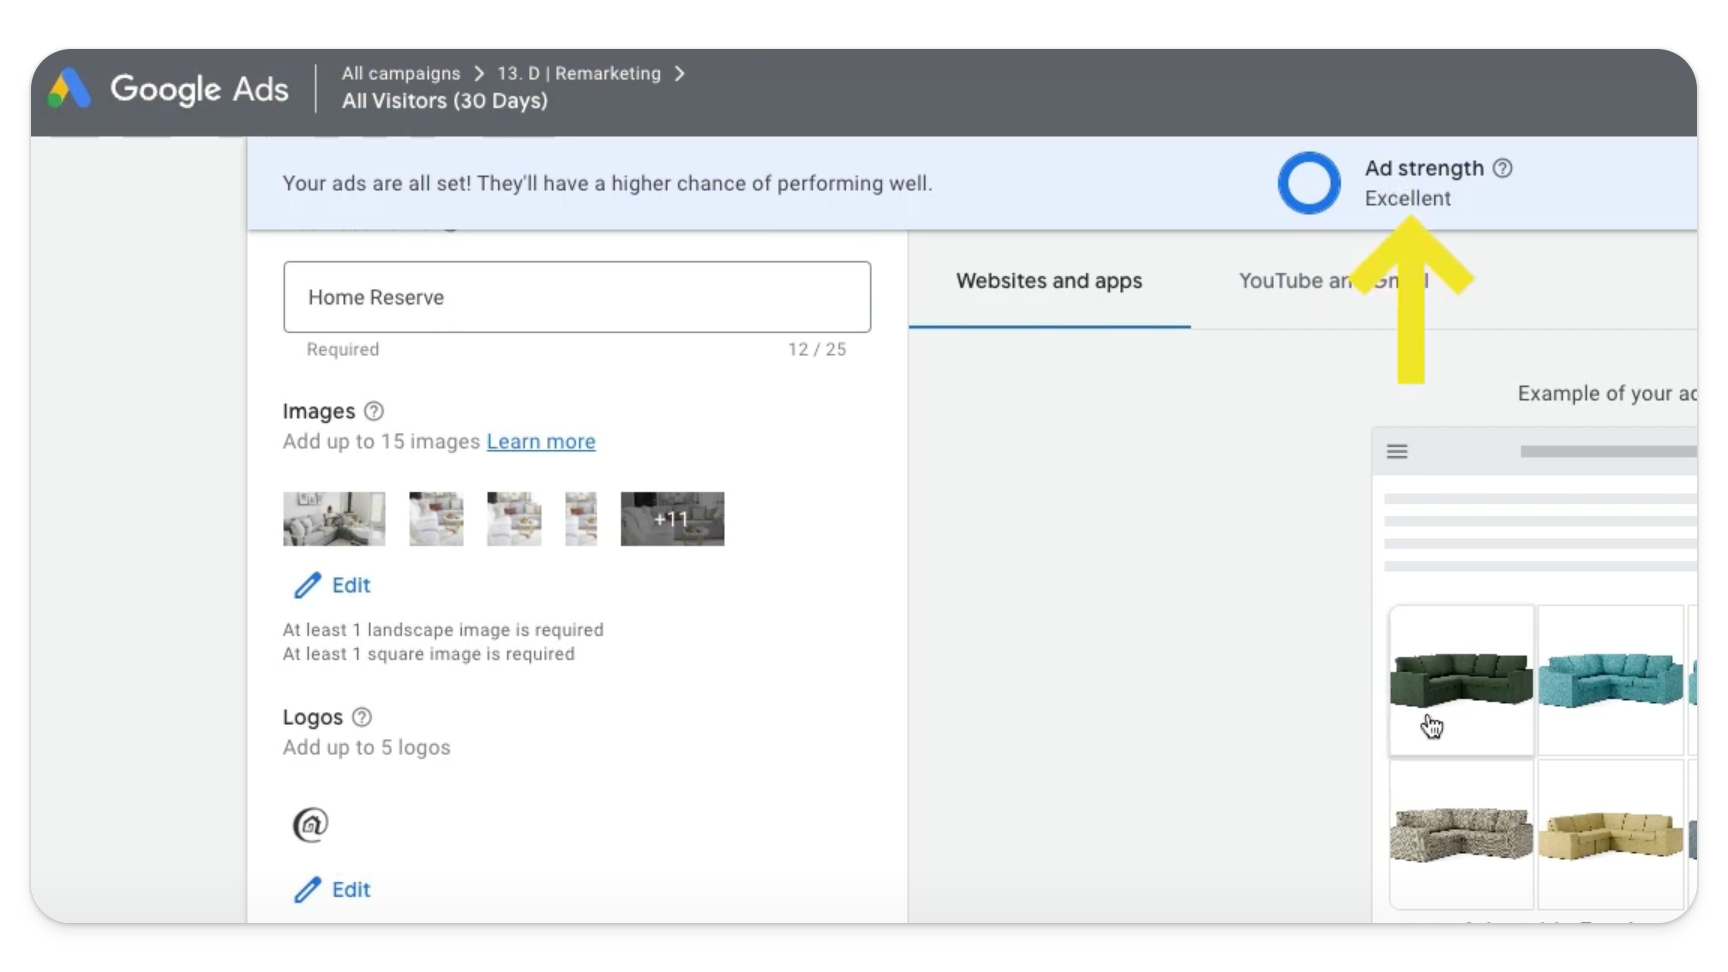
Preview Your Ad: Always preview your ad before saving it. This allows you to see how it will look in various formats, including mobile and desktop, and make any necessary adjustments. Previewing also helps catch any issues with layout or content before your ad goes live.
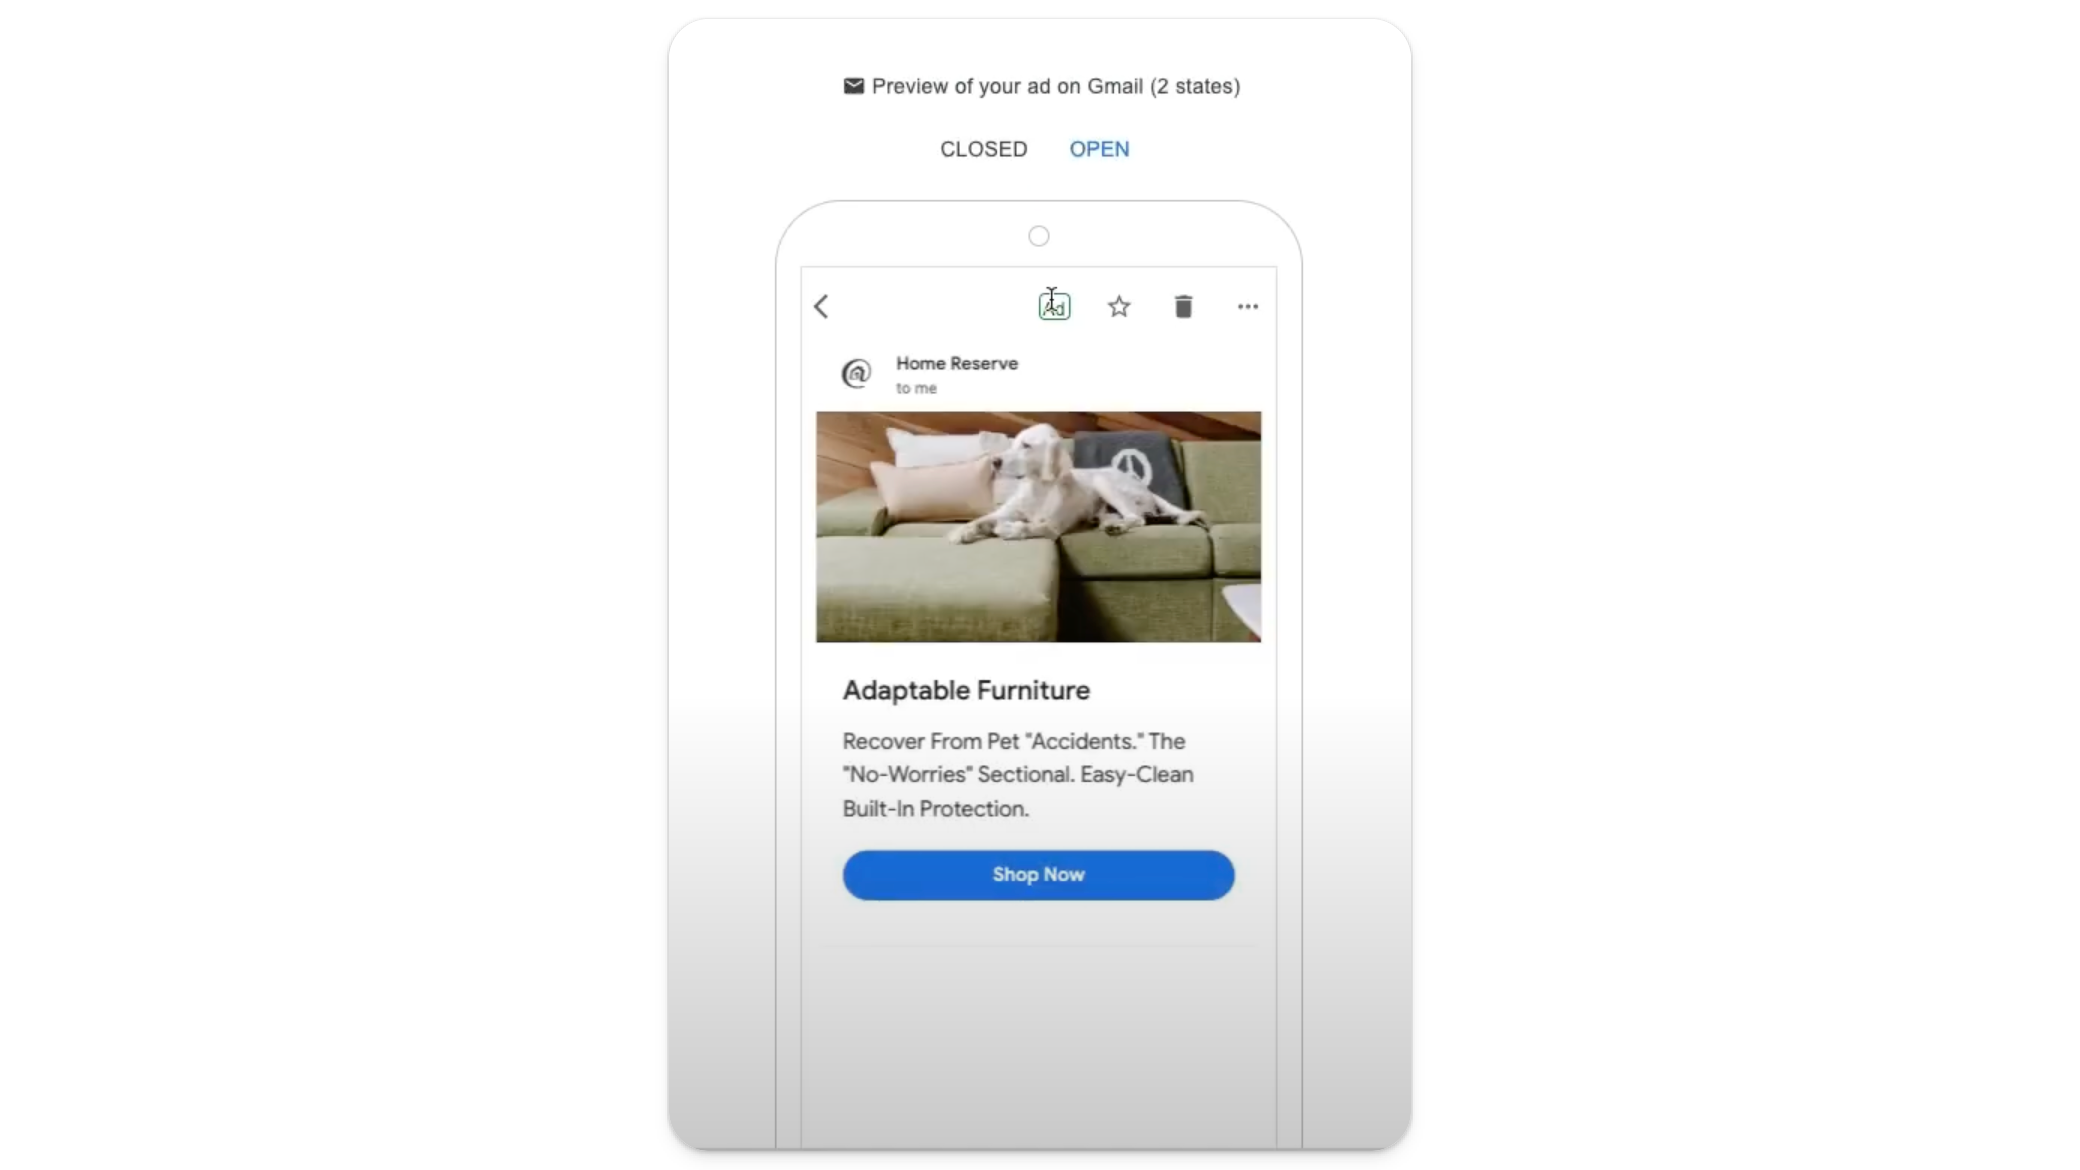
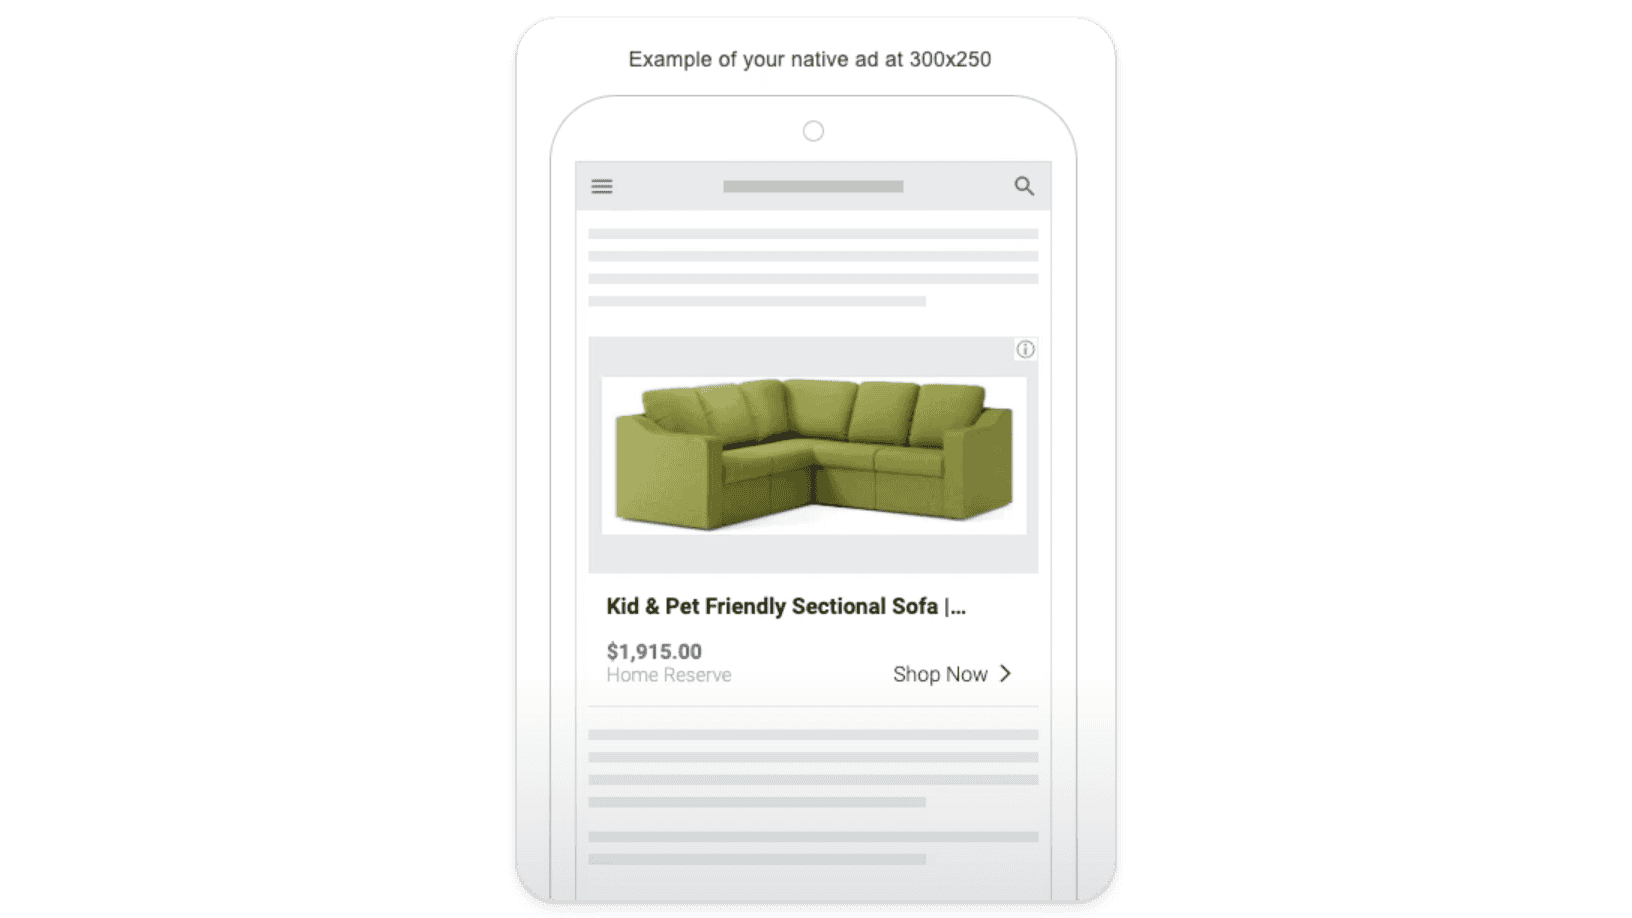
Optimizing Your Responsive Display Ads
So you’ve created responsive display ads. What’s next?
The truth is, creating responsive ads is just the first step. To get the best performance, you need to continuously optimize your ads based on their performance data. Click ‘view asset details’ for a performance overview of all elements of the ad assets.
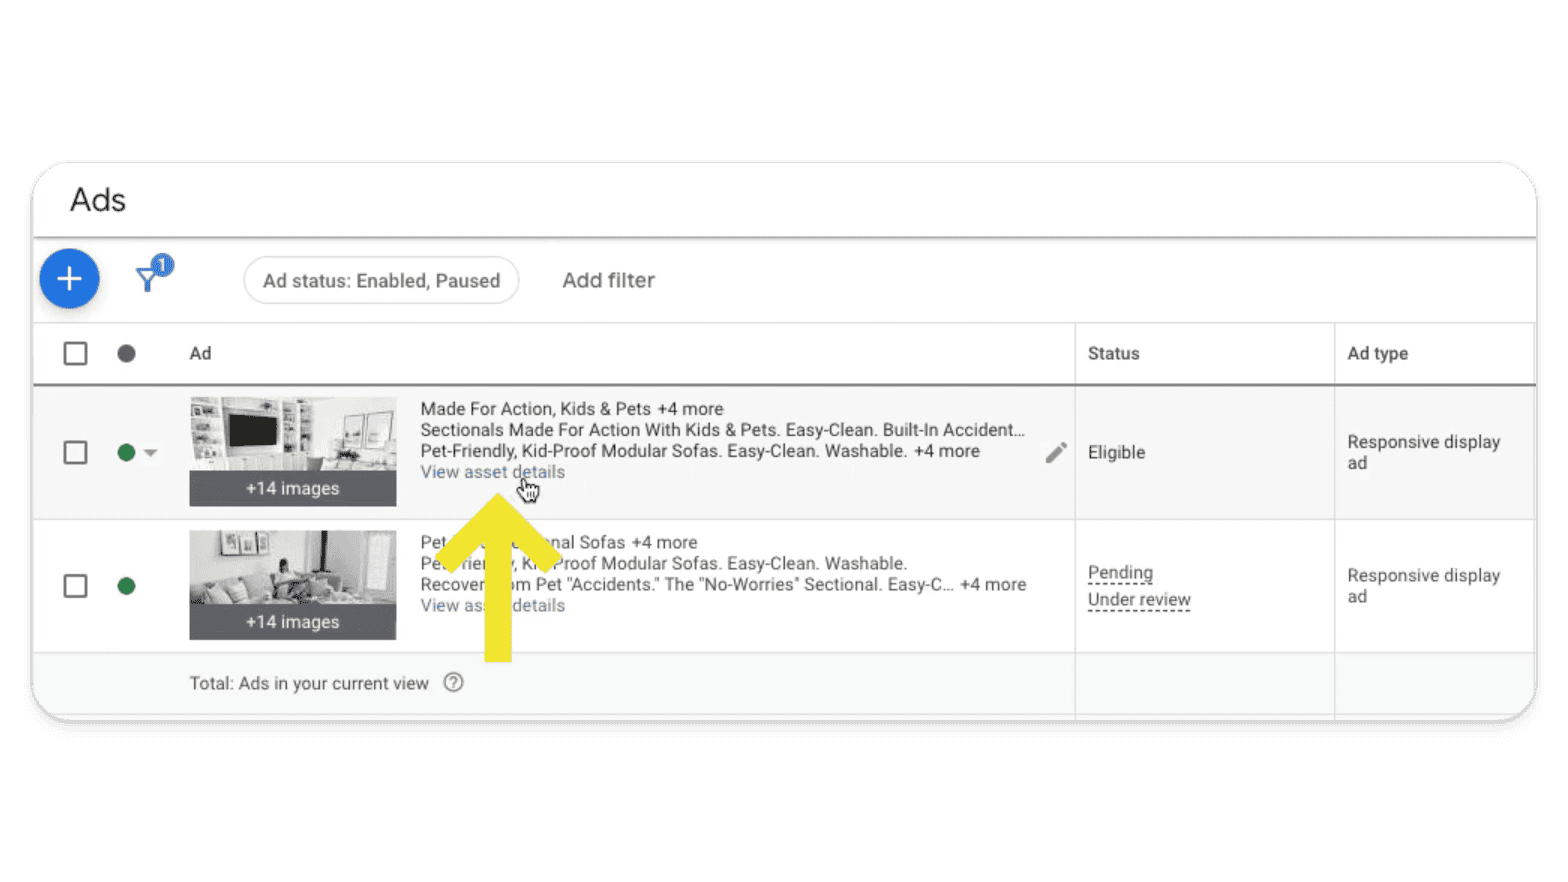
Using Asset Performance Data
Monitor Performance: After your responsive ads have been running for a while, check the performance data for each asset. Google provides insights into how well every headline, description, image, and logo is performing. Monitoring performance helps identify which assets are driving results (and which ones need improvement).
Identify High and Low Performers: Look for assets marked “best” or “good,” and keep them. Replace assets that are marked “low” with new variations.
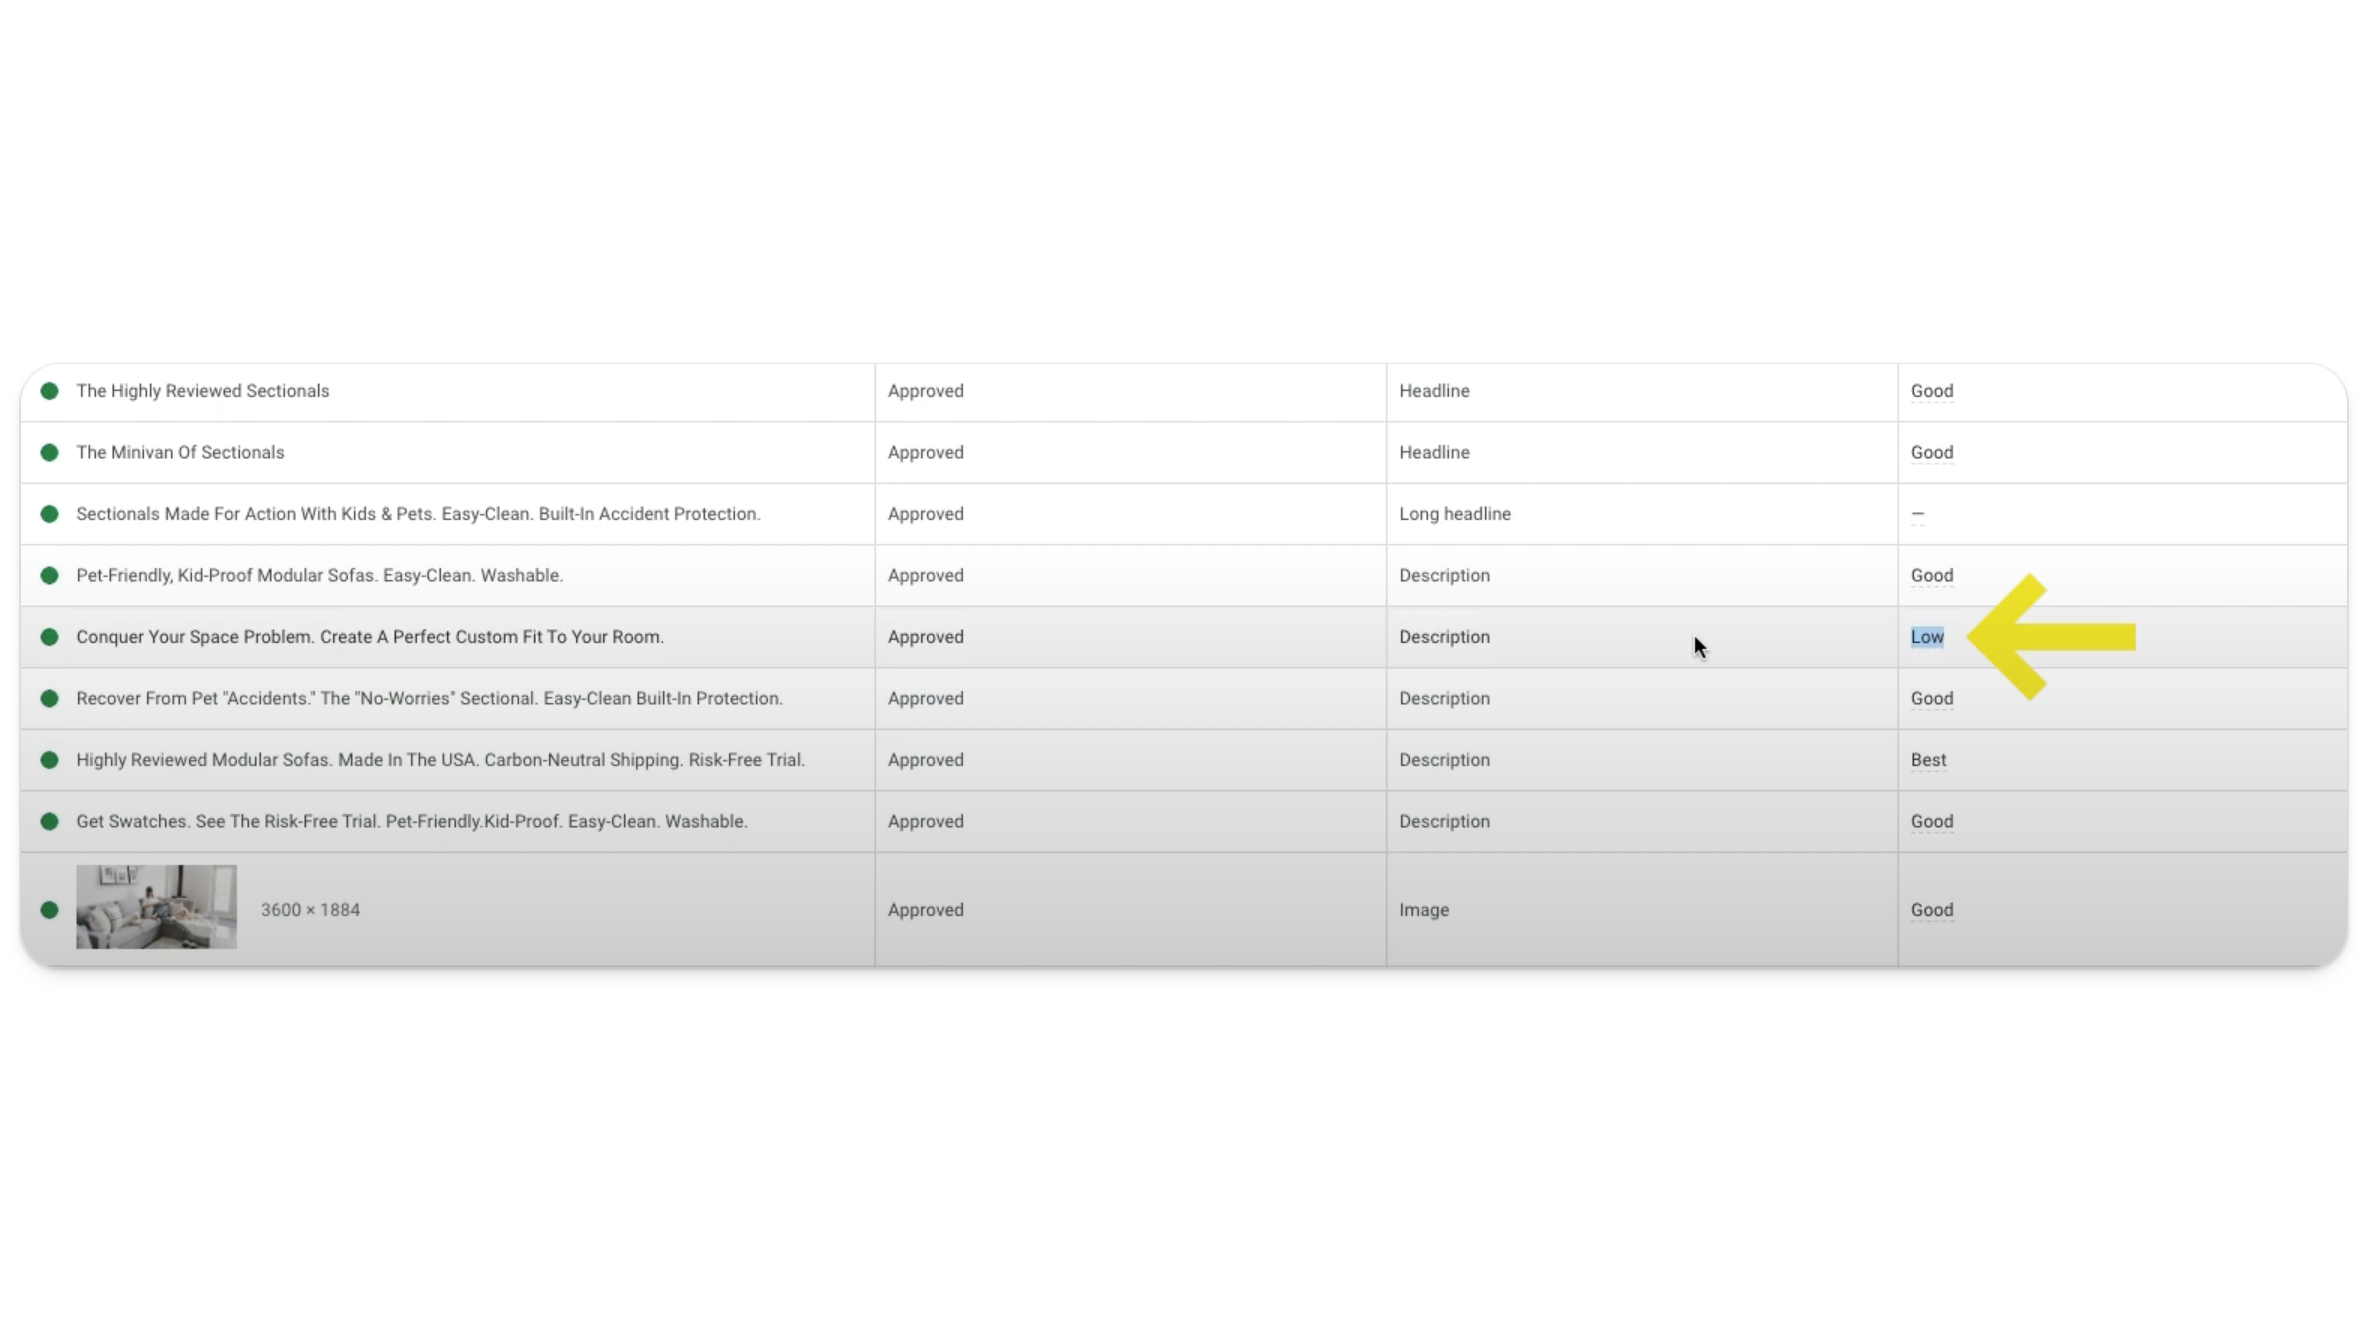
This process helps ensure your responsive display ads are always using the most effective assets.
Test New Variations: Continuously test new headlines, descriptions, and images to see if you can improve the way your responsive display ads perform. This process of iteration and optimization is key to maintaining high-performing responsive display ads. Plus, regularly testing new variations and ad combinations keeps your ads fresh.
Continuous Improvement
Running successful responsive display ads requires you to take an active approach to campaign management. Set it and forget it will not (typically) drive long-term results. To stay ahead of things (and optimize responsive display ads), be sure to:
Update Often: Regularly update your assets to keep your ads fresh and relevant. This is especially important for seasonal promotions or new product launches.
Analyze Results: Use the insights gained from your ad performance data to refine your overall advertising strategy. What you learn from one campaign can often be applied to others. Analyzing results helps you understand what works (and what doesn’t), allowing you to make informed, data-driven decisions for future display campaigns.
Leverage Google’s Machine Learning: Google’s machine learning algorithms are designed to optimize your ads over time. Ensure you’re providing enough data and variation for the algorithms to work effectively. The more data Google has, the better it can optimize your ad delivery across its ad space.
A Brief Note on Image Sizes
To get the most out of your responsive display ads, it is critical to use the correct image sizes.
Landscape, Square, and Logos
Landscape Images: Landscape images (1200 x 628 pixels) are versatile and work well across various ad formats. They provide a wide view, ideal for showcasing products or brand visuals. Landscape images are particularly effective for highlighting product features or creating a more immersive brand experience.
Square Images: Square images (1200 x 1200 pixels) are useful for social media-like ad formats and can help your ad stand out in crowded ad spaces. Square images are ideal for platforms where space is limited and can be used to create a balanced and visually appealing layout.
Logos: Use both landscape (1200 x 300 pixels) and square (1200 x 1200 pixels) logos to ensure your brand is represented correctly in all ad formats across the Google display network. Logos are essential for brand recognition and should be clear and high-quality to maintain professionalism.
Final Thoughts
Creating (and optimizing) responsive display ads in Google Ads is a powerful way to reach your audience with visually appealing and effective ads. It may seem daunting at first, but by following the steps outlined in this guide, you can ensure your ads are properly set up for maximum efficacy.
Additional Tips
Stay Up to Date with Google Ads Policies: Make sure you are familiar with Google’s policies and guidelines. This ensures your ads comply with Google’s standards and reduces the risk of your ads being disapproved.
Use A/B Testing: Regularly conduct A/B tests on different ad variations to identify which elements drive the best performance. A/B testing at a granular level helps you make data-driven decisions and continuously optimize ad performance (and ad spend).
Leverage Remarketing: Use responsive display ads in remarketing campaigns to re-engage users who have previously interacted with your website or app. This is one of the most powerful ways to stay top-of-mind, while encouraging users to return and complete their purchase (or sign-up).
Monitor Competitor Ads: Keep an eye on your competitors’ ads to understand what they are doing well and where you can differentiate. Competitor analysis can provide inspiration and help you stay ahead in your industry (but don’t get too caught up in it).
Use Google Analytics: Integrate Google Analytics with your Google Ads account to gain deeper insights into user behavior and campaign performance. Google Analytics provides valuable data that can inform your optimization strategies and unlock better performance.
Set Clear Goals: Have clear goals for your responsive display ad campaigns. Whether it’s increasing brand awareness, driving traffic, or boosting conversions, having specific goals helps you measure success (and adjust your strategies accordingly).
Allocate Budget Wisely: Monitor your ad spend to ensure you are investing in the most effective ad formats and targeting options. Regularly review and adjust your budget based on performance data to maximize your return on investment.
By implementing these tips and continuously refining your approach, you can create responsive Google display ads that effectively reach and engage your target audience, driving better results for your business in 2024 and beyond.


 Targeting Options for Google Display Campaigns
